January 31, 2013

Easy Buttermilk Pancakes with Blueberries


I love making breakfast from scratch. There is something so great about making up a big batch of pancakes or waffles and then enjoying them with butter and maple syrup. My love of breakfast foods comes from my father. Growing-up my father could only make one dish, fried potatoes. So every Sunday he would wake up early and make a huge breakfast. My mom would help with making the pancakes and I would make the scrambled eggs. It was one of my favorite things about my family growing up. I have never lost this love of breakfast and my two boys have followed on the tradition. My youngest son especially loves pancakes. He somehow managed to eat an entire batch of pancakes all by himself this morning. I don't know how he can eat so much, but never gain an ounce. Since everyone in my house loves breakfast I try new breakfast recipes frequently. Today I tried a new recipe for Basic Buttermilk Pancakes from Redbook Magazine.

This recipe has 7 ingredients. It takes 15 minutes of total time, all of which is active and makes 16 4-inch pancakes. Since I eat gluten-free I used brown rice flour instead of all-purpose flour. Additionally I substituted canola oil for the unsalted butter and decreased the amount to two tablespoons. Since my youngest loves blueberries I added 1 1/2 cups of frozen blueberries to the batter. The best way that I have found to make great pancakes is to use a griddle. They always turn out nicely browned and never under or over done. After the pancakes were done I topped them with maple syrup. I followed the remainder of the recipe as written.

These pancakes turned out perfect. They weren't too sweet and the blueberries blended perfect with the maple syrup topping. I had to make an additional batch since my youngest ate the entire first batch. He really loved them, especially the blueberries. These pancakes are also a great base for making a number of changes such as adding chocolate chips, bananas etc.

For the recipe go to Easy Buttermilk Pancakes with Blueberries.

January 30, 2013

Flavorful Low Fat Moroccan Lentil Soup


My youngest son went the dentist today and for the first time he had a cavity free appointment. While this is routine for my oldest son, my poor youngest son has had serious problems with his teeth since they came in. He never drank cows milk and still had to have two dental surgeries before his third birthday. Since then he has had fillings every six months. My dentist was determined that it was the food that he was drinking, but has finally been convinced that is has to mostly be genetics. My youngest eats healthier than any other child his age that I know and drinks a ton of water, very little carbs and a high protein diet. Luckily our pediatrician agrees with me and thinks it's 100 percent genetic and not my fault. I still hate the mommy guilt when he has to have another filling. I decided to make one of my son's favorite meals this week in order to calm him down before the dentist. My youngest absolutely loves soup, chicken noodle, vegetable you name it. This week I tried a new recipe for Moroccan Lentil Soup from the February 2013 issue of Eating Well magazine.

This recipe has 18 ingredients. It takes 1 1/2 hours of total time, 30 minutes of which is active and makes 12 servings. Since vegetable stock is so expensive pre-made I made my own. It costs a lot less money and tastes so much better. I used fresh spinach since the taste of frozen spinach always seems off to me. Thanks to my forgetfulness I failed to add the lemon and cilantro to the finished soup. I did add it to the leftovers and the flavor was delicious. I added a little more time to my overall cooking time to ensure that the lentils were fully soft. For soup I prefer my beans very soft, I find the texture more pleasing when eaten. I followed the remainder of the recipe as written.

I love that this soup is only 152 calories and 1 gram of fat per serving. Since it is full of vegetables and lentils it is filling and can either be used as a side or a main dish. I served it as a main dish and it was a perfect option for our vegetarian meal night. My youngest loved the cauliflower and ate all the pieces out first. This soup also makes a large batch so their are plenty of leftovers.

For the recipe go to Moroccan Lentil Soup.

January 29, 2013

Easy Baked Ziti with Pumpkin, Spinach and Chicken Sausage


I absolutely love pumpkin. There is something so comforting and relaxing about baking and cooking with winter squash, especially pumpkin. While I make pumpkin dishes year round I make a large number of pumpkin recipes during the fall and winter. The cooler months seem to just cry out for pumpkin. Everyone always thinks of pumpkin bread and pumpkin pie, but I love savory dishes that utilize the squash. As I have stated before my family loves pasta. Growing up my mother made pasta multiple times a week and it has been an ingredient that I have loved ever since. My two boys are huge pasta eaters and will eat spaghetti tossed with olive oil as a snack. Combining pasta and pumpkin is something I love to do. A couple of weeks back I tried a new recipe for Baked Ziti with Pumpkin and Sausage from Libby's Pumpkin.

This recipe has 12 ingredients. It takes 45 minutes of total time, 20 minutes of which is active and makes 12 servings. I had no problems finding any of the ingredients at my local grocery store and I made no ingredient modifications. Since I eat gluten free I used gluten free penne and gluten free all-purpose flour. I am not a huge fan of reduced fat mozzarella and always buy fresh mozzarella so I used full fat fresh mozzarella instead of the shredded suggest by the recipe. I prefer fresh mozzarella, the taste is superior to shredded. I found that it was hard to have enough pasta to spread across the pan when layering. Don't worry though once it is baked it works fine. I actually added the mozzarella cheese at the beginning of the cooking time and then the Parmesan cheese the last five minutes. I preferred this method since it allowed the fresh mozzarella to fully melt.

If you like your pasta with a kick I would suggest adding more cayenne. I only added a pinch as suggested and I felt that it needed a little more flavor. I would add 1/8 of a teaspoon of cayenne or 1/2 teaspoon of crushed red pepper if you like spicy foods. My husband was pleased that the recipe made the gluten free pasta not noticeable. He eats gluten free at dinner with me, but gluten free pasta he often finds lack luster. This dish was nice since it masked the taste of the gluten free pasta and the flavor from the pumpkin came out nicely.

For the recipe go to Baked Ziti with Pumpkin and Sausage.

January 27, 2013

Quick and Easy Peach Mustard Glazed Pork Tenderloin

IMG_0376_zpse531df37 photo IMG_0376_zpse531df37-1_zps2b1ea3fc.jpg

If you've read my blog for any amount of time you know that my family has a slight pork obsession. While this might seem funny it is also sadly true. My husband and two boys would be the world's worst vegetarians. I have tried adding more meatless meals in and I am successful about twice a week. However any more than that and I am met with whining and complaints about where the meat is. I don't know how I ever came into this family. Starting when I was 15 until I was 23 I was a vegetarian. It started when in high school I decided that I no longer wanted to eat meat for many reasons, most of which had to do with living in Seattle at a time when everyone was giving up meat (I really do mean everyone, it was definitely a fad). My health struggled since I was not a good vegetarian. There are great and healthy ways to be vegetarian and vegan, I did not follow these plans. I ate a ton of cheese, some tofu and lots of nuts. By my early twenties I was anemic and heavier than I was comfortable with. So I slowly added meat back in. Then I moved, met my husband and got married. I didn't realize how important meat was to my husband until we were married. Then I had my two boys and it has gotten even worse. Luckily I like meat also, just not to the level that they do.  Pork is a family favorite and I make it frequently, normally once a week. Last week I made a new recipe for Peach Mustard Glazed Pork Tenderloin from the December 2012 issue of Southern Living magazine.

This recipe has 11 ingredients. It takes a total time of 1 hour, 30 minutes of which is active and makes 8 servings. I did make a few modifications to the recipe. First I left out the bourbon. It isn't something
that I stock at home and I didn't want to buy just enough for the recipe. As most of you know I make my own chicken broth and this recipe was no exception. Do not overcook your pork. The one thing that a lot of people do is wait until their pork is overdone before pulling it out of the oven. Pull it out of the oven when it hits 145 and let it rest for 10 minutes. This resting period keeps the juices in so your tenderloin won't dry out. The recipe states to leave the roast in until 150, which is too long. The FDA now has 145 as the minimum temp for pork and the pork cooks at least 5 additional degrees while resting. If you were to take it out at 150, it would be 155 when it was eaten, which is overdone. Also, don't be alarmed if your pork is still slightly pink in the middle, this is normal. As long as your meat thermometer reads at least 145 it is fine to eat. If you don't have a meat thermometer, buy one, it is one of the most important kitchen tools a home cook can have.

The sauce on this pork was delicious. It was a nice combination of sweet from the peach preserves and savory from the mustard.  I also liked that it made enough sauce for everyone in my family. If you don't want to make 2 tenderloins this would work fine with 1. You would just end up with more sauce at the end. If you want a little more heat to the sauce you can add additional crushed red pepper, a 1/4 tsp isn't that much so it doesn't have a lot of kick.

For the recipe go to Peach Mustard Glazed Pork Tenderloin.

January 26, 2013

Overnight Hot Oat, Dried Cranberry and Quinoa Cereal

IMG_0351_zps0d82e148 photo IMG_0351_zps0d82e148-1_zpsb2cfd3f2.jpg

My meal plan got thrown-out the window this week. With a Monday holiday and very cold weather, dinners haven't gone as planned. I utilized a lot of leftovers and baked a little more than usual. My youngest somehow ate an entire batch of brownies by himself. Luckily for me I was able to eat one before the rest went into his hollow stomach. Breakfast is still a struggle with my youngest son. He would rather eat anything, except something healthy. Oatmeal is the one breakfast food that I can almost always convince him to eat, he loves it. The only problem I have is that the steel cut oats that he loves take a long time to prep when he is hungry in the morning. Therefore I have been trying a variety of overnight oat recipes. Last week I made a new recipe from Bon Appetit magazine for Overnight Hot Oat, Dried Cranberry and Quinoa Cereal.

This recipe has 8 ingredients. It takes 10 minutes of prep, an overnight soak and then 5 minutes in the morning and makes 4 servings. I decided to double the recipe in order to have enough for everyone in my family. For the dried fruit I used dried cranberries. For the toppings I added pumpkin seeds, a small amount of vanilla and maple syrup. I have never been able to find cardamom at my local stores so I left it out. Make sure to rinse your quinoa very well. If you have never used quinoa before rinsing is a very important step. The rinsing gets rid of the bitter taste and without the rinse the quinoa will have a distinct bitter taste, that is not appetizing. Even if the brand that you buy claims that it is pre-rinsed, still rinse the quinoa again. I followed the remainder of the recipe as written.

My youngest son and I both liked the idea behind this recipe. However, it needs a few changes. The taste of the quinoa was very strong. My husband wasn't a fan of the quinoa taste at all, so this recipe as written would have to be for somehow that really likes quinoa. I would suggest decreasing the amount of quinoa to 1/4 cup and increasing the steel cut oats to 3/4 cup. Adding additional fruit for sweetness might also help. The recipe suggests using barley instead of quinoa, which if you can eat gluten would be a great change and I think make the dish even better.

For the recipe go to Hot Oat and Quinoa Cereal.

January 24, 2013

Pistachio, Dried Cranberry, Coconut and Agave Syrup Homemade Granola


Mornings in my house are always crazy. With two boys, one of which is in school it is always a rush to get out the door to the bus. I have become great at putting on make-up in three minutes (and having it still look great) and I am the queen of 5 minute showers. My two boys on the other hand move like molasses. It doesn't help that many mornings my oldest is finishing his homework from the night before or my youngest is unhappy and massively grumpy from having to wake-up in the first place. Normally breakfast for myself takes a backseat and I am often left with only coffee until lunch. I try to keep at least a few things on hand that are quick to grab on the run. This week I tried a new recipe for Captain Crunch - A Better Granola from Bon Appetit magazine.

This recipe has 11 ingredients. It takes 1 hour of total time, 15 minutes of which is active and makes 12 servings. For the nuts I used pistachios since they are a family favorite. I have never seen coconut shaving at my local store so I substitute unsweetened coconut. Finally I used olive oil instead of coconut oil since coconut oil is much higher in saturated fat. So every once in a while a recipe doesn't turn out at all. This recipe was one of those cases. I had to completely redo the recipe after it came out of the oven. First the granola as written came out dry and with no crunch or clump at all. Therefore I added additional olive oil and a 1/2 cup of honey. Then I placed it back in the oven for 20 minutes. When it came out I let it cool and then broke it into chunks. After my modifications it was perfect. I would suggest adding honey instead of the agave and adding additional olive oil. The texture was definitely better with the modifications.

With my changes this recipe was very popular with my family. Before the changes the granola was too salty and did not hold together at all. It would be better as a yogurt topping, but if you are looking for a granola recipe you need to make changes such as I did by adding additional honey and oil. My two boys really loved the granola after the changes and ate over half of the batch.

For the recipe go to A Better Granola.

January 23, 2013

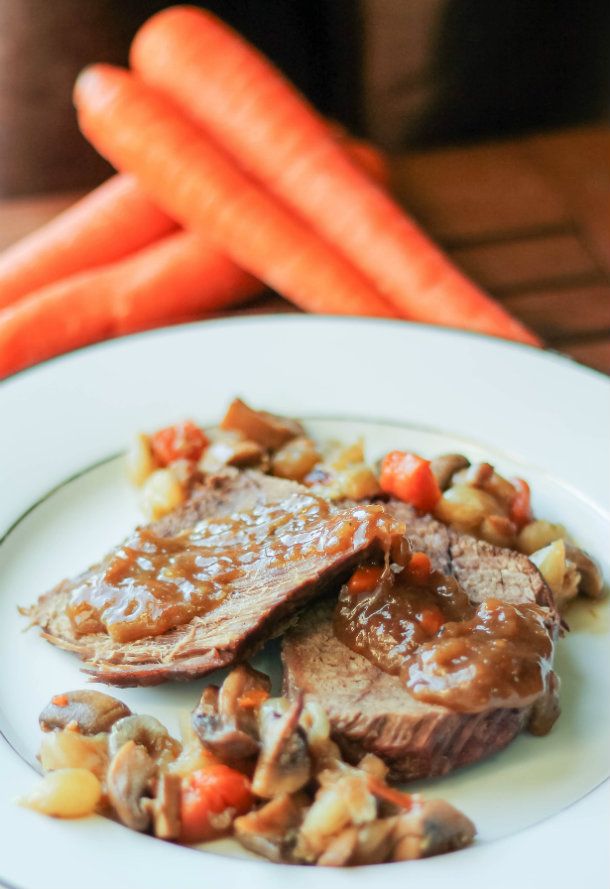
Classic Pot Roast

IMG_0344_zpsc43554e9 photo IMG_0344_zpsc43554e9-1_zps99730bb1.jpg

I was so proud of the males in my family tonight. For dessert I made pudding using silken tofu and they all ate their whole servings. I even sweetened it with sorghum and my oldest thought it was delicious. This just goes along my whole opinion that kids will eat a variety of food if you give it to them and don't make a fuss. I still serve sugar, I just limit the amount of granulated sugar and try to use honey, sorghum and maple syrup when possible. My kids have slowly adjusted, so much so that my oldest has been nagging me to allow him to take a packed lunch to school since he loves my food so much. I love that my kids will eat just about anything without complaints, especially if it contains chicken or pork. One of my family's favorite meals is pot roast. There is something so comforting about starting a pot roast on a Sunday and sitting down in the evening for a delicious meal. This week I tried a new recipe for Classic Pot Roast from the February 2013 issue of Parents magazine.

This recipe has 13 ingredients. It takes a total time of 3 hours, 30 minutes of which is active and makes 8 servings. I had no problems finding any of the ingredients at my local grocery store. Since I eat gluten free I used cornstarch instead of all-purpose flour to thicken the pan juices. If you aren't a fan of carrots skins than I would suggest peeling them before chopping. The recipe doesn't state this, but I always do it since my youngest isn't a fan of carrot skin. Make sure to let the roast rest. This rest time is very important for letting the juices stay in the roast. If you cut the roast before letting it rest the juices will spill out making for a drier roast. I followed the remainder of the recipe as written.

My husband really loved this roast. He thought it was one of the best pot roast recipes that I have made in a long time. My oldest was also a big fan, he ate most of the leftovers. The roast was a little on the dry side without the pan juices. I would add additional beef stock to the pan while the roast is cooking to ensure a larger amount of pan juice to serve with the roast.

This recipe is currently not available online, but can be found in the February 2013 issue of Parents magazine. Here is another recipe for pot roast from Parents magazine.

January 22, 2013

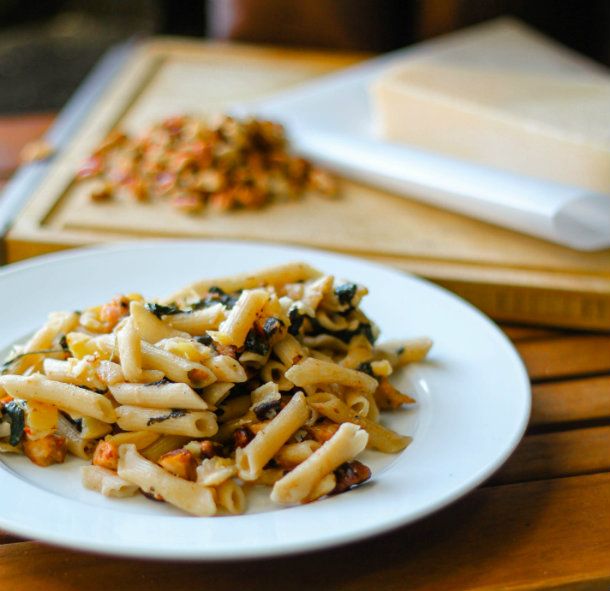
Apple, Sausage and Walnut Pasta

IMG_0335-2_zps9ee2281c photo IMG_0335-2_zps9ee2281c-1_zps1d5881d3.jpg

My youngest son has had a major developmental spurt. It happened to coincide with a massive growth spurt so he has been more than a little frustrated in the last week. What has surprised me so much are the differences between my oldest and youngest son. My oldest was 18 months before he even tried to walk, he didn't start really talking until he was almost 4 and he has yet to lose any of his baby teeth (he's almost 7). As much as I try not to compare my two kids the differences between the two are noticeable. My youngest has a very large vocabulary. He is already writing words and can built things with Lego's almost as well as his older brother. I know a lot of it has to do with my oldest teaching my youngest how to do everything. Birth order definitely has an effect on how my two kids do and approach things. Since my youngest has been eating so much I have been making foods that I know he will love. This week I tried a new recipe for Apple, Sausage and Walnut Pasta from the January 2013 issue of Family Circle magazine.

This recipe has 10 ingredients. I takes 25 minutes of total time, 10 minutes of which is active and makes 6 serving. I had no problems finding any of the ingredients at my local grocery store. Since I eat gluten free I did make a few modifications. First I used gluten free penne. I bought chopped walnuts since they were on sale and cheaper than whole so I skipped the chopping step. My walnuts also toasted quicker, they only took approximately 3 minutes total. Since my local grocery store hasn't been great with having a large selection of meat, I used pre-cooked chicken sausage and diced it instead of chicken sausage in casings. I also added a whole package of sausage, 12 ounces instead of the 3 used in the recipe. I followed the remainder of the recipe as written.

I was happy that this recipe worked well when converted to being gluten free. The substitution of pre-cooked chicken sausage was great and was popular with my two boys. The prep and cook time is very short, which is nice for a weekday meal. I didn't notice the apple much, so if you are a fan of apples I would suggest increasing the amount used.

For the recipe go to Apple, Sausage and Walnut Pasta. (registration required)

January 21, 2013

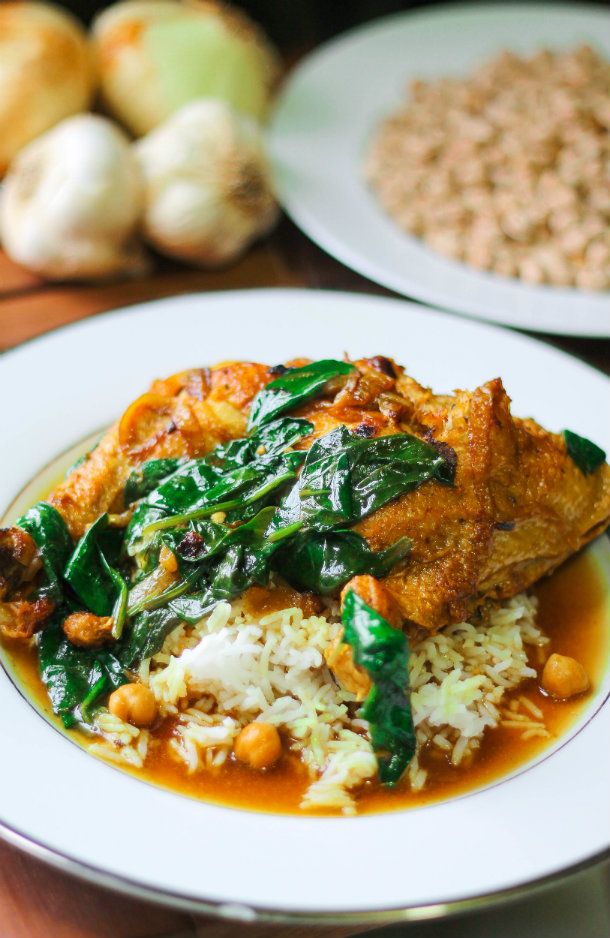
Indian Spiced Chicken with Chickpeas and Spinach

IMG_0321_zps8db7106e photo IMG_0321_zps8db7106e-1_zps3218ba2d.jpg

At the grocery store last week I needed to find chicken legs. I looked all over and then found them. In a large scary looking plastic bag. I have no problems buying large amounts of chicken, but this chicken looked like something that I would rather feed my animals than myself. Someone must be buying it, just not me. This experience got me thinking. It seems that the quality of a lot of grocery products has gone down, not up. It used to be that you could go to the store and expect to find quality products, now even if you want to buy something of higher quality it isn't even available. It is a little disconcerting especially given that there are so many problems in the state that I live in, it would be nice if there were healthy, high quality products available to everyone that wanted them. In the end I substituted all-natural chicken thighs, but it would have been nice to have at least had the option to find the product that I wanted. I digress, on to the chicken recipe that used the chicken legs that were no where to be found. Last week I tried a new recipe for Indian Spiced Chicken with Chickpeas and Spinach from the January 2013 issue of Bon Appetit magazine.

This recipe has 15 ingredients. It takes 2 hours of total time, an hour of which is active and makes 6 servings. As I stated in the intro I had to substitute chicken thighs for almost all the chicken legs. I had two chicken legs left from a previous recipe (that I was lucky enough to find at the store the one time they seemed to actually have them, never to be seen again).  For the remainder of the chicken I used chicken thighs. I found that I had to use more broth than the two cups suggested by the recipe. Two cups just wasn't enough to partially cover the thighs. I left off the cilantro at the end. Honestly my kids aren't fans and I forgot to add it to my serving. I followed the remainder of the recipe as written.

The braise on this chicken turned out very well. I'm not sure that I liked the amount of spinach. I think it needs to be doubled. The sauce was also a little thinner than I prefer as well and if you like spicy foods I would suggest increasing the amount of cayenne. I would also suggest adding a small amount of flour or cornstarch in order that the chickpea sauce has a better consistency. The chicken turned out well and was the best part of the dish, tender and flavorful.

For the recipe go to Indian Spiced Chicken with Chickpeas and Spinach.

January 20, 2013

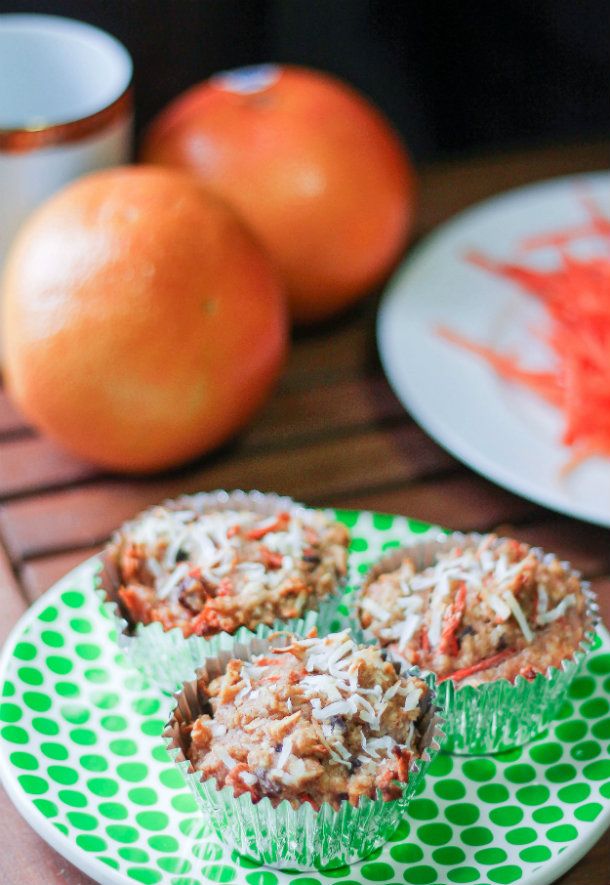
Coconut-Carrot Morning Glory Muffins

IMG_0317_zpsb38dd33c photo IMG_0317_zpsb38dd33c-1_zps059e2a78.jpg

 I have been in the kitchen literally all weekend. My youngest is in a massive growth spurt and as soon as he has finished one meal he is ready for the next. He also doesn't just eat little meals or sandwiches, he wants full on pot roast or burgers. I think that he gets this from my husband. On Friday I made a pasta dish with chicken sausage. Today I found out that after dinner my husband went in and made himself turkey sausage as a snack since the meal didn't have enough meat. Some days I think that it might be easier to have girls instead of a house full of three males. I don't even want to think about how bad it will be when they are teenagers. Since I am being eaten out of house and home I have been baking and cooking a ton. Last week I tried a new recipe for Coconut-Carrot Morning Glory Muffins from the February 2013 issue of Eating Well magazine.

This recipe has 14 ingredients. It takes a total of 1 hour, 20 minutes of which is active and makes 12 muffins. Since I eat gluten free I did make a number of modifications. First instead of using wheat flour I used all-purpose gluten free flour. The flour that I prefer has coconut flour as a base and works very well. I also use foil muffins cups. I would highly recommend these if you haven't tried them before. The muffins never stick and they come out so much easier than the paper equivalents. Best of all the generic brand is only 59 cents at my local grocery store. I did find that I had to bake my muffins for slightly longer than the 35 minutes suggested by the recipe. This might have been due to the gluten free flour. I followed the remainder of the recipe as written.

These muffins weren't sweet enough for me. It might be that I like my muffins almost as sweet as cupcakes, but even my husband who prefers things not sweet thought that these needed more sugar. I also thought that there were too many shredded carrots. I would reduce the total amount of shredded carrots, as written the muffins taste too much like carrots and not enough like raisins or coconut. Increasing the amount of raisins would also help the sweetness and flavor of the muffins overall.

For the recipe go to Coconut-Carrot Morning Glory Muffins.

January 19, 2013

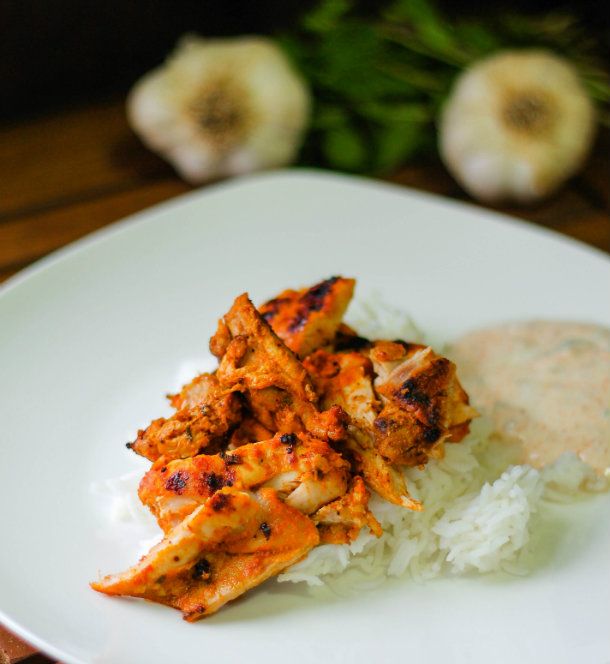
Shish Taouk (Spiced Chicken Kebabs with Garlic Yogurt Sauce)

IMG_0324_zpsefdfe7fd photo IMG_0324_zpsefdfe7fd-1_zps121a86d8.jpg

As I sit here writing this I am debating whether or not I am motivated to bake cookies. It has been a long day and I'm exhausted, but I also have a horrible sweet tooth. I would love it if I could eat all the snacks at the grocery store, but since I can't eat gluten it severely limits my snacking options. There are many days like today when I would love a snack, but lack the motivation to actually make anything. It doesn't help that my 6-year-old informed me today that he was tired of gluten free snacks. I agree with him that many gluten free snacks just taste like a not exactly right counterpart to the more delicious gluten equivalent. However, in order to combat the difficulties that gluten free living can bring about (one of the worst is eating out, I love steak, but when it is always the only thing I can eat it gets a little old), I make sure that the meals that I cook are satisfying and filling. Last week I tried a new recipe for Spiced Chicken Kebabs with Garlic Yogurt Sauce from issue Number 153 of Saveur magazine.

This recipe has 12 ingredients. It takes 2 and a half hours of total time, 30 minutes of which is active and makes 4 servings. As you can see from the photo I made a number of modifications to this recipe. First I didn't want to buy new skewers to grill the kebabs. I know that sounds odd, but I try to save money wherever I can and so I chose to change the recipe. Instead of cutting the chicken thighs I kept them whole and then when they were finished grilling I sliced them into pieces. Additionally, I used an indoor grill on the sear cycle to mimic a charcoal grill without freezing outside during the winter. I made one other major modification. I strongly believe in using the ingredients that I can find locally. I'm not against ordering things on the Internet, but I also try to be as frugal as possible. With this in mind instead of searching online and paying a large amount to purchase Aleppo Pepper I searched and found that I could substitute 4 parts paprika to one part cayenne. I did the math to make the proper adjustments and used the substituted spices. I followed the remainder of the recipe as written.

Even with all my modifications this recipe turned out very well. The flavor of the chicken was delicious and the yogurt sauce was slightly spicy with a great cooling flavor from the mint. I wasn't sure if it would work out since I didn't make the chicken as kebabs, but I was very happy with the end result. The yogurt sauce was also delicious with the leftover roasted chicken I had from another recipe and it is something that I will play around with as a sauce in future recipes.

For the recipe go to Shish Taouk.

January 18, 2013

Lemon Thins

IMG_0325_zps0fb5bebb photo IMG_0325_zps0fb5bebb-1_zps6b8b4120.jpg

As most of you know I have a major snacking habit. The thought of eating only three meals a day puts me into a panic. I need my snacks and bake almost everyday. However, I am also realistic about my snacking and try to make sure that I have a balance between healthy and indulgent. If I make a batch of brownies one day the rest of the snacks that I prepare for the week are nuts and healthy granola bars. I believe food and health in general is all about balance. I have a tread mill that I use for an hour each day. This hour of exercise makes it possible for me to sit and watch my favorite TV shows in the evening and enjoy the time just sitting and relaxing. Cookies are one of my favorite snacks. I could literally eat cookies for every meal, they are delicious. Since I love cookies so much I try to make cookies occasionally that are lower in fat and calories. Yesterday I tried a new recipe for Lemon Thins from the February 2013 issue of Eating Well magazine.

This recipe has 11 ingredients. It takes 45 minutes of total time, 30 minutes of which is active and makes 2 1/2 dozen cookies. I made a few changes to the recipe. First since I eat gluten free I used gluten free all-purpose flour instead of wheat flour. I also found that you need to make sure that the cookies are completely flat. If you don't roll out the cookies very thin they will not taste good. I actually used the side of the cup to roll the cookies after rolling the cup in granulated sugar. This method worked very well and I would recommend it. Additionally I allowed my cookies to bake for the full ten minutes to fully brown. I followed the remainder of the recipe as written.

With only 60 calories and 2 grams of fat this cookie is a snack that is healthier than many other cookie recipes. Plus they were a nice snack with a cup of coffee as a morning pick-me-up. The taste was not overly lemony, which was nice. I would say that they were a little dry. To me they tasted like they needed more fat. This could be partly due to the fact that I made them gluten free. Either way I would suggest increasing the amount of butter or using all butter instead of canola oil, which would be higher in saturated fat, but would vastly improve the texture and taste. The batter definitely needs more liquid, either with lemon juice or an increase in butter.

For the recipe go to Lemon Thins.

January 17, 2013

Crispy Chicken Thighs with Pasta and Pesto


My youngest son has decided that he no longer eats cheese. This is the same son that last year would eat an entire box of macaroni and cheese. It really is hard to keep up with the food preferences of everyone in my house (my husband included). It has gotten to the point that it can change on a daily basis, especially with my oldest. If a friend of his decides that they don't like cheese, than he no longer likes it either. I can handle my own children, but it is almost an impossible battle once they start school and begin being influenced by outside forces. However, I am also stubborn and hold my ground, so I still serve cheese. I am a firm believer that my children eat the same meal that we do, if they don't eat they aren't allowed any of the homemade snacks that I make almost daily. That being said I also don't require them to finish their plate. They have to try at least everything that they are served. 99 percent of the time they eat the rest of their serving. The other 1 percent of the time they hate the dish and that is fine also. The one dish that my whole family loves is roasted chicken. Over the years my children have loved and hated almost every food except chicken. This week I tried a new recipe for Crispy Chicken Thighs with Pasta and Pesto from the January 2013 issue of Southern Living magazine.

This recipe has 8 ingredients. It takes 45 minutes of total time, 15 minutes of which is active and makes 6 servings. I had no problems finding any of the ingredients at my local grocery store. Since I eat gluten free I did substitute gluten free rigatoni for the cellentini called for in the recipe. Additionally I used smoked paprika, I love the taste and it is great with chicken. I always use a stainless steel pan to make roasted chicken. It is great to put in the oven and you know when the chicken is browned since it will release (it will stay stuck to the pan until it is browned). It is the best way to get great crispy chicken, just make sure not to flip the chicken before it releases, you can always turn down the heat if you believe that the chicken is starting to brown too quickly. I followed the remainder of the recipe as written.

The pasta under the chicken in this recipe was delicious. The pasta and pesto were my favorite part. The chicken was your average pan roasted chicken, which was very kid friendly and my children loved. The real star of the recipe was definitely the pesto, just make sure to adequately salt, it really will need it I promise. The pesto would also be delicious with chicken (either with or without skin).

For the recipe go to Crispy Chicken Thighs with Pasta and Pesto.

January 15, 2013

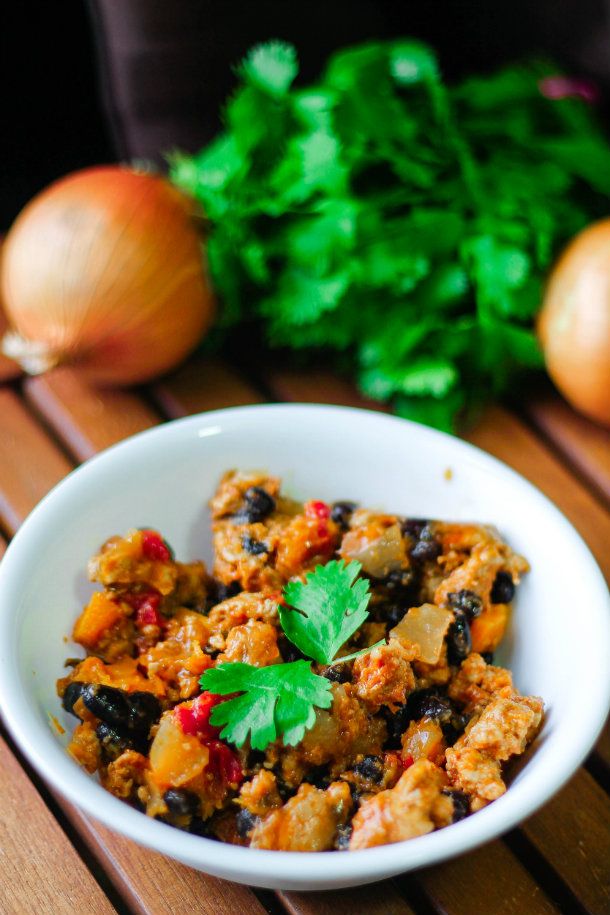
Turkey, Squash and Black Bean Chili

IMG_0310-2_zpsd93914fb

There were very few foods that my dad could cook growing-up. He would make great fried potatoes, bacon and best of all chili. Everything else he burned or didn't even try to make. There was one time that my dad managed to completely burn boxed macaroni. He forgot that the macaroni was cooking and the water went dry. It was not delicious. However, he could make great chili. I never understood how everything else he made was so bad, when his chili was so great. Since my dad made chili so well I never really made chili when I was younger. I did have a great recipe for vegetarian chili, but since I married a big meat eater I haven't made it in years. After a couple years of marriage I decided that I needed to start cooking more chili since it is so hearty and can make multiple meals. Fast forward to ten years of marriage and I cook chili once or twice a month in the winter. It is one of my favorite winter time meals, it is warm and filling. Yesterday I made a new recipe for Turkey, Squash and Black Bean Chili from the January issue of All You magazine.

This recipe has 10 ingredients. It takes 34 minutes of total time, all of which is active and makes 4 servings. I did make a few modifications to the recipe. First, I have been making an effort to make everything I can from scratch. For this reason I made my black beans from scratch in the Crock-pot. I also grind my own turkey. It is cheaper and the texture is so much better. I saved the leftover butternut squash to make squash bread and it was delicious. The recipe cooks the chili on low for 10 minutes. I chose to cook the chili on medium for 10 minutes in order for it to fully thicken. Finally, I was out of regular chili powder so I used ancho chili powder instead. I followed the remainder of the recipe as written.

My whole family was really happy with this recipe. Normally I make beef chili since it tends to come out more tender and flavorful. This turkey chili was delicious and my husband even commented about how good it was since he normally doesn't like turkey chili. Do not use low-fat ground turkey. Very low-fat turkey will dry out and not have the same flavor as turkey with higher fat content.

For the recipe go to Turkey, Squash and Black Bean Chili.

January 14, 2013

Slow-Cooker Tomatillo Pork Stew

IMG_0306_zps2884f4c8

Pork is very popular in my house. As I have talked about before my two boys and husband love bacon. If they could eat it everyday, three times a day they would. However, I am not going to let that happen. As a compromise I make pork frequently. One of my favorite cuts of pork is pork shoulder. It is tender and delicious and can be made a variety of different ways. The crock-pot is a great way to cook pork, it is simple and always turns out well. Yesterday I tried a new recipe for Slow-Cooker Tomatillo Pork Stew from the February issue of Family Circle magazine.

This recipe has 11 ingredients. It takes 8 hours and 15 minutes of total time, 15 minutes of which is active and makes 6 servings. I had no problems finding any of the ingredients at my local grocery store and made no ingredient modifications. Since all the pork shoulder at my store was 6 pounds or more I bought a larger shoulder and cut it down to size. I would recommend increasing the salt or adding additional at the end since it wasn't salty enough as written. I normally serve brown rice to my family, but for this recipe I used basmati and it worked very well. I followed the remainder of the recipe as written.

I was really pleased with how tender this stew turned out. It was flavorful enough for my husband and I without being too spicy for my two boys. If you want the dish to be more spicy use a less mild salsa. I chose to use mild salsa since I was serving it to my two boys. For my serving I used just cilantro, for my kids I served the stew with sour cream and cilantro.

For the recipe go to Tomatillo Pork Stew. (registration required)

January 13, 2013

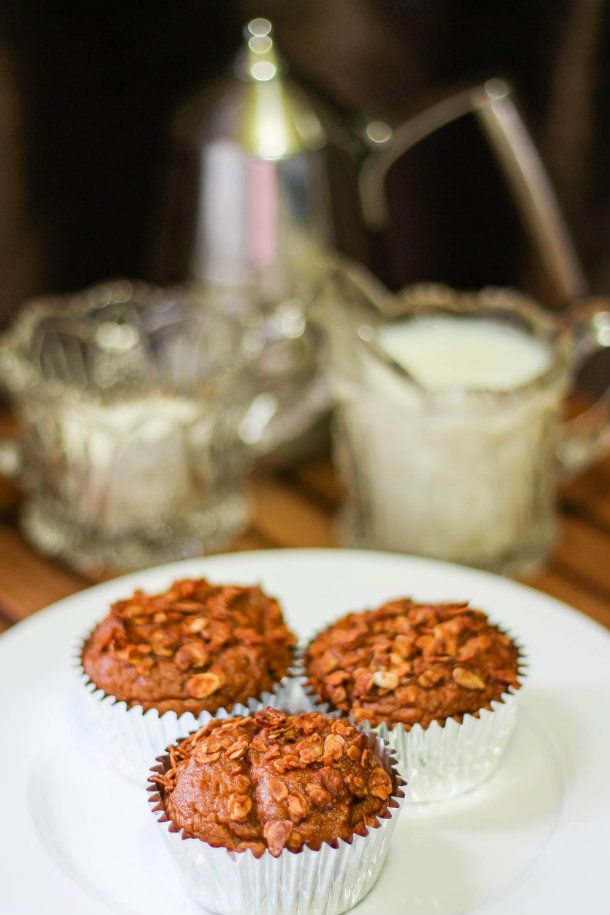
Pumpkin Muffins

IMG_0303_zps658c52b7

This is the time of the year that I snack a lot. When I say a lot I mean I tend to have at least three snacks a day, oftentimes more. I am lucky that I also work-out everyday and inherited my dad's great metabolism. With all my snacking lately, I have been baking a lot this month. There is something about winter that makes me want to bake and eat. This winter has been warmer than most, but not warm enough to do much outside. Since I have been inside so frequently I have experimented with a number of new recipes. Some have been great, others have needed some changes. Today It tried a new recipe for Pumpkin Muffins from the Libby's Pumpkin website which worked perfectly.

This recipe has 10 ingredients. It takes 25 minutes of total time, 10 minutes of which is active and makes 20 servings. I made a number of changes to this recipe. The original recipe was for mini muffins. I don't own a mini muffin pan and I'm not a big fan of mini-muffins, so I chose to make full sized muffins instead. Additionally since I eat gluten free I used gluten free all-purpose flour instead of wheat flour. I also used gluten free granola. My baking time was increased to 25 minutes and I rotated the pan halfway through baking time. The recipe uses a mixer to incorprate the ingredients. I chose to mix by hand instead and they worked fine. I followed the remainder of the recipe as written.

These muffins turned out very moist. I like that they only use a 1/4 cup of oil and they worked very well being converted to being gluten free. The granola gives the tops of the muffins a nice crunch, which was popular with my two boys. These would also work well with chocolate chips or chocolate granola on top.

For the recipe go to Pumpkin Muffins.

January 12, 2013

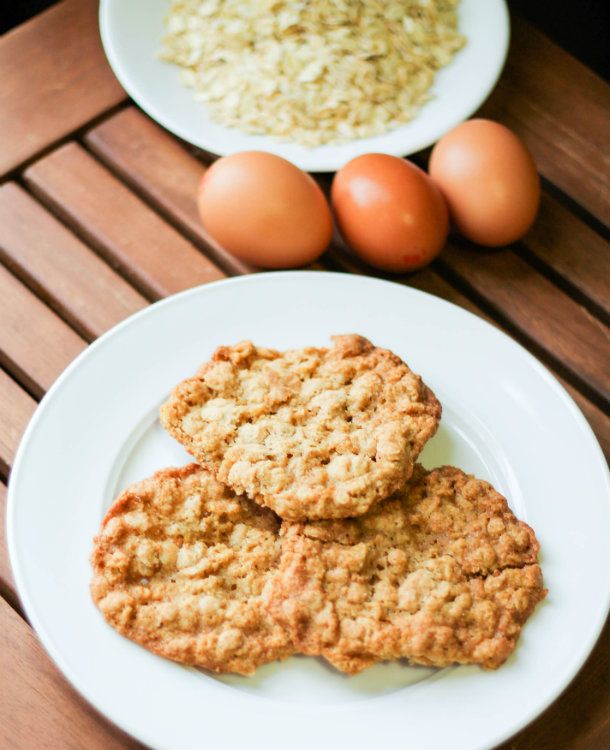
Soft Oatmeal Cookies

IMG_0274_zps1b3a62fe

Today was my grocery shopping day. Once a week I spend a couple of hours at the store without my husband and children grocery shopping. While it might sound boring to some, I cherish the small amount of me time. Since I stay at home with my youngest all day I have very little time to myself. So on Saturdays I walk down every aisle of the grocery store and slowly look at everything in the whole store. It is also a great way to save money. Since I'm not in a hurry I don't buy unnecessary items and I have the time to spot great deal like today when my grocery store paid me 5 dollars thanks to clearance finds and coupons. I try to remember my peace of mind during this time when my four-year-old has temper tantrums or draws all over the walls the rest of the week. Baking from scratch is another great way to save money. I try to bake as many things from scratch as I can, especially since I have to eat gluten free now. Last week I tried a new recipe for Oatmeal Cookies from Allrecipes.com.

This recipe has 10 ingredients. It takes 2 hours of total time (including chilling), 15 minutes of which is active and makes 2 dozen cookies. I did make a few modifications to the recipe. First since I eat gluten free I used gluten free all-purpose flour. There are a number of brands of gluten free flour, my favorite uses coconut flour as a base or I make my own using a blend of sorghum and brown rice flours. Make sure to let the dough chill. I have made this recipe a number of times and experimented with how long to let the dough chill. Without the chilling time the cookies are a mess to roll into balls and place on the cookie sheet. I have also tried making them flat with a fork like the recipe states or skipping this step. If you want soft cookies don't flatten them with a fork. If you want crunchy oatmeal cookies than you have to flatten them. Plus the sugar gives them a nice added sweet crunchiness. Finally make sure to let the cookies cool before moving them from the baking sheet. They have a tendency to fall apart if they are moved while still warm. My baking time was also slightly longer than the recipe, approximately 3-5 minutes. I followed the remainder of the recipe as written.

These cookies were very popular in my house. My boys will eat just about any type of cookie and this recipe as no exception. The cookies came out thin and crunchy, which is the type of oatmeal cookie that I prefer. My husband thought that they were very good, especially since they were gluten free. This recipe would also be delicious with chocolate chips, I would go with bittersweet since the cookies are already so sweet and reduce the amount of total sugar by 1/2 cup.

For the recipe go to Soft Oatmeal Cookies.

January 11, 2013

Roasted Pork Tenderloin with Red Pepper Pesto


As I talked about earlier in the week I have been making an effort to eat everything out of my fridge and cupboard. I really want to reduce the amount of garbage and food waste that my family accumulates. We have never been really bad, I have always cooked from scratch and I even grind my own meat, but we still had some habits that could be better. One of them was my bad habit of buying vegetables and then forgetting to use them. I know that you are probably wondering how I can forgot a vegetable that I bought, but they go into the vegetable drawer in the fridge and it sometimes takes them weeks to make another appearance. Since fresh vegetables are expensive and they are only good for you if you actually eat them I have been cutting down both the number of things that I buy at the grocery store and using every last thing that I purchase. So far it has worked well. Today I made quinoa oatmeal cookies since my cupboards are packed with oatmeal and quinoa that I bought last month for a recipe. The cookies were delicious and a great way to use items that I already own. So today I decided to make dinner with the last of the veggies I had before going grocery shopping tomorrow. I tried a new recipe for Roasted Pork Tenderloin with Red Pepper Pesto from the January 2013 issue of Better Homes and Gardens magazine.

This recipe has 7 ingredients. It takes 35 minutes of total time and makes 4 servings. I had no problems finding any of the ingredients and made no ingredient substitutions. Instead of snipping my oregano I loosely chopped it since I was making it for my two boys. Make sure to rub in the spices and oregano. The more the mixture is rubbed in the better the flavor of the tenderloin will be. I pulled out my pork at exactly 25 minutes. I normally pull out my pork at 145 degrees and let it rest to reach 150. The worst thing you can do with pork is overcook it, it becomes tough and not nearly as delicious. The recipe photo in the magazine shows the pesto on the side. I chose to serve my pesto as a sauce over the tenderloin. I thought this would lend better to the flavor and add extra tenderness to the pork. I followed the remainder of the recipe as written. 

The red pepper pesto was the star of this dish. Make sure to add adequate salt, it will need it and I added an extra clove of garlic for flavor. I preferred the pesto as a sauce rather than on the side. Additionally, I think it could be even better with roasted pine nuts on top. The pork was very tender and the roasted peppers made a nice side to the dish. Best of all it only takes slightly over a half an hour start to finish, so great for a week night meal.

For the recipe go to Roasted Pork Tenderloin with Red Pepper Pesto. (registration required)

January 10, 2013

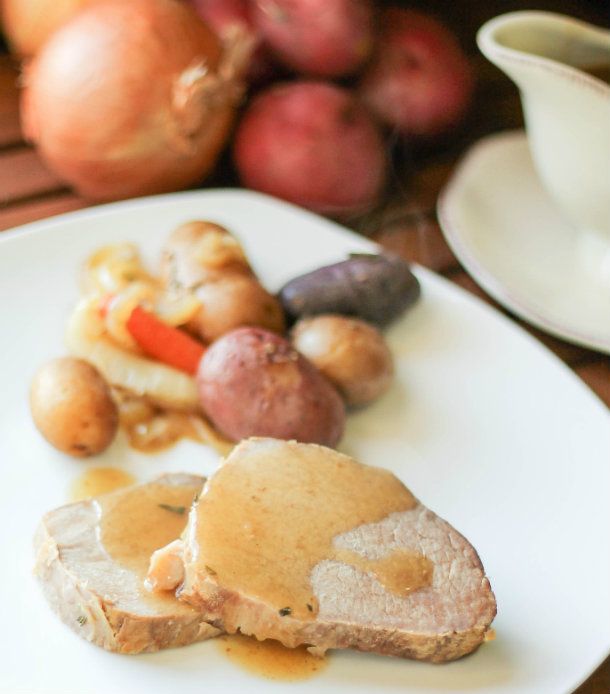
Slow Cooker Pot Roast

IMG_0255_zps2a2bde99
The weather in my area is all over the place. It has been cold, warm, foggy, rainy, but not in any way snowy and winter-like. This weekend the temperature is supposed to hit 70, in January! Normally this is the time of the year when I am bundled up in blankets drinking hot drinks and making soups. This year I am still making lots of soups and crock-pot recipes, but the weather feels more like spring than winter. Regardless of the weather I love my slow cooker. As my boys get older and my time feels more and more crunched my slow cooker has saved me many times. I never understood before having kids how hard it can be to get dinner on the table with two boys running around causing chaos. Now I know better and try to make at least one meal a week that is quick and easy. This week I tried a new recipe for Slow Cooker Pot Roast from the January 2013 issue of Family Circle magazine.

This recipe has 11 ingredients. It takes 8 and a half hours of total time, 30 minutes of which is active and makes 4 servings. I would have normally used a chuck roast for this recipe, but in my effort to use things out of my freezer I used the beef cut that my mother-in-law had bought me this fall. The recipe uses 12 ounces of small potatoes, but I chose to use the full pound bag that I bought at the grocery store. Additionally, I chose to leave the potatoes whole instead of cutting them in half. Since I eat gluten free I used cornstarch for the pan sauce and gluten free Worcestershire. Even if you can eat wheat flour I prefer cornstarch since it does a better job at thickening. I followed the remainder of the recipe as written.

Since I didn't use the best cut of beef in this recipe the sauce really made the recipe. The pan sauce was delicious and made up for any shortcomings with the beef being slightly tough. I did wish that there were more vegetables. There was only enough for exactly 4 servings, which was barely enough for my family. If I was to make this again I would double the amount of vegetables and buy a larger roast.

This recipe is not currently available on-line. It can be found in the January 2013 issue of Family Circle. Here is another Slow Cooker Pot Roast recipe from Family Circle.

January 9, 2013

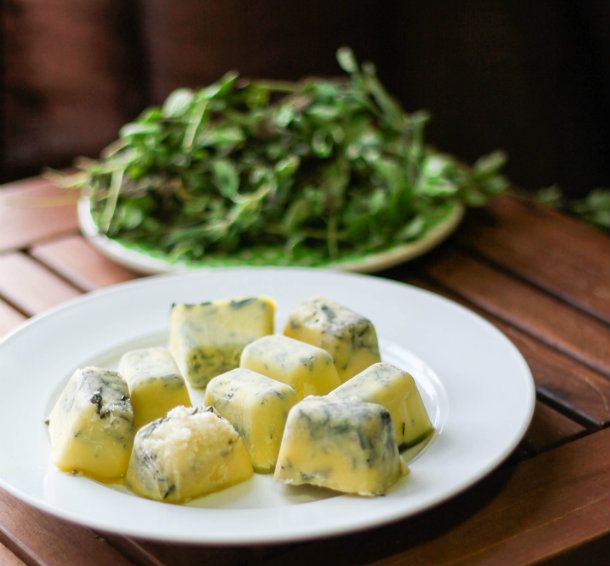
Freezing Fresh Herbs in Ice Cube Trays with Butter or Olive Oil

IMG_0267_zps88b9b4f2

My mother was great at using every last bit of the food she bought. She would use leftover veggies to make stock and the herbs from her garden were used fresh, frozen and dried. I was always amazed at how many thing she could get out of one store bought vegetable or fruit. In the last couple of weeks I have decided to buckle down on our food waste. Now granted I use as many leftovers as possible and am very frugal with making my own stock and cooking from scratch. However, even the best of us can get better and I am making a concerted effort to use every last bit of the food that I buy as much as possible. With that in mind when I had leftover fresh rosemary after making pot roast last night I remembered a great idea that my mother used. Instead of wasting the leftover fresh herbs she would freeze them with butter or olive oil and freeze them in ice cube trays. It was easy and perfect for later meals. So here is my recipe to on how to freeze fresh herbs with butter or olive oil for later use.

IMG_0256_zps3e70ae2a

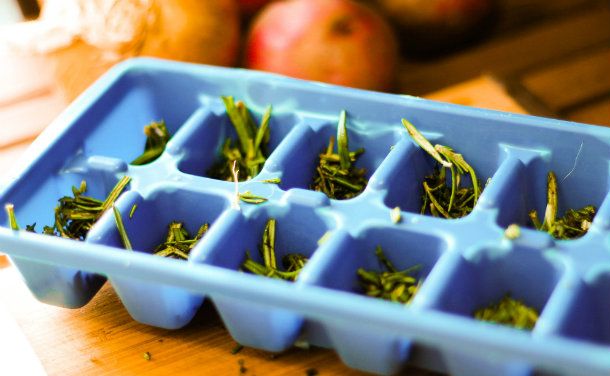
Start with fresh herbs. My favorite herb to use is Rosemary. It holds up very well to being frozen and is perfect with roasted vegetables, potatoes or chicken. I normally chop up my rosemary finely, since that is the texture that I prefer. However, this recipe would also work with torn or snipped fresh rosemary depending on your preference.

IMG_0263_zps2593ca2d

Next place the rosemary in the bottom of a plastic ice cube tray. Add as much rosemary as you wish. The more rosemary the stronger the flavor will be and the less the weaker the flavor. The amount really depends on personal preference. I normally add approximately 1-1 1/2 tsp per ice cube.

IMG_0264_zps1eed459a

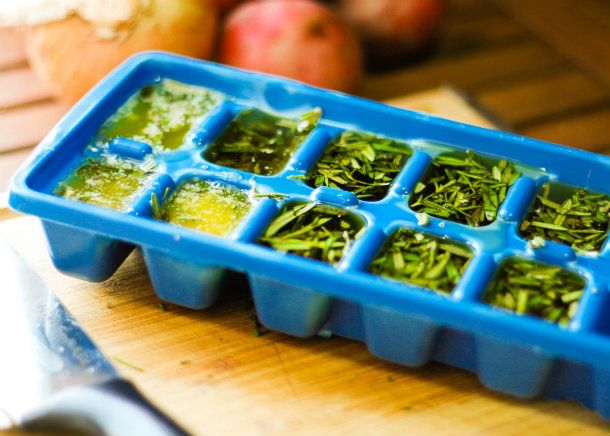
Fill each ice cube with either butter or olive oil. I really like using salted butter. It tastes delicious sliced and placed under the skin of a whole chicken and then roasting. It is also great with mashed potatoes, roasted potatoes or roasted vegetables.

Place the ice cube tray in the freezer until set. Pop out the ice cubes as needed. That's it, easy and a great way to use leftover fresh herbs.

This recipe would also work with other fresh herbs besides rosemary. I have tried it with both oregano and sage and they both work very well.

January 8, 2013

Slow-Cooker Pork Loin with Cherries


There are certain foods that I associate with events or periods of my life. My mother made the best peanut noodles and every year on my birthday I would request them. She had made-up the recipe herself and to this day it is one of my favorite foods. Since she has been gone for almost 7 years now I am sad to say that I haven't made the recipe in years. Every year on my birthday I tell myself that I am going to make them, and then I don't. I think it's a combination of things. Cooking her dish without her just isn't the same and I now associate the food so much with my birthday that I savor the memory as much as the food. I do this a lot with foods. The memory associated with the food is oftentimes as strong if not stronger than the food itself. Now that I have my own kids I hope that I am making memories with my two boys that they will associate with me. We cook frequently together. I find the memories of cooking with my mother some of the best food memories I have. My food memories aren't just isolated to my mother however. I always associate eating oysters on the half shell with my father. I took him on a number of trips and we always ate at seafood restaurants. He would never order anything that he thought was too much money (I paid for everything on the trips). However, one time I insisted he order oysters and he loved them. He still talks about the oysters and the trip as if they are intertwined in his collective memory. I also smile since they are a vivid part of my memory as well. Hopefully my kids will have similar shared food memories with me. Now that I have remembered why I love food so much, on to the recipe. Yesterday I tried a new recipe for Pork Loin with Cherries from the January issue of All You magazine.

This recipe has 8 ingredients. It takes 4 hours and 25 minutes of total time, 15 minutes of which is active and makes 8 servings. I did make a few modifications to the recipe. Since it is the time of the year when Christmas foods go on clearance, instead of cherry juice I used the sparkling cherry juice I found on closeout. The sparkling juice in addition to cherry juice also had pear and apple juice which made a nice fruity taste to the sauce. I have never been able to find a 3 1/2 pound pork loin in my area so I bought a 6 pound roast and cut it to the right size. The recipe states not to use sour cherry preserves. However, the only preserves I was able to find used tart cherries so I used it and it worked very well. Make sure to adequately brown the pork before placing it in the crock-pot. I really does keep in the juices and creates a tender roast. I followed the remainder of the recipe as written.

When the pork loin came out of the crock-pot I was worried. It looked almost like boiled pork loin and I was worried that the taste would be mediocre. I was very pleasantly surprised by what a difference the cherry sauce made. The cherry sauce was delicious and made the entire dish.  It was so good that my four-year-old thought that I should make him a peanut butter sandwich with the cherry sauce. I didn't make the sandwich, but I did have seconds of the sauce over mashed potatoes. The sauce really is the star of the recipe.

For the recipe go to Pork Loin with Cherries.


January 7, 2013

West Virginia Pinto Beans Revisted


Pinto beans are a staple in my household. They are quick and easy to prepare and cost literally dollars to make. They also freeze well for later use and are popular with my two boys. While a lot of people make their pinto beans on the stove or in a pressure cooker I make mine a little differently. When my husband and I first got married I had no idea how to make any type of beans other than kidney and garbanzo. I had moved to a state where pinto beans were everywhere and I felt like a fish out of water. I tried making them a few times on the stove and they never turned out as well as my mother-in-laws. Hers were always slightly smokey from the ham she cooked them with and delicious. So I decided that I needed to figure out a way of cooking pinto beans that worked better for me. I took my mother-in-laws idea of using a ham hock and turned to the crock-pot. It turned out perfectly and I haven't looked back. A while back I posted my crock-pot pinto bean recipe, but I decided that it needed to be re-visited and updated. So here is my recipe for pinto beans one more time.
  • 1 pound dried pinto beans
  • 1 ham hock, meaty ham bone or ham pieces
  • crock-pot
  • salt to taste
  • chow-chow for topping
Rinse dried pinto beans and cover with 8 cups of water in a pot. Let sit overnight for approximately 12 hours. Rinse beans and add to slow-cooker. Nestle ham hock (or whatever form of ham you are using) into the center of the beans. Cover with water. I normally use 6-8 cups of water. Cook on low for 8-12 hours or high for 6-8. Do not salt the pinto beans until they are finished cooking. If you salt the beans before they are finished they will take longer to cook and not turn out as soft. After the beans are done I top the servings with chow-chow.

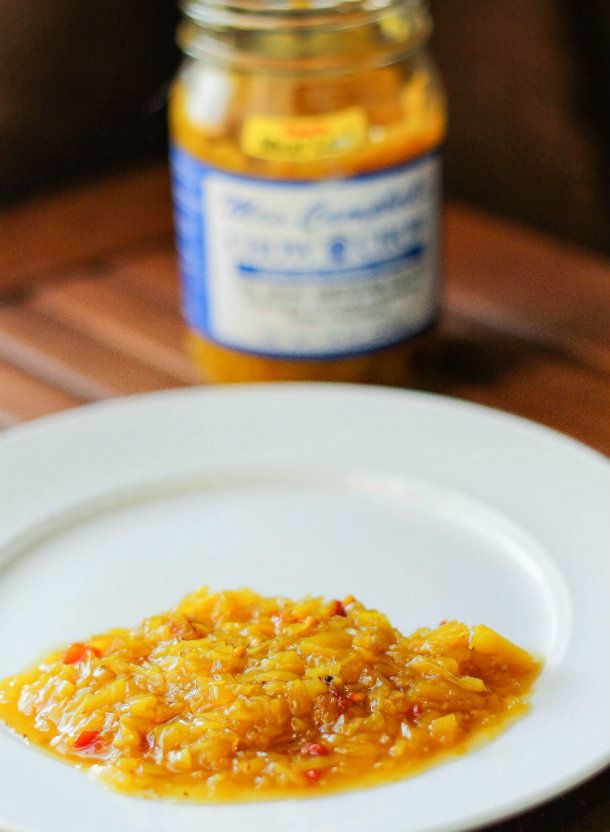
The last time I printed this recipe I had a lot of questions about what chow-chow was. It's basically a sweet pickled cabbage relish. So here is a pic:

IMG_0241-2_zps6b52e126

It is great on pinto beans and creates a nice sweet vinegar taste.

That's it, very easy and delicious. It is a very inexpensive meal and cornbread makes a great side since it can be used to soak up the pinto bean liquid. 

January 6, 2013

Salty Chocolate Chunk Cookies


Growing-up baking was something I loved doing. My mother was a great cook, but her baking skills were hit or miss. Case in point the first time I brought my husband back to Seattle to visit my mother was hosting a Christmas Eve party. She insisted that I should add an entire bag of raspberry flavored chocolate chips to the delicious brownies I was preparing. I was skeptical and said so, but my mother won out. They were terrible. The whole night I spend hovering over the desserts explaining that I had made everything, except the decision to put raspberry chips in the brownies. I look back at this story now that my mother has passed and laugh. She was a great mom in many ways, but not a great baker. Luckily I taught myself to bake when I was very young by trying every recipe in my mom's old cookbooks until they came out right. There were many cookie misses that had to be thrown out, but eventually I learned to cook everything in all the cookbooks. In college I made cookie platters until the early morning hours for co-workers, friends and families on their birthdays. How I found time for it still amazes me. My sweet tooth has stayed with me through the years, even though many other things have changed. This weekend I was in a baking mood so I decided to make gluten free cookies. I tried a new recipe for Salty Chocolate Chunk Cookies from the January 2013 issue of Bon Appetit magazine.

This recipe has 13 ingredients. It takes 30 minutes of total time, 18 minutes of which is active and makes 24 cookies. I had no problems finding any of the ingredients at my local grocery store. Since I eat gluten free I substituted gluten free flour for the all-purpose flour used in the recipe. Additionally for the chocolate I used an 8 oz bittersweet baking bar. I found that since I made these cookies gluten free they took slightly longer to cook than the recipe suggested. They also spread out thinner, which is normal for gluten free baking. Make sure to bake the cookies on parchment paper. It really does make a difference on how evenly the cookies bake and makes it much easier to release the cookies from the pan. I followed the remainder of the recipe as written.

I really liked the combination of salty and sweet in this recipe. My husband and I were both skeptical of how the salt would taste with the chocolate, but were pleasantly surprised by how delicious the cookies turned out. Since I made my cookies gluten free they were thinner and flatter than they would be with wheat flour. Either way they would be delicious.

For the recipe go to Salty Chocolate Chunk Cookies.

January 5, 2013

Rajma - Northern Indian Kidney Bean Masala Stew


I am feeling blah. For whatever reason January is never a great month for me. I don't know why, but I have horrible luck with appliances breaking and things going generally not in the right direction during this month. People also seem to be less than pleasant right now also. Today at the grocery store I was in the frozen food aisle. I was looking at some vegetables and the aisle was very narrow thanks to a display the store had set-up. When I was walking away I noticed there was a woman behind me that I hadn't noticed. Honestly, after two kids when I'm at the grocery store without them I tend to get in my 'me' zone. It is literally the only couple of hours during the week that I have to myself. I immediately apologized to the women and asked if I was in her way. Her response took me a little off guard. This woman was well into later life and used a profanity at me followed by the line 'of course you were.' Okay. I can understand if I was in her way. However, she could have said excuse me or brought it to my attention since I in no way say her since the door was open to the frozen food case. Second, why pull out the s word. Not necessary at all. I hope that my kids will grow up knowing that politeness is always the best response. Overall, I think so far I am already ready for the month of January to be over and it has just started. So I am feeling a little blah. Given my current winter mood I have been making a lot of soups and bean dishes. Last night I made a new recipe for Rajma (Northern Indian Kidney Bean Masala Stew) from a recent issue of Saveur magazine.

This recipe has 17 ingredients. It takes an hour and a half of total time, 45 minutes of which is active and makes 4 servings. I did make a number of modifications. First I doubled the recipe. Four servings is not enough for my family, which includes two growing boys. Second I try to follow a recipe as much as I can but sometimes I am unable to find a particular ingredient. So with this recipe I left one out. I have used chiles de arbol when I lived in a much larger city. Finding them in my city just isn't a possibility, so I chose to not use them. Finally, since I was making this for my kids I seeded and diced my serranos. It would have been too spicy for my kids to eat otherwise. I also chose to cook my beans on the stove. I have a pressure cooker which I use for canning, but I find it a pain to take down and use for everyday cooking. I let my beans cook for two hours in order to be fully softened. I followed the remainder of the recipe as written.

By leaving out the chiles de arbol and seeding the serranos this dish had a slight kick, without being too spicy for my kids. I let my beans cook down slightly so they were thicker than a traditional stew, but still worked well served over brown rice. My husband really loved this dish and was happy that it tasted different than the normal Indian curries that I make frequently.

For the recipe go to Rajma.

January 4, 2013

Salmon Tacos with Guacamole and Cilantro-Lime Yogurt Sauce


A couple of weeks back we got a new puppy. We have always had two large dogs that are now about 9 years old and we thought a puppy would help them feel a little younger. What I didn't anticipate was the fact that my youngest son is very jealous of anyone or anything that takes away mommy's attention. He has been having a number of temper tantrums and thinks that the puppy doesn't love him enough if it pays attention to anyone besides him. It has gotten better slowly, but it is a work in progress. I do think that it is helping my youngest to have more responsibility and understand that there are things besides mommy in the world. I'm hoping that kindergarten will be an easier transition in a couple of years. In order to make my youngest son feel better I have been making some of my kids favorite foods this week. Both of my kids love salmon. There are a number of foods that they turn up their noses at, but salmon has never been one of them. Last week I made a new recipe for Salmon Tacos with Guacamole from the January 2013 issue of Family Circle magazine.

This recipe has 14 ingredients. It takes 15 minutes of cooking time, 15 minutes of prep and makes 4 servings. I had no problems finding any of the ingredient at my local grocery store. I chose not to make the rice part of the recipe. Since it was pre-packaged and seemed unnecessary I omitted it. Normally I would have bought quality salmon. However, my husband had bought skin-on wild caught frozen salmon a few months back. I am trying to use foods that we already have in the pantry or freezer so that is the salmon I used in this recipe. My salmon took slightly less than the 15 minutes of cooking suggested by the recipe, closer to 12 minutes. I followed the remainder of the recipe as written.

These tacos were very popular with my family. My two boys loved the salmon and ate it without the tortillas. The cilantro lime yogurt was a nice addition and it was my favorite part of the recipe. It made a nice sauce with or without making the salmon as a taco.

For the recipe go to Salmon Tacos with Guacamole.

January 3, 2013

Pork Carnitas with Garlic and Orange


My oldest went back to school after winter break today. Having school starting again on a Thursday is throwing off my whole schedule. I woke-up this morning sure that it was Monday, luckily by the time my son was at the bus stop I remembered that it was only a two-day school week. I think that my age is starting to show with my lack of memory skills (I'm not discussing what birthday I am celebrating this year, lets just say that I will be halfway between 30 and 40). Since my kids have both been home this week I have been making my dinner meals easy and child friendly. Earlier in the week I made a new recipe for Pork Carnitas with Garlic and Orange from the November 2012 issue of Food and Wine magazine.

This recipe has 8 ingredients. It takes 4 hours 45 minutes of total time, 45 minutes of which is active and makes 4 to 6 servings. I did have to make a few modifications to the recipe. The pork shoulder that I was able to find didn't have a large layer of fat. Due to this fact I had to add a small amount of stock to keep the pork moist in the oven. This also helped to keep the jalapenos from drying out. It was additionally helpful in making the pan sauce to add to the pulled pork at the end of the recipe. I served the carnitas with avocado and cilantro as suggested by the magazine photo. I followed the remainder of the recipe as written.

Be careful to watch the jalapenos in order that they don't burn. Since my pork shoulder was lower in fat it was necessary to add the stock in order that the jalapenos did not burn. I would suggest following this step if you have the same problem. The roasted garlic was my favorite part of this recipe. It lent a delicious flavor to the pulled pork.

For the recipe go to Pork Carnitas with Garlic and Orange.

January 2, 2013

Blueberry Coffee Cake


 I have been a little lax on my cooking everything from scratch goal in the last couple of months. The holidays happened and my motivation seemed to go out the window. Now with the year changing and my cupboards full of food I am making a concerted effort to make as many things as I can with the ingredients I already have. Normally I am great about this goal, but with a 4 and 6-year-old, my days are exhausting and honestly I just haven't had the energy. However, I also know that budgeting and cooking as many things as I can are major ways that I am able to be a stay at home mom. I love staying at home with my kids, so it's back to the kitchen I go this week. So today I spent the day making homemade turkey sausage, grilled chicken, and snacks for lunches for the next couple of weeks. Yesterday for New Years I made a great breakfast and dinner for very little money. For breakfast I tried a new recipe for Blueberry Coffee Cake from the January 2013 issue of Southern Living magazine.

This recipe has 13 ingredients. It takes a total of 1 hour, 20 minutes of which is active and makes 10 servings. Since I now eat gluten free I substituted gluten free all-purpose flour for the wheat all-purpose flour used in the recipe. Since I didn't have turbinado sugar, I substituted regular granulated sugar and it worked fine. My total baking time was slightly longer than the recipe, approximately 35 minutes total. I followed the remainder of the recipe as written.

If you like not overly sweet coffee cake than this recipe is perfect. It is light on the sugar, which my family liked, but is still full of fruit. I really enjoy blueberry coffee cake and this recipe was easy to make gluten free, which I appreciated. It doesn't bake-up very high, it is more of a dense cake, than a high and light coffee cake. Either way it was great with a cup of coffee in the morning.

For the recipe go to Blueberry Coffee Cake. 

January 1, 2013

Chocolate Pudding


Last night for New Year's Eve I didn't even make it to midnight. I fell asleep at 10:30. I did attempt to make it to the New Year by drinking coffee, but even that couldn't keep me awake. My kids fell asleep at 9, so I did slightly better for them. Today I made black-eyed peas for good luck and my husband and I enjoyed the champagne that we never drank last night. I tried a new way of preparing my black-eyed peas and they were delicious. While I might not of stayed up to ring in the New Year, I do have traditions that I try to keep. One of them is to make a delicious dessert for New Year's Eve. There is something comforting about saying goodbye to another year with something comforting and sweet. Earlier in the day I made a new Chocolate Pudding recipe from the January 2013 issue of All You magazine to help celebrate the New Year.

This recipe has 6 ingredients. It takes 20 minutes of total time, all of which is active and makes 8 servings. I had no problems finding any of the ingredients at my local grocery store. I allowed the pudding to fully chill before serving and I served the pudding in canning jars. The look of drinks and desserts in small canning jars is great and looks unique. I did find that the recipe only made three servings, instead of the 8 suggested by the recipe and magazine photo. I followed the remainder of the recipe as written.

I thought this pudding was delicious. It wasn't overly sweet, but instead was rich and full of chocolate flavor. My two boys loved the pudding and the homemade whipped cream I served on top. I think if I made the recipe again I would double it, since my family eats large servings and it only made three. This is definitely a recipe I would make again in the future.

For the recipe go to Chocolate Pudding.
Related Posts Plugin for WordPress, Blogger...