Showing posts with label West Virginia. Show all posts

August 4, 2013

Homemade Lemonade


Homemade Lemonade
Homemade Lemonade


I'm back from my blogging vacation! It was nice having time to spend with my kids and I feel relaxed and ready to get back to cooking and sharing my recipe results. School starts for my oldest on Thursday. Today was spend looking for a new backpack. My oldest was at my in-laws house so I was left shopping for clothes and school supplies with my smart phone, texting pictures to my son to make sure everything was okay. Luckily I am super aware of what both of my kids like and my oldest was very excited with everything I chose. I love when my kids actually think that I did something great. My youngest is very jealous that my oldest is starting school so he ended up with new shirts and a toy. I'm hoping that on Thursday he doesn't have a complete meltdown when the bus pulls away without him. He will be more than ready next year when he is able to get on the bus with his older brother for his first day of school. Since this was a laid back weekend I used up a lot of items that I had leftover in my fridge and pantry. Yesterday I tried a new recipe for Homemade Lemonade from the Food Network.

Huntington, WV from across the Ohio River


This recipe has 6 ingredients. It takes 10 minutes of total time, all of which is active and makes 6 to 8 servings. Honestly this recipe is so straight forward that I didn't make many changes. The main deviation I made from the original recipe was to cook the sugar and water on the stove until the sugar fully dissolved. Then I added the syrup to the pitcher and added the remaining ingredients. After the lemonade was done I allowed it to cool in the fridge for 4 hours. I served the lemonade over ice with lemon slices.

Frank Gatski Memorial Bridge


My two kids were big fans of this lemonade. It came out pretty sweet. If you aren't a fan of very sweet lemonade you can cut down the amount of sugar. If the lemonade is too tart or strong for your taste you can add additional cold water. This is definitely a recipe I would make again and it literally costs cents to make.

The second picture is of Huntington, WV from across the Ohio River in Chesapeake. The third picture is of the Frank Gatski Memorial Bridge.

For the recipe go to Homemade Lemonade.


Homemade Lemonade


Recipe Type: Drink
Summary:
A simple 6 ingredient recipe for Homemade Lemonade. A great way to use old lemons.
Preparation Time: 0h, 10m
Total Time: 0h, 10m
Yield: 6 to 8 servings

June 4, 2013

Tired of Boring Pork Dishes? Try Ginger Orange Pork Tenderloin with Ramps

Click for Recipe for Ginger Orange Pork Tenderloin with Ramps
Ginger Orange Pork Tenderloin with Ramps


Today was free museum Tuesday at the Huntington Museum of Art. Since my husband and I are trying to expose my youngest son to a wide variety of cultural experiences we thought this would be a great day to take him. Plus it was free which is always a bonus since I am basically pretty cheap. Given the fact that he is 4 he did very well. Most of the paintings and sculptures lost his interest quickly, but he did enjoy the Eastern weapon room and the antique firearms. The piece of art that grabbed his attention the most was outside. It had metallic arms that moved around, basically a modern art version of a whirligig. He was fascinated. There was also a lizard running around the outside walls of the museum that he was determined he should take home (don't worry that was a no go). One of my favorite parts about the museum is that they have a large section of land with nature walks. Since I have a lively 4-year-old it was a great way to wind him down. Given that today was a busy day, I utilized leftovers from a meal I made earlier in the week. It is hard to have fresh meals every night, so I make a point of eating leftovers at least once a week. This way no food is wasted and I save money from my food budget. Tonight my family enjoyed leftovers of the Ginger Orange Pork Tenderloin recipe from the April 2013 issue of All You magazine.

This recipe has 8 ingredients. It takes 45 minutes of total time, 15 minutes of which is active and makes 4 servings. I did make a few changes to the original recipe. First, I found clearance blood orange juice, so I utilized it for the recipe. Second, my shallots had gone bad, so I used the ramps that I had in the freezer. I used one whole ramp (leaves and stem), minced. Instead of vegetable oil I used canola oil, I prefer olive oil and canola in my baked goods and recipes. I am happy to say that my herb garden is doing great, so I was able to use fresh thyme.

The ramps added a nice flavor to the sauce in this dish. The pork was pretty plain, so I would suggest a few changes. I would either rub the pork with a spice rub (cayenne would work well if you like a bit of a kick, or a combination of cumin, coriander or cinnamon). Another option would be to marinade the pork in a citrus marinade. Not only would this make the taste delicious it would help to keep the pork moist while cooking. Most importantly I would double the sauce amount since it was the best part of the recipe,  you will want plenty of it to enjoy!

For the recipe go to Ginger Orange Pork Tenderloin.

March 20, 2013

Appalachian Spring - Early Ramps

 Today is the first day of spring. The weather in my area seems not to have noticed since it has been cold and not spring like. However, the first telltale sign of spring is sitting my fridge, early ramps. Now if you have read this blog for any given amount of time you will have noticed that every spring I talk about ramps. They are a stable of our spring meals and a great substitute for leeks or onions in recipes. While many people prefer the later ramps which have a green leafy top, I am a much bigger fan of the early ramps which are more flavorful and delicious with dishes like pot roast. I am lucky that my in-laws live in the foothills of the West Virginia mountains and are able to buy ramps for me as soon as they are available. They are definitely a great spring vegetable and a quintessential part of the diet of many Appalachians.

Today was the day that I cleaned and prepped the 2 pounds of ramps that have been sitting in my cold hallway for the last couple of days. Here is what an uncleaned early ramp looks like:

west virgnia, early ramps, appalachia
Uncleaned Early West Virginia Ramps


In case you have never seen or heard of a ramp before they are a basically a north American wild leek. Ramp patches are heavily guarded secrets for many families and are one of the first signs that spring has arrived. The ramps that I prefer are the early ramps which do not the green tops that are common in many ramps recipes. To me the early ramps have a stronger flavor and work more efficiently in roasted potato and chicken recipes than the ramps with green tops. As the photo above demonstrates early ramps are pretty dirty. Unless you spend the large amount more money to buy cleaned ramps you will be cleaning the ramps like I do. To clean just cut off the roots and be sure to soak off all the dirt. After they are cleaned they look like the photo below:

West Virginia, WV, Ramps, Early ramps, Appalachia
Cleaned West Virginia Early Ramps


Ramps can be used a variety of recipes. Early ramps are great pickled, used in pot roast, with roasted potatoes, or as a substitute for leeks or onions. My husband has even used them as a hot dog topping in place of onions. Later ramps with the green tops are great in pesto, biscuits, fried with bacon, or with pinto beans and cornbread. Stay tuned tomorrow when I will use ramps along with potatoes and pesto for a roasted chicken recipe.

March 3, 2013

Cornbread Made Two Ways - Sweet and Gluten Free and Southern Style

click for a recipe for sweet gluten free cornbread
Gluten Free Sweet Cornbread

My husband and I agree on most things, except cornbread. Since he has lived his whole life in West Virginia he insists that his cornbread have absolutely no sugar and the pan be greased with bacon drippings. I on the other hand grew-up far away in Seattle and my idea of cornbread normally came from a box or our local Marie Callender's Restaurant. Sweet would be an understatement. Not only do I like sugar in my cornbread I also slather it with honey or sorghum syrup and butter before eating it. I have a minor sweet tooth as you can tell. When we got married I made cornbread. My husband wasn't impressed. He commenced to explain (and demonstrate) the correct way to make his version of cornbread. I wasn't impressed with his salty cornbread, so we agreed to disagree. I also learned to make two batches, one for him with salt and one for me with lots of sugar. Tonight for dinner was no exceptions I tried one new recipe for Gluten Free Golden Sweet Cornbread from Allrecipes.com and one for Southern Cornbread from the Food Network.

First up the Golden Sweet Cornbread (picture at the top of the page). This recipe has 8 ingredients. It takes a total time of 35 minutes, 10 minutes of which is active and makes 12 servings. I did make a few changes. The original recipe is not gluten free, so instead of all-purpose flour I used 1/2 cup gluten free all-purpose flour and a 1/2 cup of brown rice flour. Instead of regular milk I substituted low-fat buttermilk, I prefer the taste in cornbread. Finally, I baked the cornbread in a square 9 inch glass pan instead of the round pan suggested by the recipe, which gave me a total of 9 servings.

click for recipe for southern style cornbread
Southern Style Cornbread


The Southern Cornbread has 8 ingredients. It takes 45 minutes of total time, 25 minutes of which is active and make 9 servings (4-6 according to the Food Network). I followed this recipe pretty similar to how it was written, with only a few changes. I greased the pan with bacon drippings. My husband insists this makes for a better crust and I have been doing this method since we were first married. By now it is second nature to me. I found that my cooking time was closer to 25 minutes since I reduced the temperature to 400 degrees so I could cook both batches of cornbread at the same time.

The sweet cornbread was definitely sweet. It was sweet enough that I just ate it plain with no honey. If you want to add something sweet on top I would suggest reducing the sugar to 1/3 cup. My husband really liked the Southern Cornbread. It was perfect for him since it has absolutely no sugar and tasted slightly like salt, which he loves. My two boys had some of each kind and seemed to like them both (good boys!).

For the recipes go to Golden Sweet Cornbread and Southern Cornbread.

January 7, 2013

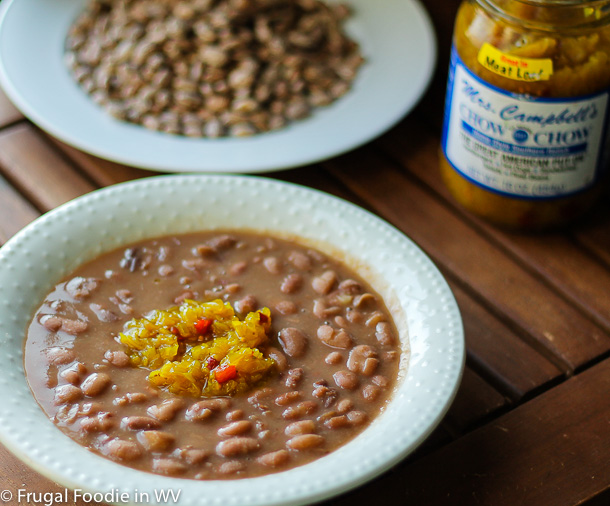
West Virginia Pinto Beans Revisted


Pinto beans are a staple in my household. They are quick and easy to prepare and cost literally dollars to make. They also freeze well for later use and are popular with my two boys. While a lot of people make their pinto beans on the stove or in a pressure cooker I make mine a little differently. When my husband and I first got married I had no idea how to make any type of beans other than kidney and garbanzo. I had moved to a state where pinto beans were everywhere and I felt like a fish out of water. I tried making them a few times on the stove and they never turned out as well as my mother-in-laws. Hers were always slightly smokey from the ham she cooked them with and delicious. So I decided that I needed to figure out a way of cooking pinto beans that worked better for me. I took my mother-in-laws idea of using a ham hock and turned to the crock-pot. It turned out perfectly and I haven't looked back. A while back I posted my crock-pot pinto bean recipe, but I decided that it needed to be re-visited and updated. So here is my recipe for pinto beans one more time.
  • 1 pound dried pinto beans
  • 1 ham hock, meaty ham bone or ham pieces
  • crock-pot
  • salt to taste
  • chow-chow for topping
Rinse dried pinto beans and cover with 8 cups of water in a pot. Let sit overnight for approximately 12 hours. Rinse beans and add to slow-cooker. Nestle ham hock (or whatever form of ham you are using) into the center of the beans. Cover with water. I normally use 6-8 cups of water. Cook on low for 8-12 hours or high for 6-8. Do not salt the pinto beans until they are finished cooking. If you salt the beans before they are finished they will take longer to cook and not turn out as soft. After the beans are done I top the servings with chow-chow.

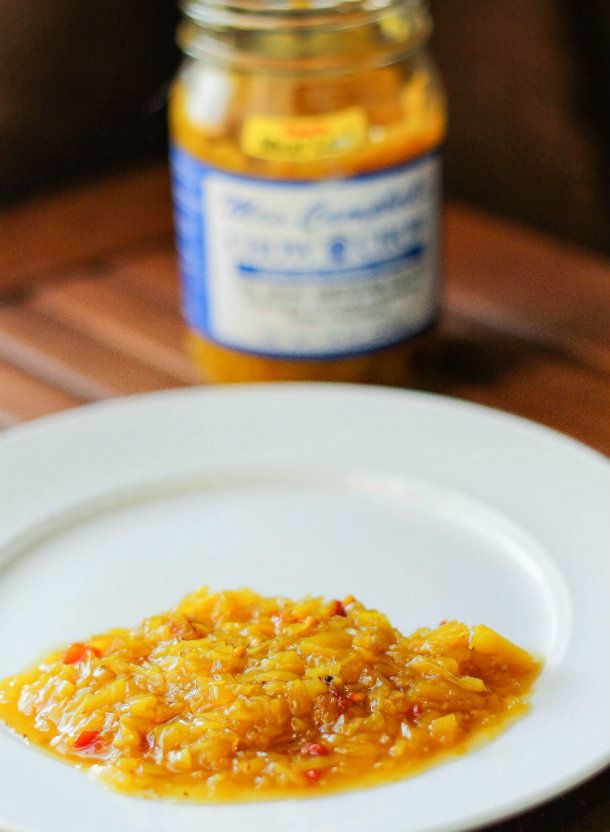
The last time I printed this recipe I had a lot of questions about what chow-chow was. It's basically a sweet pickled cabbage relish. So here is a pic:

IMG_0241-2_zps6b52e126

It is great on pinto beans and creates a nice sweet vinegar taste.

That's it, very easy and delicious. It is a very inexpensive meal and cornbread makes a great side since it can be used to soak up the pinto bean liquid. 

April 3, 2012

Ramps, Bacon, and Fried Potatoes

Early in the month of March means one thing in our house, ramps! With family that live in the mountain counties we are able to get ramps early in the season (when I think they taste the best) and by the end of the month I have normally used them in a variety of recipes. Before I met my husband I had no idea what ramps looked like, much less tasted or used them in recipes. That all changed when I married someone who grow up in the heart of West Virginia ramp country. The first year his mother brought down young ramps to clean I had no idea what to do with the bag of very muddy and ugly looking roots and shoots of what looked like a odd looking green onion.
I quickly learned that each ramp has to be cleaned and cut to be prepared to cook with. To do this I cut off the root and take off the dirt and outside husk of each of the ramps. Before each ramp is cleaned they look like this:
Not very appetizing, but after being cleaned and washed up they look like this:
So your probably asking yourself great, now what do I do with them? The answer is so much! Ramps are a great way to add flavor to a variety of recipes from biscuits to stews, pizza, you name it they work! While a lot of people prefer the later ramps which have a leafier green top, I am partial to the early shoots, I feel that the flavor is better and I prefer them when baking or cooking. So what do I do with the pounds of ramps I receive each year? I love substituting them for green onions in savory biscuits, with eggs, stews, soups and most importantly with fried bacon and potatoes. So here is my recipe for Ramps, Bacon, and Fried Potatoes.

After cleaning and trimming up your ramps, fry enough thick cut bacon (I love the maple cured variety) for the number of servings you are making. I normally make an entire package, if you've read my blog before you know that my family absolutely loves bacon and my husband would use bacon in absolutely everything if I let him.
Next I add the ramps and cook until they are softened and slightly caramelized. If you have an abundance of bacon grease pour off the excess before frying the ramps.
When the ramps are finished cooking, add the potatoes and fry until they are browned and crisp. Since the potatoes takes a lot longer than the ramps or bacon, I will often start them first and add chopped ramps in with the bacon grease while they are frying to ensure that the bacon and ramps don't get cold while the potatoes are frying.


Once everything is done, I plate the bacon, ramps and potatoes and enjoy! If you want an even stronger ramp flavor you can add minced ramps to the potatoes while they are frying. My two boys love their potatoes this way and they taste great! The most important thing to remember when using ramps is that the flavor is much stronger than leeks or green onions so a small amount goes a long way. Additionally, similar to garlic your pours will sweat out the ramps the next day after eating them, so warn everyone around you that's its ramp season. Or better yet make sure that they eat as many as you do!

March 9, 2012

Pinto Beans

We eat a lot of pinto beans in our house. In West Virginia there are a few foods that everyone seems to make including pinto beans, pepperoni rolls, and ramps. My five-year-old already has preferences as to the the proper chow chow to put on his pinto beans. There are various ways to prepare a great bowl of pinto beans. My mother-in-law makes great beans with her pressure cooker. I really only use my pressure cooker for canning and haven't branched out to anything more. My favorite way to make pinto beans is in my slow-cooker. The beans come out tasting great and take very little effort to make. Here's my recipe:

  • 1 smoked ham hock
  • 1 lb of dried of pinto beans
  • water to cover
  • chow chow or sweet onion for garnish
Rinse and then cover dried pinto beans with water and soak overnight. Dump water and then add beans to slow-cooker. Place ham hock in the center of the beans and cover with water (at least six cups, normally I add a little more). Cook on low for 6-8 hours. Salt to taste (it may take a large amount of salt to adequately season the beans). Don't add salt to the beans while they are cooking or the beans will not fully cook. After serving the beans top with chow chow and enjoy!

Pinto beans are very easy to make and are great with a big slice of cornbread slathered in butter. Even my two boys love these beans and will eat bowls full. Using the slow-cooker makes for an easy dinner that takes only minutes to prep.
Related Posts Plugin for WordPress, Blogger...