Showing posts with label Rosemary. Show all posts

August 13, 2018

Freezing and Drying Woody Herbs


My herb garden can have good years and bad years. This year was somewhere in the middle, not great, not horrible. Too much rain in the beginning of the year and too little in the last couple of weeks. However, I have still had more than enough of an abundance to freeze and dry. Here is a quick rundown of how I keep my herbs useable year round.

To freeze:
  • This works for any woody perennial herb, such as rosemary and sage (thyme, marjoram). 
  • Rinse herbs under water.
  • Pat dry with paper towels (or use a salad spinner which works great). 
  • Try to get off as much moisture as you can in order that the leaves (especially with sage) don't stick together.
  • Spread the stems (or with the case of sage I just freeze the leaves) on a cookie or jelly pan and place in the freezer for 15-20 minutes. Try to spread out the herbs as much as possible. This will allow a better flash freeze. 
  • Place flash frozen herbs in a bag or plastic container in the freezer. 
  • I freeze rosemary whole on the stem, with sage I just freeze the leaves. 
To dry:
  • Drying fresh herbs is very easy.
  • Rinse herbs and pat dry with paper towels. 
  • Strip enough leaves off the end of the stems in order to tie a piece of twine around. 
  • Gather herbs into bunches, tie with a piece of twine (make sure the twine is long enough to hang upside down). 
  • Hang herbs upside down suspended from twine. 
  • It normally takes about 3 weeks to fully dry.
  • Store in an air tight container.
  • I store my herbs whole and then when needed I use a mortar and pestle to grind or hand crumble. 
  • I find that waiting to grind or chop dried herbs until they are being used helps to keep the flavor of the herb intact.
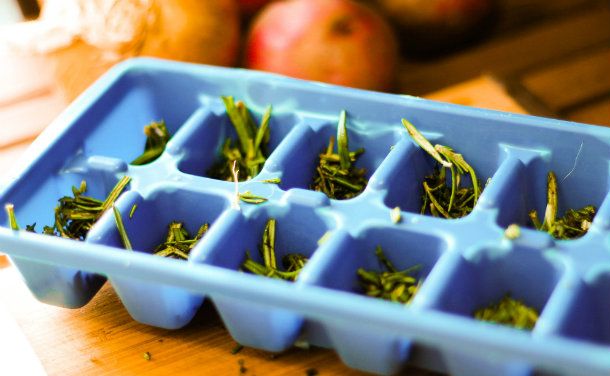
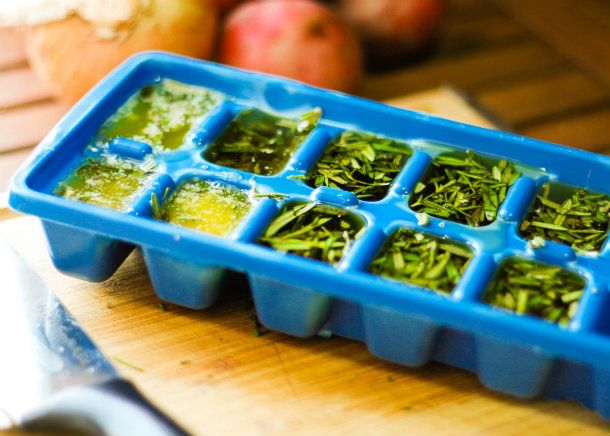
That's it. Very easy. Now soft annual herbs such as basil don't work in the same manner. Those work better frozen in ice cube trays, which I have explained in the past in this post:

http://www.foodieinwv.com/2013/01/freezing-fresh-herbs-in-ice-cube-trays.html


June 22, 2014

Savory Rosemary Sage Bread


I have a habit of buying clearanced appliances.. Most of the time I use them, the ones I don't I give as gifts, a few sit for a few years before I get around to using them. Then there are the appliances that I get from someone else. About 5 years ago my mother-in-law gave me a bread maker. It sat on the shelf for a couple of months and then I used it non-stop for a year. Later it broke and I made bread from scratch for years. Until I found a bread maker marked down to 15 dollars (from 80!), so of course I had to buy it. Honestly, this summer it has been my best friend. It has kept my house cool when the weather is 95 and humid, which is seems to be frequently this year. My herb garden has also been crazy so I have been trying to combine my love of making fresh bread with the over abundance of fresh herbs I have in my garden. I discovered a recipe for Rosemary Sage Bread a couple of weeks back and I love it! The recipe is as follows.


Adapted from Recipe 4 Living
Rosemary Sage Bread

A savory bread that is a great way to use garden herbs. Works well made in both the bread maker and in the oven.

Yield: 2 loaves 16 slices each

Ingredients
  • 1 tablespoon granulated sugar
  • 1 cup warm water
  • 2 1/4 teaspoons active dry yeast
  • 2 tablespoons finely diced fresh rosemary
  • 2 tablespoons finely diced fresh sage
  • 1 teaspoon salt
  • 2 tablespoons softened butter
  • 3 cups bread flour
Cooking Directions
  1. If making in the bread maker add ingredients in order suggested by the manufacturer of your bread maker.
  2. If you are making the bread from scratch use the following instructions.
  3. In the one cup of warm water dissolve the sugar and then mix in the yeast.
  4. After 5 minutes (when the yeast is foamy) add the butter, sage, and rosemary.
  5. In a separate bowl combine the bread flour and salt.
  6. Add the wet mixture and then knead by hand for 10-12 minutes (alternately you may use a mixer for this step).
  7. Rub the inside of a plastic bowl with oil.
  8. Place dough in bowl, cover with plastic wrap, and rise for 1 hour or until doubled.
  9. Punch down dough, and divide into two balls.
  10. Grease the inside of two loaf pans, shape the two pieces of dough into loaves and place in loaf pans.
  11. Cover top of pans with plastic wrap and allow loaves to rise for one hour or until doubled in size.
  12. While the dough is on the last rise preheat oven to 375 degrees.
  13. Bake the loaves in the oven for 20-30 minutes or until golden brown and sound hollow when tapped (total time will depend on your oven, if they brown too quickly tent with foil. A bread thermometer is helpful-when the bread temps 190-200 it is ready to pull out.
  14. Allow cool for 30 minutes in pan and an additional 30 minutes before slicing.
This bread is nice as a side with soup. It also makes great savory toast, my kids loved it with goat cheese (my kids have adult tastes). You can adjust the amount of herbs based on your tastes. Some people might like more or less rosemary/sage. It would also work with other herbs if you have an over abundance of thyme, dill, etc. 


Rosemary Sage Bread


Summary:
A savory bread that is a great way to use garden herbs. Works well made in both the bread maker and in the oven.
Preparation Time: 2h, 20m
Cooking Time: 0h, 20m
Yield: 32 Slices

July 14, 2013

Cooking with Fresh Herbs: Fresh Rosemary Muffins

Click for Recipe for Gluten Free Fresh Rosemary Muffins
Gluten Free Fresh Rosemary Muffins


My oldest son only has three weeks left of summer vacation. He has been great about working on his workbooks and is more than ready to start second grade. My youngest is ready for his older brother to go back to school so he can have his days back to being just him and I. With only one child at home it is much easier to go places during the day and the pace of my house is more mellow. The only problem is that my oldest is very nervous about starting second grade. He is worried that all of his friends will be in other classes, he won't like his teacher and that the work will be too hard. I felt so bad when he came to me the other day in tears with all of his fears. I know he will be fine after the first day, he just needs to get through the next 3 weeks. In the meantime I have been baking foods that he likes. Yesterday I tried a new recipe for Fresh Rosemary Muffins from Southern Living magazine.

This recipe has 12 ingredients. It takes 35 minutes of total time, 15 minutes of which is active and makes 12 muffins. I did make a few changes. First I substituted gluten free all-purpose flour for the regular wheat flour. Secondly, I was unable to find currants at my local store so I doubled the amount of raisins. Since I made the muffins gluten free I added 2 eggs instead of 1. I often increase the amount of egg when I convert baking recipes to being gluten free. I ended up with a total of 11 muffins which took just barely 20 minutes to bake.

These muffins have a nice sweet taste that blends well with the savory goat cheese. They made a great breakfast with scrambled eggs. My husband thought they were a little sweet for anything other than a dessert or snack, but my kids loved them like I did for breakfast. Overall this was a nice way to use fresh rosemary and worked well being converted to being gluten free.

For the recipe go to Fresh Rosemary Muffins.

April 15, 2013

Recipe for Roast Bacon Wrapped Pork

Click for recipe for Pancetta Wrapped Pork Roast
Pancetta Wrapped Pork Roast


I have fallen off the healthy breakfast eating band wagon the last month or so. Normally I am great about eating breakfast, but due to a variety of reasons the last couple of months I have grabbed for sweets more often than not first thing in the morning. It has finally started to catch up with me and I have been feeling not so fabulous the last couple of weeks. Therefore I woke up this morning and started my day the right way food wise. I have felt much better the rest of the day and am going to continue the healthy eating especially in the morning. One breakfast food that my family loves is bacon. The males in my family could eat bacon three times a day and be incredibly happy. This weekend I tried a new recipe for Roast Bacon Wrapped Pork from Food and Wine magazine.

This recipe has 7 ingredients. It takes 1 hour and 30 minutes of total time, 20 minutes of which is active. I used pancetta instead of bacon since it goes great with pork roast. Make sure to tie off the roast or the meat will dry out during cooking. The resting time is also essential. It helps to keep all the moisture in the roast and is vital to any pork recipe.

The flavor from the fresh herbs was great. I really love using fresh herbs since they create a lot of flavor with little effort. Plus they are very easy to grow in your garden. The roast that I bought wasn't the best. I would suggest using a high quality roast, the better quality really does make for a better tasting slice of meat. Overall, the flavor on this roast was delicious and the same herbs would work well with a tenderloin.

For the recipe go to Roast Bacon Wrapped Pork.

February 10, 2013

Rosemary-Apricot Pork Tenderloin with Curried Apricot Rice


I have already gotten tired of candy and Valentine's Day is still days away. I'm not anti-Valentine's Day, but I do hate all the sweets that go along with the holiday. Many people think that I am mean, but I do not allow candy and pre-packaged sweets in my house. And when I say none I mean none. I bake cookies, cakes and treats from scratch, but I try to limit the amount of granulated sugar that my family consumes so I bake with honey and molasses. Inevitably during holidays my kids receive candy and treats from relatives. Since they don't normally eat foods with large amounts of corn syrup and sugar they tend to get very cranky and melt down after only a few pieces. Today the candy that they have went into a bag for my husband to take to work. This happened after my oldest cried for an hour wanting another piece of candy after he had eaten way too many mini Butterfingers bars. He's lucky that I didn't throw them in the trash, which I have also been known to do. To make up for all the candy eating that happened in my house the last couple of days, I decided for dinner tonight to make a protein that my kids would like. Pork is always a popular favorite and everyone in my house absolutely loves pork tenderloin. Tonight I tried a new recipe for Rosemary-Apricot Pork Tenderloin from the December/January 2012 issue of Taste of Home magazine.

This recipe has 8 ingredients. It takes 40 minutes of total time, 15 minutes of which is active and makes 8 servings. For the rosemary I used crushed dried rosemary. Fresh rosemary is just too expensive at the store and my herb garden was non-existent last summer thanks to squirrels and cats. For the apricot preserves I used all natural preserves. I am not a fan of the cheaper jams that use corn syrup as a main ingredient. They taste too sugary and have more apple juice than actual fruit. Last summer I canned a bunch of jam that I had planned on using this winter, but thanks to my two boys it was eaten within a couple of months. For a side dish I modified the Curried Apricot Couscous recipe from the same page of the magazine. Since I eat gluten free I substituted rice for the couscous, added 3 cups of homemade chicken stock and modified the cooking time to 20 minutes. The recipe cooks the pork to 160 and pulls it out of the oven to rest. That is way too high of a temp. The FDA now states that the temp for pork is 145 with a 5 minute rest. During the rest the temp will go up approximately 5 degrees to 150. If you were to cook the pork to 160 degrees, it would be over done. If you don't already own a well made meat thermometer, buy one. They are a very important kitchen tool that can mean the difference between delicious and over cooked meat. I temp all meat that I cook to ensure that it gets just done without before over done and tough.

 The pork in this dish turned out very tender. My two boys stated they weren't hungry for dinner, but after tasting the pork they ate an entire serving. The glaze has a nice sweetness, without being over sweet and is balanced nicely by the rosemary. I think for this recipe I prefer using the dried rosemary like I did, so it wasn't overpowering and worked well with the glaze.

For the recipe go to Rosemary-Apricot Pork Tenderloin.

January 10, 2013

Slow Cooker Pot Roast

IMG_0255_zps2a2bde99
The weather in my area is all over the place. It has been cold, warm, foggy, rainy, but not in any way snowy and winter-like. This weekend the temperature is supposed to hit 70, in January! Normally this is the time of the year when I am bundled up in blankets drinking hot drinks and making soups. This year I am still making lots of soups and crock-pot recipes, but the weather feels more like spring than winter. Regardless of the weather I love my slow cooker. As my boys get older and my time feels more and more crunched my slow cooker has saved me many times. I never understood before having kids how hard it can be to get dinner on the table with two boys running around causing chaos. Now I know better and try to make at least one meal a week that is quick and easy. This week I tried a new recipe for Slow Cooker Pot Roast from the January 2013 issue of Family Circle magazine.

This recipe has 11 ingredients. It takes 8 and a half hours of total time, 30 minutes of which is active and makes 4 servings. I would have normally used a chuck roast for this recipe, but in my effort to use things out of my freezer I used the beef cut that my mother-in-law had bought me this fall. The recipe uses 12 ounces of small potatoes, but I chose to use the full pound bag that I bought at the grocery store. Additionally, I chose to leave the potatoes whole instead of cutting them in half. Since I eat gluten free I used cornstarch for the pan sauce and gluten free Worcestershire. Even if you can eat wheat flour I prefer cornstarch since it does a better job at thickening. I followed the remainder of the recipe as written.

Since I didn't use the best cut of beef in this recipe the sauce really made the recipe. The pan sauce was delicious and made up for any shortcomings with the beef being slightly tough. I did wish that there were more vegetables. There was only enough for exactly 4 servings, which was barely enough for my family. If I was to make this again I would double the amount of vegetables and buy a larger roast.

This recipe is not currently available on-line. It can be found in the January 2013 issue of Family Circle. Here is another Slow Cooker Pot Roast recipe from Family Circle.

January 9, 2013

Freezing Fresh Herbs in Ice Cube Trays with Butter or Olive Oil

IMG_0267_zps88b9b4f2

My mother was great at using every last bit of the food she bought. She would use leftover veggies to make stock and the herbs from her garden were used fresh, frozen and dried. I was always amazed at how many thing she could get out of one store bought vegetable or fruit. In the last couple of weeks I have decided to buckle down on our food waste. Now granted I use as many leftovers as possible and am very frugal with making my own stock and cooking from scratch. However, even the best of us can get better and I am making a concerted effort to use every last bit of the food that I buy as much as possible. With that in mind when I had leftover fresh rosemary after making pot roast last night I remembered a great idea that my mother used. Instead of wasting the leftover fresh herbs she would freeze them with butter or olive oil and freeze them in ice cube trays. It was easy and perfect for later meals. So here is my recipe to on how to freeze fresh herbs with butter or olive oil for later use.

IMG_0256_zps3e70ae2a

Start with fresh herbs. My favorite herb to use is Rosemary. It holds up very well to being frozen and is perfect with roasted vegetables, potatoes or chicken. I normally chop up my rosemary finely, since that is the texture that I prefer. However, this recipe would also work with torn or snipped fresh rosemary depending on your preference.

IMG_0263_zps2593ca2d

Next place the rosemary in the bottom of a plastic ice cube tray. Add as much rosemary as you wish. The more rosemary the stronger the flavor will be and the less the weaker the flavor. The amount really depends on personal preference. I normally add approximately 1-1 1/2 tsp per ice cube.

IMG_0264_zps1eed459a

Fill each ice cube with either butter or olive oil. I really like using salted butter. It tastes delicious sliced and placed under the skin of a whole chicken and then roasting. It is also great with mashed potatoes, roasted potatoes or roasted vegetables.

Place the ice cube tray in the freezer until set. Pop out the ice cubes as needed. That's it, easy and a great way to use leftover fresh herbs.

This recipe would also work with other fresh herbs besides rosemary. I have tried it with both oregano and sage and they both work very well.

December 4, 2012

Creamy Turnip Soup


I love soup. There is something very comforting about sitting down with a nice hot bowl of great homemade soup. Growing-up my mother made a ton of soup. As I have talked about before we never had a lot of money so my mother did the most with what we had. We were always getting garden vegetables from friends and my mother would make delicious soup from them. While most kids would turn up their noises at turnips and parsnips, I feel in love with these root vegetables. My mother could turn a hated vegetable into something spectacular. A basic great soup is something to be savored. I am lucky that my two boys will pretty much try any type of food I put in front of them. I started giving them all the foods that my husband and I eat when they were still toddlers so they have never had a fear of new foods. I think this is an important way to teach your kids not to be afraid of trying new foods and new experiences in general. Recently I tried a new recipe for Creamy Turnip Soup from the December issue of Eating Well magazine, which looked like a great winter soup.

This recipe has 11 ingredients. It takes a total time of 45 minutes, 30 minutes of which is active and makes 6 servings. I had no problems finding any of the ingredients at my local grocery store. The turnips sold at my grocery store don't have the greens attached so I followed the suggestion in the recipe and used spinach. I found that when I tried to use my immersion blender on this soup the turnips were not soft enough. They needed to either by sliced much thinner or cooked longer than the time suggested. I let my turnips cook ten minutes more and then used my blender to puree the soup fully. This methods worked much better. I followed the remainder of the recipe as written.

I loved how creamy this soup turned out. The salad topping was the best part of the recipe. It allowed the soup to be less bitter and bring out the flavor of the turnips. Make sure to fully salt the soup at the end. It needed a good amount of salt to taste correct. If you want to make this soup vegetarian you could substitute the chicken stock for vegetable stock. I frequently substitute broths in recipes especially if I am cooking for vegetarian/vegan friends and family.

For the recipe go to Creamy Turnip Soup.

November 27, 2012

Slow Cooker Ham and Navy Bean Soup


My freezer is currently full of soup. In the last couple of months I have made numerous soup recipes and frozen a great deal of them. I freeze in single serving containers in order that all I have to do for a great lunch is pull one out and reheat. It's a great time saver and so much better than canned. I'm also lucky that both of my kids are huge fans of soup and stew. They actually get excited when they discover soup on the stove for dinner. It might be genetic since I seem to always reach for soup when I need some good old fashioned comfort food. There are few things better than a great bowl of soup, a warm blanket and a great book on a cold fall/winter afternoon. Since I also love my slow cooker this time of year I am always looking for new soup recipes that utilize the crock-pot. Recently, I tried a new recipe for Slow Cooker Ham and Navy Bean Soup from the holiday recipes magazine from Better Homes and Gardens, which looked easy and perfect for a cold winter afternoon.

This recipe has 14 ingredients. It takes 5 1/2 hours of cooking, 40 minutes of prep and makes 6 servings. I had no problems finding any of the ingredients at my local grocery store. I chose to use navy beans instead of Lima beans for this recipe. I would love to say that I love Lima beans, but I don't. They are the one bean that I just can't learn to love. My husband loves kale, so that is what I used in this recipe. As I've stated numerous times before I make my own chicken broth and this recipe was no exception. Instead of quick soaking my beans I chose to let the beans soak overnight. I find overnight soaking much easier and less time consuming. Make sure to adequately salt this soup once it's done. I found that I had to add a substantial amount of salt. I followed the remainder of the recipe as written.

If your looking for an easy slow cooker soup recipe, this dish fits the bill. It is very easy to put together and the flavor was perfect. My whole family really liked the flavor and I love that it uses kale which is very healthy. This recipe would also work well with a variety of dried beans, so don't be afraid to experiment.

For the recipe go to Slow Cooker Ham and Lima Soup.

October 3, 2012

Slowcooker Lemony Lentil Soup


I love fall. The leaves, the weather and most importantly the food. I have never been a warm weather person and I pretty much am miserable all summer with the humidity and the heat. No amount of air conditioning ever seems to cool me down enough. When fall rolls around the the temps start to drop, I love it. The weather hasn't gotten bitterly cold, but is just cool enough to start to enjoy great dishes like soups and stew. Beans are one of my favorite ingredients in the fall. There is something very comforting and delicious about all varieties of beans. Luckily my two boys share my love of beans, with one of their favorite fall dishes being bean soup. They absolutely love it and will eat multiple servings. Last week I tried a new recipe for Lemony Lentil Soup from the September issue of Parents magazine, which looked like a perfect fall dish.

This recipe has 12 ingredients. It takes 6 hours of total time, 15 minutes of which is active and makes 4 servings. I had no problems finding any of the ingredients and made no substitutions. I know from previous experience that my local grocery and super stores don't carry red lentils. However, the farmer's market in Charleston does, so I always buy a few pounds and keep it in my cupboard. I love that they have bulk beans, they are a great way to save money. Make sure to mince the carrots and onion. The recipe states to chop both of the ingredients, but my husband and I weren't fans of the texture after being in the crockpot. I would suggest dicing both of the ingredients and then sauteing them in a little bit of butter until they are soft and then adding to the crockpot. This would eliminate the texture problem. I followed the remainder of the recipe as written.

I love lentil soup. The lemon flavor in this soup was delicious and really brought out the flavor of the lentils. The one thing that I was not a fan of was the texture of the carrots and onion. They tasted almost not all the way cooked and they definitely would be better diced and then sauteed instead of chopped. The leftovers of this soup re-heated well and my two boys ate the leftovers happily.

For the recipe go to Lemony Lentil Soup. 

July 11, 2012

Rigatoni with Tomato Sauce

To say that I love pasta would be an understatement. Growing up I was a very picky eater and my mom had a horrible time for a couple of years getting me to eat anything other than McDonald's or cheese. I was lucky that I was so active in swimming, dance and running that I burned off the McDonald's and cheese without consequences, but my mom realized that neither constituted a healthy diet. Then one day my mom decided to make me an Asian noodle dish that she created. I can still remember the first time she made it, I fell in love. To this day it is possibly the best thing that I have ever eaten. With this success my mother branched out to cooking other pasta dishes, with similar reactions from me. So throughout my teens pasta became a household stable. Once I moved out on my own I ate a lot of pasta, but rarely if ever cooked any recipes at home. After getting married I started cooking as much as I could. It was a great way to relieve the stress of working on my thesis and I found some delicious recipes. Now I cook with my two boys and they have the same amount of zest towards pasta that I do. Recently we tried a recipe for Rigatoni in Tomato Sauce from Saveur magazine.

This recipe has 13 ingredients. It takes an hour and a half of cooking time and 15 minutes of prep and makes 6-8 servings. I had no problems finding any of the ingredients at my local grocery store. I did make a few modifications. I chose to leave off the sliced parsley leaves, I struggle with my two boys with eating parsley especially when it's used as a garnish. For the onion I used a vidalia sweet onion, I love them when they are in season and use them frequently. To crush the tomatoes I place them in a plastic bag, seal it and break the them apart with my hands. This makes for a much less messy clean-up. Finally, for the cheese I used Romano since it was what I already had in my fridge. I followed the remainder of the recipe as written.

I love simple recipes full of flavor. This recipe was easy enough that my two boys were able to help me in the kitchen, while still retaining taste. It would work with a variety of pasta types including spaghetti. Plus it made enough for dinner for my family of four plus leftovers for lunch the next day. Overall, an easy pasta sauce recipe that is versatile enough to be used with spaghetti, bow ties etc.

For the link go to Rigatoni with Tomato Sauce.

April 28, 2012

Roast Chicken with Rosemary, Lemon, and Honey

I used to buy a lot of store bought stock. Literally every couple of weeks I was spending approximately twenty dollars at the grocery store for overly salty not great chicken and beef stock. Then a couple of years ago I decided that there had to be a better way. I opened up my mom's old loved and worn cook book and scoured the pages for a chicken stock recipe. After some searching I came across a great recipe that my mom had hand written in the margins. I bought all the ingredients, roasted the chicken and made the stock. It turned out great and I have never gone back to store-bought again. During my first stock experiment I subsequently discovered that homemade roasted chicken is tasty and very easy to make. So once every couple of weeks I roast a chicken and make chicken stock. It's a great way to save money and the leftovers are great for a variety of recipes. The May issue of Bon Appetit magazine had a recipe for Roast Chicken with Rosemary, Lemon, and Honey, which promised great flavor from the fresh rosemary sprigs.
This recipe has 9 ingredients. It takes approximately an hour and fifteen minutes of prep and cooking time and makes 6-8 servings. I did make a few modifications to this recipe. Shallots weren't available at my regular grocery store and rather than go to another store and spend over ten dollars on just shallots, I chose to use an onion and ramps instead. Additionally, the recipe states to cook the chicken for 55 minutes. I found that this length of cooking time was not adequate  to cook the 4.5 pound birds that I bought. The skin on the bird also never fulled crisped up the way that it normally does when I roast chicken. I think that the olive oil, while it kept the bird moist made the skin not as crispy as I like. I followed the remainder of the recipe as written.

The rosemary springs in this recipe made the chicken breast taste delicious and fragrant. I was skeptical when the chicken came out of the oven since the skin wasn't as crisp as my normal roasted chicken. However, once we ate the meat my husband and I were both impressed by how much flavor the fresh rosemary gave to the chicken meat. The leftovers were great for chicken salad and I have frozen the remainder since it will make a great chicken pot pie in a couple of weeks. Overall, while the skin isn't overly crispy the meat is moist and delicious.

For the recipe go to Roast Chicken with Rosemary, Lemon, and Honey.

February 11, 2012

Martha Stewart Living Parsnip-Rosemary Muffins

I love baking and cooking with fresh herbs. The smell of freshly snipped herbs is wonderful and creates great flavor in recipes. I would love to have the space to have a garden outside or cats that didn't eat anything green in the house (trust me I have tried too many times to count). As it is I normally have to go to at least two grocery stores to find all the fresh herbs that I want every week. Luckily I love the taste enough that it's worth the hassle. My two boys are just beginning to appreciate the subtle flavors fresh herbs provide and I have been experimenting with a number of new recipes. Recently, Martha Stewart Living had a recipe for Parsnip-Rosemary Muffins, which looked unusual and utilized fresh rosemary.

This recipe has 10 ingredients. It takes 1 hour and 25 minutes and makes 14 muffins. I had no problems finding any of the ingredients at my local grocery store. I used whole milk Greek yogurt instead of the plain low-fat yogurt suggested by the recipe. I already had the Greek yogurt in my fridge (I eat it every morning) and I didn't want to spent money on additional yogurt that wasn't needed. I peeled my parsnips before grating them into the recipe. The recipe didn't recommend this step, but I prefer root vegetables grated. I followed the remainder of the recipe as written.

I liked the unusual flavor of these muffins. They made a great dinner side for the meat dish that I prepared alongside and had a delicious flavor from the fresh chopped rosemary. My two sons ate numerous muffins without realizing that they weren't the usual sweet muffins that they normally eat. Overall, a nice combination of flavors that would go well with a variety of main dishes.

For the recipe go to Parsnip-Rosemary Muffins.

January 30, 2012

Redbook Cauliflower and Tomatoes

My two kids were great about eating their vegetables until about a year ago. Now they love fruit and will eat whole bags of apples a week, but getting them to eat the vegetables on their plate can be hit or miss. My husband on the other hand is the opposite, he love vegetables and will eat as many as I put in front of him, but it's like pulling teeth to get him to eat a piece of fruit. I fall somewhere in the middle, I love both fruit and vegetables and eat large servings of each everyday. One of my favorite ways to get everyone in my household to eat their vegetables is to roast them. Roasted vegetables have a delicious nutty flavor and are very popular in my house. Combining fresh herbs and roasted vegetables is easy and flavorful and Redbook magazine recently had a recipe for Roasted Cauliflower and Tomatoes which looked perfect for my family dinner table.

This recipe has 8 ingredients. It takes 30 minutes of prep and cooking time and makes approximately 4-6 servings. I had no problems finding any of the ingredients and made no substitutions. There were a few things with the recipe that I had to change. The temp was too high and the roasting time too long. I ended up roasting the recipe at 400 degrees for 20 minutes. I also made sure to toss the cauliflower twice during the cooking time or they would have otherwise burned. Granted I did make my cauliflower heads small, so if you keep the heads on the larger side than the original temp and time might work more sufficiently. I followed the remainder of the recipe as written.

Roasted vegetables are a great way to get people who hate boiled or steamed vegetables to eat a recipe. I liked that this recipe was simple and the combination of the cauliflower and rosemary worked well together. The tomatoes created a nice sweet flavor and the garlic brought everything together. Overall, a great, easy and flavorful vegetable side dish recipe.

For the recipe go to Cauliflower and Tomatoes.

January 23, 2012

Everyday Food Roasted Squash with Parmesan Herbs

One of my favorite things about the fall is the abundance of inexpensive squash. For many years I only made acorn squash roasted with maple syrup or brown sugar. As I got older I branched out to other types of squash and absolutely fell in love with butternut and spaghetti squash. I love how easy it is to create a delicious pasta dish with roasted squash and how little effort it takes. The squash I use the most is butternut squash and since I use it so frequently I figured that it was time to try other squash varieties. Recently, Everyday Food Magazine had a recipe for Roasted Squash with Parmesan and Herbs, which looked delicious and different than my normal squash routine.

This recipe has 10 ingredients. It takes one hour and twenty minutes to roast the squash,15 minutes to prepare the dish and makes 6 servings. All the ingredients were easy to find at my local grocery store and I made no substitutions. I used flat leaf parsley, which is the only kind that my husband will eat, he doesn't like the texture of regular parsley. The longest part of this recipe is making sure to remove the seeds and scraping out the flesh of the squash after roasting. I actually added more than the recommended 2 tablespoons of Parmesan cheese, my family loves cheese so I added more than twice the amount. I followed the remainder of the recipe as written.

Getting my kids to try new types of vegetables can often be difficult on the best of days. This recipe was well received by both of my boys, they actually thought the squash was pasta. I liked that one squash made more than enough for my family of four and the taste of the fresh herbs was delicious. A great way to try new squash varieties and very kid friendly.

For the recipe go to Roasted Squash with Parmesan Herbs.

December 29, 2011

Eating Well Warm-Potato Salad with Bacon-Mustard Dressing

Potatoes are one of my favorite foods. Growing up every Sunday my dad would get up early and start fried potatoes. Those fried potatoes to this day are one of the most delicious dishes I have ever had. I have tried to duplicate them in my own house and they never seem to be as good as the ones my dad made. My dad and husband have told me that I'm too impatient with the potatoes and flip them too often and too soon. They are probably right, they are both way more patient than me. Instead of obsessing over perfecting fried potatoes I have fallen in love with trying new types of potato salad. Not the store bought overly mayonnaise based varieties, but real homemade potato salad. Eating Well Magazine recently had a recipe for Warm Potato Salad with Bacon Mustard Dressing, which looked easy and low in fat and calories.

This recipe has 10 ingredients. It takes 40 minutes of total time and makes 10 servings. All the ingredients are basic and I had no problems finding any of them at my local grocery store. The fingerling potatoes cooked quicker than the recipe suggests so make sure to turn them frequently in order to prevent burning. I let my potato salad cool slightly before serving, my husband wasn't a fan of the salad being hot when served. I followed the remainder of the recipe as written.

The dressing on this potato salad is delicious. It is the perfect combination of sweet and savory and makes a great compliment to the potatoes and apples. The best part of this salad is that it only contains 129 calories and 4 grams of fat per serving. Even my two boys enjoyed this salad, including my currently very food picky three-year-old. There are more than enough servings to take to a party or potluck or for multiple family meals.

For the recipe go to Warm Potato Salad with Bacon-Mustard Dressing.

December 19, 2011

Food Network Magazine Chipotle and Rosemary Roasted Nuts

I am not one of those people that can limit themselves on nuts. The whole idea of eating 10 almonds for a serving doesn't fit with my snacking personality. I'm lucky that I am constantly moving and burning calories, so I look for high protein snacks that will tide me over until my next meal. As I've stated before I tend to eat 6 smaller meals throughout the day, instead of three large ones. I am drawn towards sugar, so I try to find protein snacks that will satisfy my sweet tooth while providing energy. As I was looking through the December issue of the Food Network Magazine I came across a recipe for Chipotle and Rosemary Roasted Nuts, which looked like a great sweet and savory protein snack.

This recipe 11 ingredients. It takes a total of 35 minutes, 10 minutes of which is active, and makes 8 to 10 servings. I thought that I had chipotle powder in my cupboard, but when I got ready to make the recipe I discovered that I did not. Instead I substituted Ancho chili powder, which I do relatively frequently in recipes. I chose to combine all my ingredients in a bowl and then pour onto a baking sheet. This way all the nuts were evenly coated. Make sure to watch the nuts while they are in the oven. I probably turned the nuts about every 8 minutes in order to prevent burning. I would not suggest turning down the heat though, the temp needs to be high enough to caramelize the brown sugar. I followed the remainder of the recipe as written.

The sweet flavor from the brown sugar combines nicely with the savory flavors from the rosemary and chili powder. This recipe makes a lot of nuts, so it would be great as a party snack. If you are making it for your family I would suggest cutting the recipe in half unless you have two growing boys like I do. I served this as an after school snack to my oldest and he loved it. Overall, an easy sweet and savory snack.

For the recipe go to Chipotle and Rosemary Roasted Nuts.

December 10, 2011

Family Circle Apple-Sausage Stuffing

I'm lucky that my husband will normally eat my food without complaints. However, the one complaint that he frequently voices about my culinary skills is my lack of ability to make a dish more than once. My husband claims that if he likes a dish and tells me how much he enjoys it, he will never see it again. I think he has now gotten to the point that he never tells me if he loves something for fear that it will never make an appearance at the dinner table again in the foreseeable future. The one exception to this rule is the holidays. I am pretty stuck in my ways about what I like to fix at Thanksgiving, Christmas and Easter. Every once in a while I will try a new variety of mashed potatoes or biscuit, but the main food categories still remain. In the weeks leading up to Thanksgiving this year I decided to experiment with new side dish recipes and came across a recipe for Apple-Sausage Stuffing in the November issue of Family Circle magazine, which looked easy to prepare and a great new way to make a traditional holiday side dish.

This recipe has 13 ingredients. It takes approximately at hour to prep and cook, and makes 8 servings. All the ingredients I was easily able to find at my local grocery store. I used homemade chicken stock and whole-wheat bread which I made the day before to save time during dinner prep. Since I don't salt my chicken stock I had to add a larger amount of salt than if I had bought store bought stock. I found the stuffing to be too dry with the amount of chicken broth stated in the recipe, I would suggest adding additional stock until the stuffing looks sufficiently moist. As written the stuffing was too dry for my family's liking. I would also suggest making sure that your cubes of bread are small enough for them to get toasted adequately. Normally I would always use homemade bread, but this recipe I think might actually work better with store bought. I found that the consistency of the homemade bread didn't work as well as I would have liked. Part of that could have been due to the fact that 10 slices of homemade bread can be vastly different than 10 pieces of store bought. I followed the remainder of the recipe as written.

I liked the combination of the granny smith apple and the sweet sausage in this stuffing. It lent a nice sweet/tart taste to the overall flavor of the stuffing. I think I would have preferred white bread for the bread cubes. The whole-wheat was a little over powering to the rest of the flavor. White bread would allow the flavor of the granny smith and sausage to shine through more effectively. Overall, this recipe would work well as a side dish for poultry or pork and takes very little prep. 

For the recipe go to Apple-Sausage Stuffing.

November 23, 2011

Rosemary Roasted Nuts

I have a horrible snacking habit. Growing up I would drive my mom crazy when I would come home from school and eat half the fridge. I would then go on to eat dinner and snack again before bed. I was lucky to have inherited my dad's genetics, which pre-disposed me to being tall and thin, the opposite of my mother's family. My mother was always determined that my snacking would make me overweight, but eventually gave in to the fact that I snack instead of eating big meals. As an adult I have become even worse with my snacking. My two kids are constantly on the go, so I have become adept at snacking throughout the day since I end up missing meals. One of my favorite snack foods is nuts. They taste great and have enough protein to keep my energy levels up. Recently I found a recipe for Rosemary Roasted Nuts on recipe.com, which loved very simple and a great way to get more nutrition into my snacks.

This recipe has 5 ingredients. It takes 10 minutes of prep and 20 minutes of baking, and makes a total of 12 servings. All the ingredients are basic, with the exception of the nut varieties. I would love to be able to purchase hazelnuts, however, they only come once a year at my local grocery store during the fall. Additionally they are always in the shell, so I passed and instead I used all whole almonds. I chose to use fresh rosemary, I prefer the taste of fresh herbs to their dried counterparts. Make sure to watch the nuts during the baking time or they could burn. My nuts had to be pulled out at exactly 15 minutes or they would have been overdone. I followed the remainder of the recipe as written.

These nuts have a great subtle flavor, which is delicious. The recipe is very easy to prepare and takes little total time. My whole family enjoyed snacking on these and they were able to tide me over until my next meal. The best part of this recipe is that they are great as an everyday snack, but would work equally as well as a snack food for a party.

For the recipe go to Rosemary Roasted Nuts.

November 20, 2011

Better Homes and Gardens Roasted Vegetables and Chickpeas

As I've stated numerous times before I love fall. The spices, the tastes, the smells, everything about fall cooking appeals to me immensely. Growing up fall was full of family functions and tons of baking and cooking by my mother. Coming from a very large family, she was used to making enough food to feed an army, so family functions involved a large amount of prepping and cooking. Fall vegetables were one of the highlights of the fall season in my household, a tradition which has translated to my own much smaller family. One of my favorite vegetables in the fall are sweet potatoes. The November issue of Better Homes and Gardens magazine had a recipe for Roasted Vegetables and Chickpeas, which looked simple, full of fall flavor, and delicious.

This recipe has 11 ingredients. It takes approximately 30 minutes of prep and 45 minutes of roasting time, and serves 8 people. All the ingredients are basic and I had no problems finding any of them at my local grocery store. Be sure to watch the vegetables carefully and stir approximately every fifteen minutes. The tops of the vegetables will otherwise burn, especially the red onions. Instead of dried rosemary, I used fresh snipped rosemary. I prefer the taste of fresh herbs when available to their dried equivalents. I followed the remainder of the recipe as written.

There are few things better than fresh, roasted vegetables. This recipe is simple, and full of flavor. I appreciated how the recipe lets the vegetables speak for themselves, without adding unnecessarily spices. My two boys particularly appreciated this recipe, especially the carrots. The flavors are simple and delicious and overall, a great fall recipe.

For the recipe go to Roasted Vegetables and Chickpeas.

Related Posts Plugin for WordPress, Blogger...