Showing posts with label Cheddar. Show all posts

August 10, 2013

Summer Vegetable Chili

Summer Vegetable Chili


My son is enamored with a pet rat. The first thing I heard as he got off the bus his first day of school was that his classroom had a new pet, a hairless rat. Apparently they are also getting two hamsters next week. He is obsessed now. At the library he wanted all books on rats and he talks about it constantly. I think it's pretty cute. We have three dogs and three cats, but we haven't had any small pets since before he was born. Before kids my husband and I had dwarf hamsters and I grew up with gerbils. I haven't allowed my boys to have any small pets yet, since they are a little small to be able to understand being gentle. Having a classroom pet is the perfect compromise. My oldest son feels an attachment and responsibility for a small animal and I don't have to do the daily care etc. I love it. With last week being the first week of school I didn't do a lot of cooking, but this weekend it's back to the kitchen. Today I tried a new recipe for Summer Vegetable Chili from the June 2013 issue of the Food Network Magazine.
Owingsville, Kentucky

This recipe has 16 ingredients. It takes 40 minutes of total time, 25 minutes of which is active and makes 4 servings. I only made a few modifications to the original recipe. First I always use canola oil instead of vegetable oil, I prefer it for heart health. I bought regular frozen corn since I have never seen fire-roasted at the stores near me. Additionally I purchased regular beans and tomatoes not low sodium since the store I went to only had one variety. I cooked the beans on high for the 20 minutes of cooking time, watching it closely to ensure that it did not burn. Using a dutch oven is a great way to make chili, it heats evenly and is big enough to make big batches. I found that I had to add more salt at the table, but that is more of a personal preference, if you like food with less salt it would be fine as written.
Country Roads Kentucky

The mushrooms in this recipe really made the dish. They allowed for the chili to have a lot of flavor. Plus my husband who isn't a big fan of vegetarian chili really liked this recipe. With the mushrooms it was definitely more male friendly. My two boys were skeptical, but after tasting it they ate their whole bowls. The recipe states that it only makes 4 servings, but after my family of 4 had a dinner sized portions there was more than enough for at least another meal.

For the recipe go to Summer Vegetable Chili.

Summer Vegetable Chili


Recipe Type: Main
Summary:
An easy vegetarian chili recipe that has great flavor from the addition of portobello mushrooms. Makes enough servings for multiple meals.
Preparation Time: 0h, 25m
Total Time: 0h, 40m
Yield: Serves 4

July 22, 2013

Regional Food Trends: Kentucky Beer Cheese

Click for Recipe for Kentucky Beer Cheese
Kentucky Beer Cheese


Each state has at least one signature food. West Virginia is the home of the pepperoni roll. If you have never had one, they are delicious. A sweet, yeasty roll with pepperoni and sometimes mozzarella or pepper jack cheese. Growing up in Seattle everything revolved around salmon and pan-Asian food. I learned to make sushi when I was 9 and still love it to this day. Where you grow up has a large influence on the types of food you eat and what you learn to cook. When I moved to West Virginia I had no idea how to cook southern food. I had never made a biscuit in my life and I had only made gravy from a can. After meeting and marrying my husband I turned to my mother-in-law for help. Over the past 10 years I have learned to make all the foods my husband loves. My husband's side of the family lives in Kentucky and he is obsessed with Kentucky foods. He is obsessed to the point he stocks up on Ale 8 when we go to the grocery store on the other side of the river. One of his favorite regional foods is Kentucky Beer Cheese, so I tried a new recipe for it this week.

This recipe has 7 ingredients. It takes 15 minutes of total time, all of which is active and makes 16 servings. My husband made the majority of this recipe and he made a few changes. I had to help him use the blender since I don't think he had ever used it before. He was a fast learner though. For the cheddar he used extra sharp cheddar, PBR beer, 3 cloves of garlic, Tabasco and a slight amount of horseradish. When I blended the cheese in the blender I added it in batches, putting the beer in first. After the cheese was blended I let it sit overnight in the fridge for the taste to mellow.

The first day this cheese is made it's pretty strong. However, by the second day it's perfect. I would suggest cutting the garlic down to only 2 cloves and my husband thinks that it would be better with Yuengling beer. It is great served with crackers or spread on a toasted baguette.

Does your region have a food that it is known for? (I love finding out about regional foods!).

For the recipe go to Kentucky Beer Cheese. 

March 11, 2013

Sweet Chili Rolls with Homemade Hamburger Buns

click for recipe for sweet chili rolls with homemade hamburger buns
Sweet Chili Rolls with Homemade Hamburger Buns

I am finally feeling back to normal after having strep throat. Luckily I got antibiotics this weekend and after being sick for almost two weeks, I am feeling somewhat back to normal. I don't think that winter and me get along, I never seem to get a little sick, I get very sick. Last winter it was pneumonia and this winter it was strep. I promise that my posting schedule will be back to normal this week, things have been a little crazy while I was sick. When I get sick I rely heavily on my crock-pot to cook, I love it. There is nothing easier than taking out the ingredients in the morning, putting them in the slow cooker and by dinner it smells and tastes delicious. Last week I tried a new recipe for Sweet Chili Rolls from the October 2012 issue of Family Circle magazine.
click for recipe for Sweet Chili Rolls with Homemade Gluten Free Hamburger Buns
Sweet Chili Rolls with Homemade Gluten Free Hamburger Buns

This recipe has 12 ingredients. It takes 8 hours 15 minutes of total time, 15 minutes of which is active and makes 8 serving. I did make a few changes to the original recipe. First instead of using store bought buns I made my own. For my family I made regular hamburger buns and for me a gluten free version. For the ketchup I used the kind that uses real sugar. I try to limit the amount of high fructose corn syrup that my family consumes and a lot of brands of ketchup are full of it. I am a big proponent of label reading. Instead of canned pinto beans I made them from scratch. It is much cheaper to buy beans dried and prepare them. I make big batches at a time and then freeze them in small containers that are equal to the amount in 15 ounce cans. Finally, since it isn't Vidalia season I used a regular sweet onion.

My two boys really loved these sandwiches. They left off the cheddar cheese for their servings and my husband used pepper jack on his. The recipe claims that it makes 8 servings, but it made more than enough for my family of 4 with a large number of leftovers. The sandwiches are a little sweet, which could be adjusted by adding a spicier chili powder.

For the recipe go to Sweet Chili Rolls. (registration required)

March 8, 2013

Grilled Cheese with Bourbon Melted Onions and Homemade Bread

click for a recipe for grilled cheese with bourbon melted onions and homemade bread
Grilled Cheese with Bourbon Melted Onion and Homemade Bread

Today the weather was mild and it made me think about spring. I love spring and I am so ready to start my garden and enjoy the warmer weather. One of the other things i love about spring are the vegetables. In my house spring vegetables means one thing, ramps. Haven grown-up in Seattle I had never heard of a ramp before moving to West Virginia. Then I happened to marry someone from the edge of the Monongahela National Forest and the heart of ramp country. The first year we were married his mom brought us a large bag of dirty roots, I thought she was crazy. Then my husband explained that they had to be cleaned first and then could be used the same way as a onion or leek. I feel in love with them. Now every March I start asking my mother-in-law if the ramps have started to appear. With the warmer weather and start of March I am busy thinking about all the dishes that I will make this spring. Onions in general are a big spring item in my household and this week I tried a new recipe for Grilled Cheese with Bourbon Melted Onions from Redbook Magazine.

click for recipe for gluten free grilled cheese with bourbon melted onions
Gluten Free Grilled Cheese with Bourbon Melted Onions

This recipe has 9 ingredients. It takes 33 minutes of total time, all of which is active and makes 4 sandwiches. I made two versions of this sandwich, one for my husband and two boys and one for me. For my version I used gluten free bread, which I made from scratch and for the version for my family I made homemade crusty bread using the Dutch oven. For the cheese I followed the suggestion and used Gruyere and Sharp Cheddar. Instead of grilling the sandwiches on the stove I used my indoor electric griddle. I love using my griddle, it reduces the chance of burning and the crust always comes out even.

I served the sandwiches with tomato soup and the combination was delicious. The recipe for the tomato soup will be up on my blog tomorrow night. My boys ate their servings without the onions. They aren't fans of onions, but love grilled cheese sandwiches so they loved them none the less. My husband absolutely loved the sandwiches with the homemade bread and ate three for dinner. This recipe was definitely a hit and can be modified to use whatever type of cheese you prefer.

For the recipe go to Grilled Cheese with Bourbon Melted Onions.

December 17, 2012

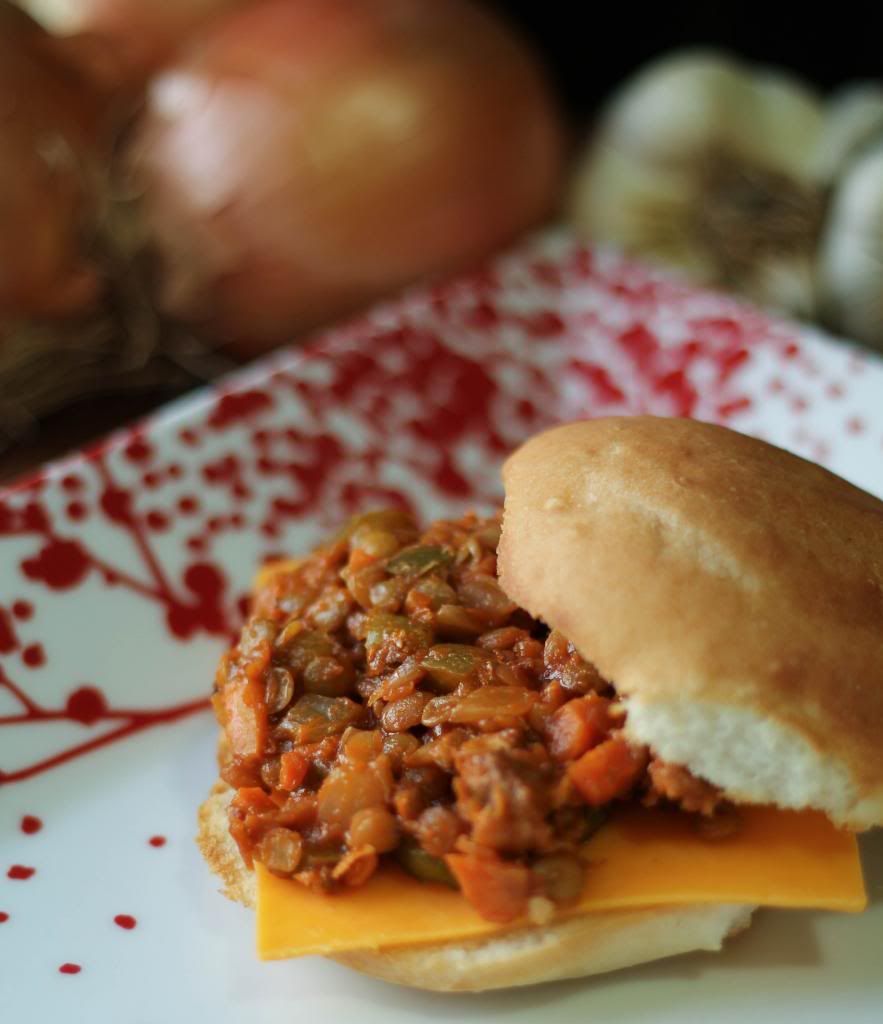
Lentil Sloppy Joes

Photobucket

I can't believe that Christmas is next week. This month/year have gone by so quick! I am taking a laid back approach to the holidays this year. As I have gotten older I have realized that all the craziness of the holidays that I put myself through when I was younger just isn't worth all the stress. My boys are now 4 and 6 and I fully expect to enjoy Christmas instead of obsessing about everything being perfect. Things will still be great, even if the presents aren't perfectly wrapped and dinner is simple, yet still delicious. This year I am determined to enjoy my kids and the time that I have with them. I am old enough now to realize that these moments are fleeting and I would rather enjoy the time than run around making myself tired and cranky. Since next week will be so busy I have been making meals that are easy to put together, while still being nutritious and flavorful. Last week I tried a new recipe for Lentil Sloppy Joes from the December issue of the Food Network Magazine, which looked like a great way to add fiber and iron into my family's diet, while still being low in calories.

This recipe has 15 ingredients. It takes a total of 1 hour 10 minutes, 30 minutes of which is active and makes 6 servings. I did decide to make a few changes to the recipe. First I was not motivated to make ground beef, so I substituted ground lamb instead. Secondly, since I eat gluten free I used gluten free hamburger buns. I would normally make them from scratch, but this time I bought store bought. I chose to use sliced pickles, but not the pickled jalapeno peppers. The recipe suggests that you may need to add up to an additional cup of water in order to cook the lentils, but I did not need to make this addition. I did find that the lamb was a little rich, but a mixture of lamb and beef would be perfect. I followed the remainder of the recipe as written.

I was surprised how great these sloppy joes turned out. I wasn't sure how the lentils would taste, but they worked great with the meat and were a good way to save fat and calories. My husband added jalapenos to his serving and he thought that they were a great addition. If you like spicy foods this would be a great way to add some heat. 

For the recipe go to Lentil Sloppy Joes.

November 22, 2012

Gluten Free Cheddar Chive Corn Muffins


This has been a long day. I started cooking and baking yesterday and finally sat down this evening. Everything turned out great thankfully and I even had time to do a a craft with my two kids. Index cards, glitter and ribbon can make great place cards and my kids had a blast helping me make them. I am also happy to report that my first gluten free Thanksgiving went off without hitch. My gluten free pie crust was wonderful and the coffee cake muffins I made for breakfast were delicious. I went non-traditional and made Cornish game hens instead of turkey and my two boys devoured them. They were definitely a hit. Now that I have made Thanksgiving gluten free I am much more confident with my gluten free baking skills and I feel so relaxed. It was  great Thanksgiving. Gluten free baking can be hit or miss. Sometimes things turn out great and other times they are a disaster. Recently I tried a new recipe for Cheddar-Chive Corn Muffins from the December issue of Food and Wine which I made into a gluten free breakfast for my family.

This recipe has 13 ingredients. It takes 30 minutes of total time, 10 minutes of which is active and makes 12 muffins. I had no problems finding any of the ingredients at my local grocery store. I chose to use red pepper jelly since that was the variety available at the store I shopped at. Instead of the 1 1/2 cups of all-purpose flour I used a gluten free all-purpose flour that uses coconut flour. I also used muffin liners since gluten free muffins tend to fall apart easier than those with gluten. Finally, I ended up with 15 muffins instead of the 12 stated by the recipe. I followed the remainder of the recipe.

The pepper jelly/cream cheese spread in this recipe was delicious. I served the leftover jelly with crackers and it made a great spread. The muffins turned out well, they rose effectively and were not dry like a lot of gluten free recipes can be. The cheese made the muffins savory and slightly sweet, with the pepper jelly making a great compliment.

For the recipe go to Cheddar Chive Corn Muffins.

November 13, 2012

Gluten Free Jalapeno and Cheddar Cornbread


I really love bread and baked goods. As far back as I can remember I have wanted donuts over potato chips, bread over Cheetos. My mother on the hand had a rather large potato chip and popcorn obsession. She could take or leave bread, but anything salty she would go to town on. When I had my doctor confirm my fears that gluten was the reason I was having a vast array of problems I had my food life flash before me. No more bread or baked goods, I was devastated. However, I then got determined. There was no reason I couldn't still eat the foods I love with a few changes. So I set about re-working recipes to be gluten free. I have been lucky that I have had far more successes than failures. Next week is Thanksgiving and then Christmas will be here before you know it. I am a little nervous about dealing with being gluten free during the holidays. I have a major sweet tooth and I know that almost all the food will be things I can't have. So I have been making all my favorites at home modified. Last week I made pumpkin bread and muffins and they were delicious. Next week I am going to attempt a gluten free pumpkin pie. One of my favorite baked goods is cornbread. Cornbread with butter and honey is so good! Last month I tried a new recipe for Gluten Free Jalapeno and Cheddar Cornbread from the November issue of the Food Network Magazine, which looked easy and flavorful.

This recipe has 13 ingredients. It takes a total of 1 hour, 25 minutes of which is active and makes 6 to 8 servings. I had no problems finding any of the ingredients at my local grocery store and I made no ingredient modifications. I found a great gluten free flour that uses coconut flour. It is perfect for gluten free baked goods, my two boys can't tell that they are eating gluten free. I have a horrible time with cast-iron skillets. Growing up in the Northwest I never owned one until I moved to West Virginia. The first year my husband and I were married my mother-in-law gave me a cast iron skillet. I washed it and it rusted. That was a lesson I learned quickly. I also decided that I am horrible about keeping cast iron seasoned. So I rarely use cast-iron skillets, I just can't seem to get the hang of them. For this recipe I made muffins instead. The recipe made a total of 12 muffins, which I cooked at 400 degrees for 20-25 minutes. Make sure not to overly stir the batter. Stir just until combined, it will make your cornbread rise more effectively. I followed the remainder of the recipe as written.

For gluten free cornbread this turned out pretty well. I would suggest a few changes though. First, I would not seed the jalapenos. The cornbread needed more flavor and keeping the seeds would definitely provide this. Second, I would add more fat into the batter. I always use bacon grease melted into the bottom of the pan or muffin tin. This method would definitely help this recipe. Most cornbread recipes have at least 1/4 cup of butter, so the fat in this recipe needs to be increased. Finally, instead of cheddar cheese I would use Monterey Jack. The cheddar cheese just ends up tasting a little on the bland side. With these changes I think this recipe could be a great gluten free option.

For the recipe go to Gluten Free Jalapeno and Cheddar Cornbread.

February 28, 2012

Martha Stewart Living Three-Cheese Gougeres

If you've followed this blog for any amount of time you know that I love cheese. When my husband and I traveled when we were younger I was the one interested in the various local cheeses and food, not the shopping and tourist attractions. My two kids have followed in my foot steps and are often caught in front of the fridge eating large amounts of goat cheese. Since I eat cheese so frequently I am always experimenting with new recipes and cooking methods. In the past year I have tried more than a few gougeres recipes, but none have turned out as well as I hoped. Recently, Martha Stewart Living magazine had a recipe for Three-Cheese Gougeres, which looked promising and full of one of my favorite foods, cheese.

This recipe has 10 ingredients. It takes approximately 55 minutes of prep and cooking time and makes 26 puffs. I actually had to buy new white wine since the bottle in my fridge had been in there so long that it had brown sediment when I poured it. I was able to find all the ingredients easily at my local grocery store and I didn't have to make any ingredient modifications. I weighed out my cheese on my food scale to insure proper amounts in the recipe. If you don't already utilize a food scale I highly recommend buying one, having exact amounts of an ingredient can really make or break a recipe. Watch the gougeres the last 10 minutes of cooking time. I actually rotated my pans and switched them halfway through the cooking time to prevent burning and ensure even browning. I followed the remainder of the recipe as written.

I was impressed by how well these gougeres turned out. In many of the previous recipes that I have tried the puffs never actually puffed up and stayed flat. These gougeres turned out beautifully. I like that they use three different cheeses and would be perfect for a party or brunch. I served my gougeres as a side with red meat and the combination was perfect. They would also work well with a variety of other meats or soups. Overall, a better recipe for gougeres than the previous ones that I have tried and great for a party.

For the recipe go to Three-Cheese Gougeres.

January 14, 2012

Taste of Home Cheddar Gougeres

So after a long hiatus I am back to blogging. Thanks everyone for sticking with me while I recovered from being sick. I have always eaten healthy, but after being diagnosed with low potassium I have gotten much better about eating fruit and making sure that I have breakfast. I can definitely feel a difference and I have more energy than I have had in a very long time. So it's back to business as usual and a new recipe. As I've stated many times before my family loves cheese. My three year old can eat more cheese than anyone I've ever met and is often seen sneaking cheese from the refrigerator. Since my family eats such a large amount of cheese I am always looking for a new spin on ways to prepare cheese dishes and I was intrigued when the December/January issue of Taste of Home Magazine had a recipe for Cheddar Gougeres.

This recipe has 8 ingredients. It takes approximately 30 minutes of prep and 15 minutes of baking time and makes 3 dozen gougeres. All the ingredients are basic and I had no problems finding any of them at my local grocery store. This recipe was very easy to prepare. The one problem I encountered is that my gougeres did not rise as much as the photos on the webpage recipe. I would assume this is due to the dough still being slightly warm when I added the eggs, cheese, chives and garlic. Instead of letting the flour mixture sit for 5 minutes, I would suggest letting it cool completely before adding the remaining ingredients. I also found that my gougeres took longer than the 14-16 minutes suggested by the recipe. Finally, I made sure to rotate my pans halfway through the baking time to prevent burning/over browning. I followed the remainder of the recipe as written.

Three dozen is a lot of gougeres! This recipe makes more than enough to feed a crowd and would be great for a party or dinner get together. Even though my gougeres didn't rise as much as I hoped, they still turned out delicious and my two boys were big fans of this recipe. I think in the future I would modify the resting time to ensure proper puffing. Overall, a great new way to use cheese.

For the recipe go to Cheddar Gougeres.

January 2, 2012

Parents Magazine Chili Con Carne

As I've stated numerous times before my family loves meat. If given the choice my husband would eat only bacon and pork with every meal. Since this wouldn't be the healthiest option I try to incorporate as many beans and other non-meat proteins as I can. I still serve meat I just make it an ingredient as opposed to the center of a meal. Recently, the November issue of Parents Magazine had a recipe for Chili Con Carne with 25 grams of protein and only 9 grams of fat, which looked like perfect combination of beans and meat for my family.

This recipe has 14 ingredients. It takes approximately 20 minutes and makes 4 to 6 servings. All the ingredients I either already had in my pantry or were easy to find at my local grocery store. I ground my own beef since I believe it tastes better and I can control the amount of fat. Make sure to adequately rinse the canned beans or the taste will effect the taste of the chili. I chose to leave off the optional corn chips or brown rice and chopped cilantro. I followed the remainder of the recipe as stated.

With 25 grams of protein this is a very filling dish. Both of my boys ate their whole servings and it made more than enough for a meal for my family of four plus leftovers. I liked that the chili had both beans and meat for protein and was full of flavor. Overall, a very family friendly recipe.

For the recipe go to Chili Con Carne.

December 3, 2011

Better Homes and Gardens Double-Cheddar Holiday Biscuits

As I've stated before I absolutely love cheese. I have been caught many times eating almost a whole block of cheese from the fridge. The rest of my family holds the same feelings towards biscuits that I have for cheese. West Virginians take their biscuits very seriously, there is even a whole chain of biscuit fast food restaurants that have lines around the corner most mornings. It has taken me the whole eight years that my husband and I have been married for my biscuits to be considered better than just adequate. Biscuits are serious business around here. Recently, Better Homes and Gardens magazine had a recipe for Double-Cheddar Holiday Biscuits, which combined two household favorites, cheese and biscuits, and looked like the perfect accompaniment to my Thanksgiving meal.

This recipe has 10 ingredients. It takes 20 minutes of prep and 16 minutes of baking time and makes 24 biscuits. All the ingredients are basic and I had no problems finding at my local grocery store. I always use whole fat buttermilk and this recipe was no exception. I rarely use low-fat buttermilk even if a recipe calls for it, the taste seems unauthentic to me. Instead of rolling the dough out to cut the biscuits I followed the way that my mother-in-law taught me a long time back and hand patted out the dough and used the top of a plastic cup to cut. I have also used the top of measuring cups to cut out biscuits before and that works well also. I did not pierce the dough, I forgot to do the step and have never done it to my biscuits before, so I don't think the step is necessary, my biscuits rose nicely without. I followed the remainder of this recipe as written.

I must say this was one of the highlights of my Thanksgiving spread. Everyone absolutely loved these biscuits and they were the perfect accompaniment to the collard greens that I served. The two cheddar cheeses blended perfectly together and made for a rich and delicious biscuit. Most importantly these biscuits are very versatile and would work well as either a side dish or a breakfast food.

For the recipe go to Double-Cheddar Holiday Biscuits.

November 8, 2011

Everyday Food Cheese Crackers

I have a slight obsession with cheese. Growing up I wouldn't go for chocolate, or candy, but instead I was fascinated by the fancy cheese section of our local grocery store. I loved going out to restaurants to try new types of cheeses and recipes, and would spend hours in the local Italian grocery store which had a huge fresh cheese section. I wasn't surprised when my youngest son started taking blocks of Parmesan out of the fridge and eating it like an apple. He doesn't seem to understand that blocked cheese isn't a snack that most children would request before candy. As I was looking through the November issue of Everyday Food magazine I came across a recipe for Cheese Crackers, which looked perfect for my cheese loving family.

This recipe has 7 ingredients. It takes 4 and a half hours of prep, chilling, and baking time and makes 24 crackers. All the ingredients are very simple and I either already had in my pantry or they were easy to find at my local grocery store. Make sure to watch the crackers, they burn easy, I took mine out at exactly 15 minutes of baking time. I followed the remainder of the recipe as written.

These are best eaten the day they are made. After sitting for a day they become far less crisp. My two boys really like these crackers and ate the majority of the recipe by themselves. The best part of this recipe is that it could easily be modified to include other types of cheeses, bacon, or fresh herbs. I think when I try it again I will add cooked chopped bacon, a crowd pleaser with the men in my family.

This recipe is currently unavailable online. However, it can be found in the November issue of Everyday Food magazine. I did find some other cracker recipes on the Martha Stewart website, which are Peppery Cheese Crackers and Mushroom and Blue Cheese Crackers. They look just as delicious and I plan to try them in the future. Tell me if you have/or do try them!

September 29, 2011

Taste of Home Italian Sausage Quiche

Growing up I loved eggs. My mom would make me sunny side up eggs and toast before school every morning and I was ecstatic. When I moved out on my own, my eggs never tasted as good as my moms and I stopped making them as frequently. However, I never stopped making one of my favorite egg dishes, quiche. I love just about every type of quiche, it's delicious. The October issue of Taste of Home magazine had a recipe for Italian Sausage Quiche, which looked perfect for my love of eggs.

This recipe has 14 ingredients. The prep time is 30 minutes, with 35 minutes of bake time. I had no problems finding any of the ingredients at my local grocery store, and I had the majority already in my pantry cupboard. I was unable to find bulk Italian sausage, so I used regular Italian sausage and took it out of the casing, adding about 5 minutes to my prep time. The magazine recommends using disposable gloves when working with the jalapenos, I never do this step and have never had any problems, just make sure not to touch your eyes etc. Approximately half-way through the cooking time I had to tent the crust in order to prevent burning, I would recommend doing this step. I followed the remainder of the recipe as written.

My husband and I enjoyed this quiche recipe. I appreciated how easy the prep was and how I had leftovers for breakfast the next morning. I love how versatile quiche is in that it can easily be used as either a dinner entree or a breakfast dish. This recipe is no exception and I was able to use it for multiple meals. My two boys were skeptical when I first served this recipe, but loved the recipe for breakfast the next day. Overall, an easy and delicious dish.

For the recipe go to Italian Sausage Quiche.

September 27, 2011

Martha Stewart Living Three-Cheese Macaroni

Most days I eat very healthy. However, I still love comfort food and make it relatively frequently. Growing up my mother made the best homemade macaroni and cheese. She had a hand written recipe for my grandmother's macaroni and cheese that I still keep in my recipe file. It was simple and delicious. My two sons will eat any type of macaroni and cheese that I give them, boxed or homemade, so I am always looking for a recipe that my husband and I will also enjoy. The October issue of Martha Stewart Living magazine had a recipe for Three-Cheese Macaroni, which loved like a delicious grown-up comfort food.

This recipe has 13 ingredients and takes 1 hour and 10 minutes, 40 minutes of which is active. I had no problems finding any of the ingredients at my local grocery store and had the majority already in my pantry cupboard. The three cheeses used in the recipe are sharp cheddar, Gruyere and Fontina. I used a 9-by-13-inch baking dish, rather than mini pie plates. The total cooking time, I found to be longer than the suggested 15 minutes due to the larger pan. My total cooking time was probably closer to 20-25 minutes. I followed the remainder of the recipe as written.

The cayenne in this recipe gave a nice kick to the macaroni, making it not bland like many macaroni and cheese recipes can be. This makes a large pan of macaroni, so it would be perfect for a potluck or dinner party. I actually thought that the dish tasted even better after it had sat in the fridge overnight and then was re-heated in the oven. It gave the macaroni a nice thick consistency, so I recommend letting the recipe sit in the refrigerator. This dish was a hit with my two-year-old, he absolutely loved it, a very family friendly recipe.

As with most of the October 2011 Martha Stewart Living magazine recipes, this recipe is currently unavailable on-line. It can be found in the October 2011 issue or there is another recipe for Macaroni and Three Cheeses on the Martha Stewart website.

September 10, 2011

All You Corn and Cheddar Waffles

Breakfast is the one meal that I consistently struggle with my family over. My husband seems to only want to eat cereal and my boys will go for the worst possible choices in the cupboard and fridge. I might possibly be the worst of us all, I tend to grab coffee and not eat or drink anything else until the middle of the afternoon. Since my children are getting older and learning from both my good and bad habits I have been trying to make a greater effort to eat breakfast every morning. I was intrigued when a recent issue of All You magazine had a recipe for Corn and Cheddar Waffles, which looked perfect for my normally non-breakfast eating family.

This recipe has 10 ingredients and takes approximately 10 minutes to prepare and 7 minutes per waffle to cook. I was easily able to find all the ingredients at my local grocery store and I already had the majority in my pantry. I chose to use fresh corn, I prefer the taste to frozen when it's in season. I followed the remainder of the recipe as written.

I actually ended up using this recipe initially as a side dish for a meal and then used the leftovers for breakfast the next day. The taste was delicious and the only topping I used was butter. My youngest son loved these waffles and ate the majority of the servings. I liked that they were savory and worked well as both a bread side and a breakfast food. A great easy, recipe to change up your breakfast routine.


For the recipe go to All You Corn and Cheddar Waffles.

August 29, 2011

Bon Appetit Tomato and Cheddar Pie

My oldest son absolutely loves tomatoes. During the summer when tomatoes are easily available, he will bite into them like apples. My husband and I love tomatoes baked in dishes, but aren't fans of them raw. I have been trying to find tomato dishes that will please both my tomato loving sons and my husband and I. I was interested when the August issue of Bon Appetit magazine had a recipe for Tomato and Cheddar Pie, which looked liked a recipe everyone in my family would enjoy.

This recipe has 17 ingredients, and takes about three hours to prepare and bake, including cooling time. The ingredients are basic, most I had in my pantry or I was easily able to find at my local grocery store, with one exception. For whatever reason, I have been unable to find fresh dill at my local stores. Therefore, I had to leave it out of the recipe. I did have to tent my crust with foil about half way through the baking time to prevent burning. I followed everything else in the recipe as written. The dough will be sticky when the buttermilk is added, just add additional flour, but not too much or the dough will turn out tough. After the dough was chilled, I had no problem rolling it out.

Even without the dill, this recipe turned out delicious. The tomatoes and cheese complimented each other nicely and the crust came out perfect. My husband and I were bigger fans of this recipe than my two boys, I think it might have been a little too rich for their tastes. Overall, a great way to use fresh tomatoes during the summer..

For the recipe go to Bon Appetit Tomato and Cheddar Pie.


August 23, 2011

Taste of Home Rosemary Cheddar Muffins

When I first started making homemade meals, I was great about making main dishes, but often forgot sides or vegetables. Now that I have been consistently making meals from scratch for years, I make an effort each week in my menu plan to include a main dish, vegetable and side. One popular side dish in my household is homemade bread. I make bread at least twice a week and it gets eaten very quickly. I have been trying to branch out my bread baking to include new types of starches and was intrigued by the August/September issue of Taste of Home magazine, which had a recipe for Rosemary Cheddar Muffins.

This recipe has only 5 ingredients and takes approximately 25 minutes to prepare. All the ingredients are basic and were easy to find at my local grocery store. I used fresh rosemary and whole milk, instead of the 2% in the recipe, since I already had it in my refrigerator. I followed the recipe as stated, with no modifications. One word about the muffin dough. It is not thin like a normal muffin batter, but instead resembles a biscuit texture. Due to this consistency, I hand patted the dough into patties and then placed them in the muffin cups, since the batter would not pour effectively.

These muffins turned out delicious. The recipe calls them muffins, but they taste and look more like a biscuit. My two boys especially liked this recipe and ate multiple servings. I liked that they took only a couple of minuted to prepare and made a great side to the meat dish I was preparing. This recipe is a great, light bread to accompany a main dish, or would also be great alone for a breakfast or a snack.

For the recipe go to Taste of Home Rosemary Cheddar Muffins.
Related Posts Plugin for WordPress, Blogger...