Showing posts with label cumin. Show all posts

October 30, 2014

Cumin Pork with Adobo Black Beans and Red Pepper Salad


I used to love Instagram. When it first came out I used it all the time and thought it was a great way to share my food photos and I quickly gained over 3,000 followers. Now it seems to be a little bit of a waste of time. It doesn't create any blog traffic the way that Pinterest does (Pinterest is awesome for blog traffic!), interaction is at a minimum, and there seems to be a large number of 20 year old girls taking photos of themselves in bikinis. Now I could rock a mean looking bikini if I wanted to, but that isn't something that at 36 I feel the need to want attention for doing. I think social media is stuck at a crossroads. One can only take so many selfies, be they making duck faces for Facebook, or full body bikini shots for Instagram, before the saturation point is reached. Then what. I think Instagram is at that point. How does it move from an over abundance of people taking photos of every little thing they ate and the full body bikini shot of them doing it, to something that can actually be of use to anyone from a business or professional point of view. In the mean time I refuse to start taking photos of myself holding a pie in a skimpy bikini for more likes.


My family is obsessed with pork. If my husband and two kids had their way we would pretty much eat pork everyday. While I love pork, I try to minimize the amount of pork, beef, and lamb that my family eats, so we only eat red meat approximately once a week. When we do eat pork it's normally in the form of pork tenderloin or bacon. The following is a recipe for Cumin Pork with Adobo Black Beans and Red Pepper Salad.

Recipe adapted from the Food Network Magazine.


Cumin Pork with Adobo Black Beans and Red Pepper Salad


Ingredients
  • 1 thinly sliced red onion
  • 3 limes, juiced
  • 1 teaspoon chopped chipotle chile in adobo sauce
  • 2 teaspoons adobo sauce (from chipotle chili can)
  • 2 teaspoons ground cumin
  • 1 1/2 pounds trimmed pork tenderloin
  • 2 tablespoons extra-virgin olive oil
  • 3 small red peppers, cut into strips
  • 1 15.5 ounce can black beans, drained and rinsed
  • 1 teaspoon honey
  • 1/2 cup chopped fresh cilantro
Cooking Directions
  1. In a small bowl combine half of the sliced red onion with the juice of 2 limes, `1/2 teaspoon cumin, a pinch of salt, and the chopped chipotle.
  2. Heat a skillet over medium heat with 1 tablespoon of olive oil.
  3. Rub the pork with 1 1/2 teaspoons of ground cumin.
  4. Add the pork to the skillet and brown on all sides.
  5. Roast pork on a baking sheet in a 425 degree pre-heated oven for 15-20 minutes (or until the temp reaches 145 degrees).
  6. Transfer to a cutting board, cover with foil, and let the pork rest for 10 minutes before slicing.
  7. Add 1 tablespoon olive oil and the red peppers to the skills that the pork was browned in.
  8. Cook the pepper for approximately 4 minutes, or until slightly softened.
  9. Add 1/4 teaspoon salt and 1/2 cup water.
  10. Cook until the water evaporates, approximately 4 more minutes.
  11. Add to the onion mixture in the bowl.
  12. Add the black beans to the remaining red onion, 2 teaspoons adobo sauce, honey, 1/4 teaspoon salt, cilantro, and juice of one lime.
  13. Serve the beans, peppers, and sliced pork together.
Tips: 
  • You can substitute cooked beans for the canned. 1 1/2 cups of cooked beans is approximately equivalent to a 15 ounce can. 
  • If you don't use olive oil, canola, sunflower etc. can be substituted. 
  • Don't cut the cilantro until right before you are going to use it. Cilantro starts to lose flavor as soon as it's cut. That's why it's best to chop cilantro right before it is added to salsas etc. Cilantro is not one of the herbs that you want to pre-prep, just don't do it. 

May 3, 2014

Slow Cooker Chicken Nacho Soup

I went grocery shopping last night with my two kids. We didn't get to the store until 9 and I was worried that the store would be crowded and my kids would be wild. Turns out I love Friday nights at the store. It was dead, no cranky women (like there always are on Saturday afternoons), very friendly cashiers, and my kids were perfect. It helped that they were tired and too sleepy to run around acting crazy. All I know is that it was the best grocery shopping trip I have had with my kids in years. I told my husband this morning that I am switching my shopping to late on Fridays, if nothing else it will help to keep my sanity the rest of the weekend.

It's been soup season in my house. Our spring weather has been all over the place. One minute it's 90 and the next we have snow. My oldest told me that the weather is drunk this year, it definitely has been a little off. Since I love soup year round (even when it's hot, weird I know), I tried a new recipe for Chicken Nacho Soup from the April issue of the Food Network Magazine.

This recipe has 17 ingredients. It takes 8 hours and 20 minutes of total time, 20 minutes of which is active, and makes 4 servings. I only made a few changes to the original recipe. First, I used homemade chicken broth. This is the method I use for most recipes, it saves money and cuts down on the amount of sodium. For the cheese sauce I allowed it to sit for approximately five minutes. This allowed it to thicken and made it easier to pour over the soup. Finally, I added the chicken at the beginning of the recipe. I prefer to cook my chicken in the soup adding flavor. The meat came out very tender, so there was no problem with toughness.

We are big soup fans in my house and this recipe went over well. It was mild enough for my kids to enjoy, but with enough flavor for my husband and I. You can adjust the amount of heat by removing (or not) the amount of jalapeno seeds. The recipe states that this dish makes 4 servings, but it was more than enough for my family of four with leftovers for the next day.

For the recipe go to Chicken Nacho Soup.

February 1, 2014

Smokey Weeknight Chili with Homemade Chili Powder

Smokey Weeknight Chili


My husband thinks that I rearrange our furniture every 3-4 months to amuse myself. While I do enjoy moving things around in the house, the main reason I tend to rearrange rooms is to make space for the new things we accumulate. With four people in the house we end up with a lot of new things over the course of the year. Most things I buy second hand, clearanced or up-cycled. Every three or four months I go through the house and donate any items that we no longer use or I can't find in a way to re-purpose. Yesterday I spent the day moving a bookcase out of my kid's room and re-arranging the remaining furniture in their bedroom. Now they have a large play area and I have a bookcase that I will paint and make look like new for the living room. I already found oopsie paint at the home improvement store for 2 dollars. I love oopsie paint, it's a great way to buy high quality paint for very little money. The paint I found was originally 40 dollars, so 2 dollars was a great deal! The best part of rearranging furniture is watching my husband try to figure out where everything has been moved to. It always makes me smile.

I have been making a lot of soups and chili the last month due to the cold weather. It has been a very cold winter and when the weather is far below freezing I prefer food that is warm and comforting. Last week I tried a new recipe for Smokey Weeknight Chili from the February 2014 issue of Better Homes and Gardens.
Smokey Weeknight Chili

This recipe has 9 ingredients. It takes 45 minutes of total time, 10 minutes of which is active. I followed the original recipe pretty closely. The only change I made was to make my own chili powder. I prefer homemade chili powder to store bought, it tastes better and I can adjust the amount of heat for my family's tastes. Here is the recipe I used:

4 tablespoons Ancho chili powder
2 teaspoons chipotle chili powder
4 teaspoons paprika (I use smoked)
1/4 teaspoons ground cumin
1/2 teaspoons garlic powder
1/2 teaspoons oregano
1 teaspoons black pepper

It took minutes to make and was really great tasting. I also made my beans from scratch. I made my beans in the crock pot in a big batch and then measured out the equivalent amount of beans (about a cup and a half for a 15 ounce can). 

This is a very easy recipe to put together. You can substitute black or kidney beans if you don't have chickpeas (or just prefer the taste). It's also an inexpensive meal since it's vegetarian and is even cheaper if you make the beans from scratch. It has 15 grams of protein per serving and only 6 grams of fat so it's a nice all around meal. My family liked the chili with a bit of sour cream since my homemade chili powder is a little on the spicier side. 

For the recipe go to Smokey Weeknight Chili. 

January 15, 2014

Butternut Squash Tortilla Soup

Butternut Squash Tortilla Soup


I have a ton of cookbooks. The bad thing is I never really use them. That's right I am horrible about using my vast supply of cookbooks. Most of them were either gifts or belonged to my mother. I love looking through them and finding ideas, but I really if ever actually follow a recipe from one. A great deal of it has to do with the fact that I find so many recipes on the Internet. Finding a recipe in a cookbook can involve looking through an index and flipping through multiple books. Most of the time I just want to find something quickly. That's where online recipes are great, I can type in the ingredients or recipe I am thinking of and thousands of recipes appear instantly. There are a few things that I prefer with cookbooks. My mother's handwritten notes and modifications being the biggest. Both my mother and grandmother loved their cookbooks and wrote in the margins with the changes that they made. There is such a sense of history and connection to these notes that they are a big part of the reason I love my cookbook collection. An online recipe can have reviews, but it has far less tangible history linking it to the past. Plus I still love the feel and smell of books. There is something so romantic about standing in the middle of a very old library, it feels perfect to me.

During the winter I make a large number of soups and stews. I am always cold in the winter and soups does a great job of warming me up. Last week I tried a new recipe for Butternut Squash Tortilla Soup from the January 2014 issue of Southern Living magazine.
Butternut Squash Tortilla Soup

This recipe has 10 ingredients. It takes 45 minutes of total time, 25 minutes of which is active and makes 10 cups. I did make a few changes to the original recipe. First, I make my own chicken broth. As I have stated numerous times before I prefer homemade stock since its inexpensive, lower in sodium and tastes better than store bought. Plus it is so easy to make! For the toppings I did not add chicken or tortilla chips. Instead I used cheese and served corn tortillas on the side.

The only thing I would change in this recipe would be to use a sweet or yellow onion instead of a red one. The red onion was a little strong, a sweet onion would be perfect. That aside my family liked this recipe. My husband thought it would be better with black beans instead of the squash, he isn't a fan of the current food trend of putting butternut squash in every soup recipe. The soup reheated very well the next day and made enough servings for two meals, which is always nice when following a food budget.

For the recipe go to Butternut Squash Tortilla Soup. 

November 13, 2013

Oven Fried Beef Taquitos

Oven Fried Beef Taquitos


I can be a very outspoken and stubborn person. Not in a mean or spiteful way, but I grew up with a mother that made it very clear that I was not going to have the life that she ended up with. She spent hours taking me to chess club, dance classes and science camps. I never thought that I couldn't do something, I just had to try a little harder. My mother was one of the smartest people that I have ever known. However, she was also the oldest of 12 kids, so money was always tight and opportunities were few.

Growing up we oftentimes had little money. My dad worked as an aide in a nursing home and my mother sold Tupperware. Neither of my parents were fortunate enough to have gone to college and most of the jobs they worked were minimum wage. There were years my mother cried standing in line at the food bank, but we pulled through.

While I would never wish hardship on anyone, my mother was incredibly strong and passed this trait on to me. I worked my way through college and graduate school, paying my own tuition, rent and traveling to Europe twice. My parents weren't overly gushy with praise, but the day I graduated with my undergraduate degree my dad cried. He didn't have to say anything, I understood. Nine days after my oldest son was born my mother passed away of cancer 2500 hundred miles away from me. I called on the strength that my mother instilled on me to get through some of the hardest weeks of my life.

So whenever my husband jokes that I am stubborn and outspoken, I smile. Those aren't the worst traits that someone can have and I hope that my kids carry on the family tradition.

The last couple of weeks I have been trying to make more oven roasted recipes that use less oil. I try to watch my husband's diet due to health issues that run on his side of the family. That doesn't mean that we don't enjoy the occasional treat, but I try to use recipes that reduce the fat at least a couple of days a week. Last night I tried a new recipe for Oven Fried Beef Taquitos from the November/December 2013 issue of Eating Well Magazine.
Lake Vesuvius Ohio

This recipe has 10 ingredients. It takes 40 minutes of total time, all of which is active and makes 4 servings. I did make a few changes to the original recipe. I find it much easier to heat corn tortillas in the microwave with a damp paper towel. I do them in batches of 6 at a time, be careful they are really hot when they come out. The biggest change I made was to cook the taquitos for an extra 5 minutes. At 18 minutes they were still not fully browned.
Lake Vesuvius Ohio
Lake Vesuvius Ohio

My kids absolutely fell in love with this recipe, they loved it. I served the taquitos with sour cream and salsa, which were great sides. My husband and youngest son ate the left overs cold the next day. They both thought that the cold leftovers were even better than when the recipe was served hot. The one change that I would make would be to increase the amount of salt. As the recipe is written it is under salted.

For the recipe go to Oven Fried Beef Taquitos. 

Oven Fried Beef Taquitos


Recipe Type: Main
Summary:
An easy oven fried beef taquitos recipe with 33 grams of protein per serving. Even better the next day!
Preparation Time: 0h, 20m
Total Time: 0h, 40m
Yield: Serves 4

August 14, 2013

Spiced Salmon Kebabs

Spiced Salmon Kebabs


Food blogging can drive me crazy. I started blogging not knowing what my focus was going to be. If you go back to my first 5 posts, I talked about coupons, cleaning, you name it. Then my husband and I were talking about how much I loved to cook. I made the decision to start a food blog. It was a rough start to say the least. My photos for the first year and a half were pretty horrible. Then I bought a new cell phone and for 6 months the photos were a slight bit better. After those 6 months I decided I wanted to take myself a little more seriously. I bought my domain (and changed from the horrible name I started with), bought a new camera and tried to be better about engaging with other bloggers. Then the Internet started to change everything. I had to teach myself how to code rich snippets (wordpress make things so much easier with their pluggins!), fix coding errors, found out that Google never even knew my new domain existed and pretty much decided that I hate html coding. Then last week I read a post on Facebook telling a female blogger that they didn't need to know how to html code on their blog. It ruffled my feathers a little. While I would love to say that food bloggers can just sit back and wait for people to flock, it doesn't work that way. There are millions of food blogs and in order to be noticed you really have to step it up. And I still don't do everything right. I refuse to write key search words in my first two sentences. It would make my blog sound ungenuine and fabricated for hits. According to search engines though it would make me a better food blogger. I think I resign myself to being a blogger that likes food, I don't think that I have the patience to play in the big leagues. Plus I'm not a straight recipe blog, so I fall in Bermuda Triangle of food blogging. Enough food blog rants, on to the recipe. Today I tried a new recipe for Spiced Salmon Kebabs from the June 2013 issue of Bon Appetit magazine.
Rainy Day Railroad Bridge WV

This recipe has 8 ingredients. It takes 25 minutes of total time, all of which is active and makes 4 servings. The salmon that I purchased was skin-on. I had to bone and skin the fillets, which added slightly to my prep time. I used my indoor grill to cook the salmon so my total cooking time was approximately doubled. It's normal for an indoor electric grill to take a lot longer. I let my kebabs sit in the fridge with the spice mixture for 45 minutes before they were grilled. This allowed the seasoning to absorb slightly and intensify the flavor.
Rainy Day Railroad Bridge Huntington, WV

My two boys loved this recipe. I wasn't sure if it would be too spicy with the red pepper flakes, but they ate their whole servings and then tried to steal food off my husband's plate. If you have three males in your house like I do, this recipe will not serve four people. I would suggest at least doubling the amount of salmon (and increasing the other ingredients proportionately). The inside was perfectly cooked, while the outside had a nice browned look and texture.

For the recipe go to Spiced Salmon Kebabs.

Spiced Salmon Kebabs


Recipe Type: Main
Summary:
An easy grilled Spiced Salmon Kebabs recipes. Perfectly cooked on the inside and full of nice flavor.
Preparation Time: 0h, 15m
Total Time: 0h, 25m
Yield: Serves 4

August 10, 2013

Summer Vegetable Chili

Summer Vegetable Chili


My son is enamored with a pet rat. The first thing I heard as he got off the bus his first day of school was that his classroom had a new pet, a hairless rat. Apparently they are also getting two hamsters next week. He is obsessed now. At the library he wanted all books on rats and he talks about it constantly. I think it's pretty cute. We have three dogs and three cats, but we haven't had any small pets since before he was born. Before kids my husband and I had dwarf hamsters and I grew up with gerbils. I haven't allowed my boys to have any small pets yet, since they are a little small to be able to understand being gentle. Having a classroom pet is the perfect compromise. My oldest son feels an attachment and responsibility for a small animal and I don't have to do the daily care etc. I love it. With last week being the first week of school I didn't do a lot of cooking, but this weekend it's back to the kitchen. Today I tried a new recipe for Summer Vegetable Chili from the June 2013 issue of the Food Network Magazine.
Owingsville, Kentucky

This recipe has 16 ingredients. It takes 40 minutes of total time, 25 minutes of which is active and makes 4 servings. I only made a few modifications to the original recipe. First I always use canola oil instead of vegetable oil, I prefer it for heart health. I bought regular frozen corn since I have never seen fire-roasted at the stores near me. Additionally I purchased regular beans and tomatoes not low sodium since the store I went to only had one variety. I cooked the beans on high for the 20 minutes of cooking time, watching it closely to ensure that it did not burn. Using a dutch oven is a great way to make chili, it heats evenly and is big enough to make big batches. I found that I had to add more salt at the table, but that is more of a personal preference, if you like food with less salt it would be fine as written.
Country Roads Kentucky

The mushrooms in this recipe really made the dish. They allowed for the chili to have a lot of flavor. Plus my husband who isn't a big fan of vegetarian chili really liked this recipe. With the mushrooms it was definitely more male friendly. My two boys were skeptical, but after tasting it they ate their whole bowls. The recipe states that it only makes 4 servings, but after my family of 4 had a dinner sized portions there was more than enough for at least another meal.

For the recipe go to Summer Vegetable Chili.

Summer Vegetable Chili


Recipe Type: Main
Summary:
An easy vegetarian chili recipe that has great flavor from the addition of portobello mushrooms. Makes enough servings for multiple meals.
Preparation Time: 0h, 25m
Total Time: 0h, 40m
Yield: Serves 4

July 15, 2013

Summer Slow-Cooker Meals: Spicy Pumpkin Chili

Click for Recipe for Slow Cooker Spicy Pumpkin Chili
Slow Cooker Spicy Pumpkin Chili


There are days I get burnt out as a stay-at-home mom. This has been one of those weeks. I love my kids and spending time at home with them everyday. However, there is also the flip side. I started working as an intern when I was 17. I stayed at the company for 7 years until I moved to West Virginia. During grad school I worked three jobs, including teaching a class. I met my husband and got married during my master's program and have stayed home since. Then there are the moments when you realize all the things that your high-school friends that got married and had kids later have accomplished. Some of them have been very, very successful. There is always that awkward situation when everyone that I knew back in Seattle talks about how smart and successful I was when I was younger. I know they don't mean it the way it comes out, but it still gives me pause. My husband thinks that I should start claiming that I work at home since I blog and take care of the household. Maybe he's right. I can always hope that one day my blog will become vastly successful, but we all know that's unrealistic. In the meantime I remind myself that my kids are growing up surrounded by my love and knowledge. That's enough rambling for now, onto the cooking! This weekend I chose to keep my cooking simple and I relied on my slow cooker. I tried a new recipe for Spicy Pumpkin Chili from the new All Recipes magazine.

This recipe has 18 ingredients. It takes 1 1/2 hours of total time, 15 minutes of which is active and makes 10 servings. I did make a few changes to the original recipe. First, I allowed my chili to cook in the slow cooker for 4 hours on low. I like my flavors to fully come to fruition so I increased the total cooking time. It would also work well on the stove in a dutch oven or a big pot with a lid. I was unable to find my crushed red pepper flakes, so I was forced to leave them out. Finally, I used a full 8 ounces of tomato sauce with garlic. I also found that I needed to add more salt than the 1 teaspoon suggested by the recipe.

My husband liked that this recipe has the health benefits of pumpkin without the taste being overly noticeable. He isn't a big fan of pumpkin, but he was surprised by how much he enjoyed this recipe. I love pumpkin and chili so this was a dish I really liked. It made a very big batch, more than enough for at least 10 servings. For the servings for my kids I added cheese and sour cream. They aren't big chili fans so these additions made them willing to eat their bowls. If you like your chili on the spicy side I would suggest adding jalapenos or a bit of cayenne. Since I cook with my kids in mind I always try to have my recipes be on the mild side.

For the recipe go to Spicy Pumpkin Chili.

May 28, 2013

Perfect For Summer Grilling Season: Grilled Chicken Thighs with Cucumber Mint Salad Recipe

Click for Recipe for Grilled Chicken Thighs with Cucumber Mint Salad
Grilled Chicken Thighs with Cucumber Mint Salad


There are weeks I love complex meals. I will spend hours in the kitchen making the perfect recipe. Then there are days like today where I want simple comfort food. Hence why I currently have pinto beans in the crock pot and I will be making cornbread later in the afternoon. There is something about the beginning of summer that makes me want to have something warm and comforting one more time before the weather and humidity make me want nothing more than cold iced tea and lemonade. To me pinto beans are not only part of what I love about West Virginia, but they make me remember what I love about food and cooking, sometimes the simplest of dishes are the best. One simple dish that I love in the warm summer months is salad. Cold side salads are such a great option, they are cool and refreshing. Last week I tried a new recipe for Grilled Chicken Thighs with Cucumber Mint Salad from the June 2013 issue of Eating Well magazine.

This recipe has 10 ingredients. It takes 35 minutes of total time, all of which is active and makes 4 servings. I did make changes to the original recipe. First since I have three males to feed I doubled the recipe. One chicken thigh for each person just wouldn't have cut it. I think I may be the only food blogger that does not have a mortar and pestle, so for the garlic paste I used the side of a knife. I use this method frequently and it is a perfect substitute. My outside grill is still out of commission so to cook the chicken thighs I used my indoor electric grill. It would also work well under the broiler.

To me the star of this dish was the cucumber salad. It was light and the perfect palate cleanser for the chicken thighs. The flavor of the rub on the chicken was great and would work well with other cuts of chicken (such as breasts) or even fish. At under 2 dollars a serving this is an inexpensive meal option for summer.

For the recipe go to Grilled Chicken Thighs with Cucumber Mint Salad.

May 26, 2013

Recipe for Flavorful Chicken Tikka Masala

Click for Recipe for Chicken Tikka Masala Over Rice
Chicken Tikka Masala Over Rice

I love to shop local. There are so many great things about buying food that is made/grown close to where you live. I would love it if we had a big farm where I could raise and grow everything that I ever wanted, but until that day comes I grow what I can and buy the rest. I am a firm believer that buying local in not only great for supporting the local economy, but much better for the environment. This weekend I was able to find great heirloom popcorn at a shop in our area. It is run by volunteers and provides  fresh and packaged foods from local producers. My kids love going and seeing the new items that they have each week. There are some foods that I am unable to find locally, such as certain spices for ethnic dishes. For these items I either have friends send them to me or I order online. I grew up eating Indian food since my father worked with a number of nurses from south India and I love it. Last week I tried a new recipe for Chicken Tikka Masala from the April 2013 issue of Bon Appetit magazine.

This recipe has 18 ingredients. It takes 5 1/2 hours of total time, an hour of which is active and makes 6 servings. I did make a number of changes to the original recipe. I was unable to find chiles de arbol so I followed the recipe suggestion and used crushed red pepper. Cardamom pods are hard to find around here, so I left them out. For the marinading time I allowed the full 6 hours. My oven broiler has been broken for a while so I used my toaster broiler setting instead. The chicken did not blacken as well as it would have in the oven, but it still came out decent.

Even though the time required to prepare this recipe is long, the outcome is worth the wait. The recipe turned out delicious and the step were relatively easy. This dish was particularly popular with my husband, who loves Indian food, but is never able to order it as often as he would prefer.

For the recipe go to Chicken Tikka Masala.

March 22, 2013

Crock Pot Pinto Bean Stew with Jalapeno Corn Dumplings

Click for recipe for Crock Pot Pinto Bean Stew with Gluten Free Jalapeno Corn Dumplings
Crock Pot Pinto Bean Stew with Gluten Free Jalapeno Corn Dumplings

Beans weren't something my mother prepared very often when I was growing up. She made terrific pasta and meat dishes, but beans were only a sometimes food. When I decided to become a vegetarian in high-school my stomach went into shock due to the sudden increase in bean consumption. Luckily I got used to it and to this day I eat a substantial amount of beans every week. My husband was born and raised in West Virginia and pinto beans were always a stable in his house. When we got married I had to learn to cook with pinto beans since I had only eaten black, white and navy beans previously. Now days we eat pinto beans regularly and my kids love them. This week I tried a new recipe for Pinto Bean Stew with Jalapeno Corn Dumplings from the April 2013 issue of Eating Well magazine.

This recipe has 20 ingredients. It takes 9 hours in the slow cooker, 30 minutes of prep and makes 8 servings. I made a few changes to the original recipe. I allowed my beans to soak overnight. The overnight soaking method is the way that I prefer since it takes less active time than quick soaking on the stove. Since I eat gluten free I used brown rice four instead of the all purpose flour called for in the dumpling recipe. For the topping I let off the sliced radishes. My kids do not like them and my local grocery store didn't have them in stock. I let my beans cook on high for 8 hours and then another hour with the dumplings. I always allow my pinto beans to cook for at least this long. Beans in the crock-pot take a will in order to come out soft and flavorful.

The dumplings in this stew are the stars of this dish. The stew tasted like any other vegetarian chili and didn't leave a lasting impression. I thought that the pinto beans would be better cooked with a ham hock with the dumplings served on top. Pinto beans cooked in the slow cooker are delicious and the dumplings would work well with them as a topping. My two boys liked the chili (I seeded the jalapeno and used mild chili powder so it wasn't too spicy). They ate their servings and most of the leftovers.

For the recipe go to Pinto Bean Stew.

March 12, 2013

Easy Enchiladas Suizas with Ground Turkey and Zucchini Filing

click for recipe for Enchiladas Suizas with Ground Turkey and Zucchini Filling
Enchiladas Suizas with Ground Turkey and Zucchini Filling

Salt is always a battle in my household. My husband and two boys could literally eat it straight from the shaker while I would be fine never salting anything. I know your thinking how can a self proclaimed foodie and food blogger hate salt. I seem to be a little bit of the odd one out. Chefs and foodies love salt. It adds flavor and substance to dishes and many chefs claim that over salting if always better than under salting. I salt all my recipes. I just don't add more than is necessary. Salt is absolutely essential for dishes to taste correctly, but I also believe that most Americans overuse salt, sometimes to an extreme. There is a happy medium where the flavor of dishes come through while keeping my blood pressure nice and low. It's also all about moderation as it should be with all food. If I make a dish high in salt one day I try to compensate and make something low in sodium the next. That way everyone is happy and we will all still live until we're at least 90. This week I tried a new recipe for Enchiladas Suizas from the April 2013 issue of Family Circle magazine.

This recipe has 12 ingredients. It takes 60 minutes of total time, 40 minutes of which is active and makes 6 servings. I did make a few changes to the original recipe. First for the turkey I used 93 percent lean, I substituted non-fat half and half for regular and mild salsa instead of medium since my kids would be eating it. Instead of heating each tortilla individually on the stove, I heated them in two sets in the microwave in between a moist set of paper towels for 40 seconds. I also skipped the step of heating the salsa mixture before adding the cheese, I was in a rush and needed dinner of the table as quickly as possible. Finally make sure to squeeze out the water from the zucchini. The recipe doesn't state this step and it is essential. Place the grated zucchini between paper towels and squeeze. A large amount of water will come out. Without this step the turkey will never brown and your enchiladas will be soggy.

I really like how easy this recipe is to prepare. The spices used in the turkey mixture were delicious and my whole family really liked the filling. I do think that there wasn't enough sauce to fully coat all the enchiladas. I would recommend making a double batch of sauce (you won't need it all you can freeze the extra). If you are a big cheese lover I would also suggest adding slightly more cheese to the top. The magazine picture shows more cheese than would actually be there if you only used 3/4 of a cup like the recipe suggests.

For the recipe go to Enchiladas Suizas (registration required).

March 5, 2013

Flavorful Tomato Yogurt Chicken Curry

click for a flavorful recipe for tomato yogurt chicken curry


The area which I live in is slowly getting better about having food other than pizza as dining options. We live in a college town so the majority of food involves a meal with fries or pizza, lots and lots of pizza. Since I eat gluten free pizza doesn't hold the same appeal as it did before my diagnosis. When I first moved and met my husband their were only a few ethnic restaurants and almost all of them were Mexican food. I quickly learned that I was going to have to learn to cook as many things as I could at home or be stuck with the frozen ethnic aisle (which is never great) at our local grocery store. So I bought a ton of cookbooks and failed at making a lot of dishes. However, I kept trying and talking to friends about the dishes that they grew up making in their various households and I learned that with practice all food is doable. Now I look at recipes for the flavors and feel confident that I can make a large variety of foods. Tonight I tried a new recipe for Tomato Yogurt Chicken Curry from the October 2012 issue of the Food Network Magazine.

This recipe has 18 ingredients. It takes 1 hour 15 minutes of total time, all of which is active and makes 4 to 6 servings. I made a few modifications to this recipe. Since I was cooking for my kids (and I have never actually seen them at our local stores) I left out the dried arbol chiles. 14.5 ounce cans of whole tomatoes are another rarity in my area so I bought a 28 ounce can and weighed out the needed amount of tomatoes and liquid. I had leftover baby red potatoes from another recipes so I cut them into fourths and used approximately 10 of them for this recipe. Finally I used 2 percent Greek yogurt not whole since it was what I already had in the fridge.

Using a dutch oven really does make this recipe easier to make. If you haven't already bought a dutch oven they are a great kitchen tool and make it much easier to make soups, stews and curries. Based on my family I would say that this recipe serves 4 people. If you want a larger amount or leftovers I would suggest doubling the recipe. Overall this was a nice basic Indian curry recipe that can be adjusted to suit your desired spiciness level.

For the recipe go to Tomato Yogurt Chicken Curry.

March 2, 2013

Slow Cooker Beef Stew and Easy Homemade Cornbread Recipe


The winter weather seems to be back in my area. It has been spitting snow all day, which just makes me want to curl up with a good book and a cup of tea. I love winter weather for about a month, then I get increasing sick of it. I am one of those people that loves when the seasons change and then quickly get tired of the new season. Now there are some seasons that I like more than others, winter being pretty far down the list. One of the things that saves winter for me is the food. I am a huge fan of soups and stews and fall and winter are the perfect time of the year to prepare them. Approximately once a week (at least) during the winter I pull out my slow cooker and try a new stew recipe. I find stew in the winter comforting and makes the cold weather more bearable. Last week I tried a new recipe for Slow Cooker Beef Stew and Homemade Cornbread from the February 2013 issue of All You magazine.


The beef stew recipe has 17 ingredients and the cornbread has 8 ingredients. The cornbread takes a total of 25 minutes, 10 minutes of which is active and makes 9 servings. The beef stew recipe takes a total of 8 1/2 hours, 30 minutes of which is active and makes 6 servings. I did make a few changes to the recipes. For the beef stew instead of all-purpose flour I used brown rice flour. I made my own beef broth from scratch. If you have never made beef broth before it is very easy. Roast 2 onions, 2 carrots and 1 pound of beef bones in the oven at 425 for 40 minutes. When they are done roasting add them to a large stock pot, add 12 peppercorns, 2 bay leaves, 2 sprigs of parsley and cover with water. Bring to boil and then turn down to a low simmer for 4-6 hours. The longer you cook the stock the stronger the flavor. I chose not to top my stew with cilantro since my kids have decided that they currently won't eat it. For the cornbread I only made a few changes. First I used low-fat buttermilk instead of full fat. I try to limit my dairy fats and low-fat buttermilk is a great way to do it. Since I was not eating the cornbread I did not make it gluten-free, but instead made the recipe as written.

This beef stew has a little bit of a kick from the chilies and chipotle pepper. I topped my boys servings with a little bit of sour cream to cut down on the spiciness, My husband and I didn't find that the dish was that spicy, but my boys noticed immediately. I like that the beef turned out very tender and the parsnips gave the beef a delicious sweet root vegetable undertone.

For the recipes go to Beef Stew and Homemade Cornbread.

February 25, 2013

Cilantro Lentils and Lemon-Cumin Rice


My posts have been slim this week. Normally I post once a day, but between family obligations and sick kids I have had no time for my blog. Right now my youngest is miserable on my lap while I attempt to write something that is at least semi intelligible. Whenever I am sick with a cold I love spicy food, the spicier the better. Especially when I have a stuffy nose I love things that have lots of flavor and kick. One of my favorite types of food to make spicy is Indian cuisine. The flavors can be made mild or intense and many recipes are easy to make at home. Last week I tried a new recipe for Cilantro Lentils with Lemon-Cumin Rice from the March 2013 issue of the Food Network Magazine.

This recipe has 10 ingredients in the lentils and 6 in the rice. The lentils take 1 hour of total time, 15 minutes of which is active and makes 6 servings. The rice takes 45 minutes, 5 minutes of which is active and makes 6 servings. I had no problems finding any of the ingredients. I did make a few changes. Instead of butter in the lentils I used canola oil and I increased the cayenne pepper to 1/2 teaspoon. Additionally, I let my lentils cook longer than the recipe suggested. I increased the total time by approximately 1/2 hour. This increased cooking time allowed the lentils to fully thicken. Make sure to salt again before serving, I needed to add an additional 1/2 tsp of salt.

The lemon juice added at the end of the lentil recipe makes all the difference. It really does add a great flavor that finishes the dish. The lentils and the savory rice are delicious together. The tastes play off of each other and are perfect. The rice would also work well with other recipes and could be modified to be more or less savory.

For the recipes go to Cilantro Lentils and Lemon-Cumin Rice.

February 20, 2013

Healthy and Low-Fat Southwestern Vegetable and Chicken Soup


I have a horrible habit of trying to eat healthy and then falling off the wagon. Don't get me wrong the majority of the time I eat very healthy, but making big changes in my diet always seem to take a number of failures before they are successful. In college I ate a ton of restaurant food. There were always cheap places to eat and I rarely made food at home. Eventually it caught up with me when I realized that I never seemed to have any energy and I generally felt run down. I vowed to change my habits and I did until I started graduate school and then I was back to my old habits. After getting married I vowed again to start eating healthier, then I got pregnant and the smell of meat made me sick. To compensate I ate a ton of ice cream and peanut butter. After my first son was born I reformed and gave up pretty much any bad food while I breastfed. Then I became pregnant again and my bad food habits quickly came back. So over the years I have started and stopped a lot of healthy eating plans. Luckily since having my youngest and starting this blog my eating habits have leveled off. 99 percent of the time I eat healthy and the other 1 percent I remind myself that I'm human. Since my husband's dad had heart surgery last year I have been determined to make my husband healthier. He has lost 30 pounds in the last year and a lot of it has had to do with dietary changes. This week I made a new healthy recipe for Southwestern Vegetable and Chicken Soup from the February 2013 issue of Eating Well magazine.

This recipe has 16 ingredients. It takes 1 1/2 hours of total time, 1 hour of which is active and makes 8 servings. I did make a few changes to the recipe. First I made my own chicken stock from scratch. It really does taste better and is a great way to save money. Second, instead of diced canned tomatoes I used one fresh tomato. I am trying to use more fresh ingredients and rely less on canned goods. Plus the price of fresh tomatoes is lower than canned currently. Finally, I also used fresh spinach and I cooked my own beans.

I love that this recipe is high in vitamin C and only has 5 grams of fat and 199 calories. It has great flavor and the lime juice makes the soup delicious. I tasted the soup before adding the lime and the lime makes a tremendous difference. Make sure to salt at the end, especially if you are making your own stock or using low sodium store bought. This recipe could easily be modified to being vegetarian by omitting the chicken and using vegetable stock instead of chickens stock.

For the recipe go to Southwestern Vegetable and Chicken Soup.

February 16, 2013

Very Tender Slow Cooker Chicken and Hominy Chili Bowl


My oldest has been obsessed with chicken for a while now. He goes through picky stages every couple of weeks where he won't eat anything, except chicken (and bacon, the men in my house always love bacon). If I'm making dinner and he starts complaining and getting hungry, I can always make him happy by informing him that chicken is part of dinner. I agree with him that chicken thighs are delicious and they can create great flavor in a variety of dishes. They are one of my favorite dishes to prepare and I make them at least twice a month. Last week I tried a new recipe for Chicken and Hominy Chili Bowl from the March 2013 issue of Family Circle magazine.

This recipe has 13 ingredients. It takes 10 hours 30 minutes of total time, 15 minutes of which is active and makes 6 servings. I did make a few changes to the original recipe. First I never have ten hours between when I get up and my husband comes home for dinner, so I let my chili cook for 8 hours on high. As I always do I made my own chicken stock which I don't salt until I make the recipe. My chicken was so tender that it fell off the bone when I tried to take it out. Therefore I shredded the chicken and put it back in the chili. Finally, my chili was more than thick enough after shredding the chicken so I left out the cornmeal. I served the chili with corn chips, which was a perfect combination.

I love using my slow cooker to make chili and stews. This recipe states that it only makes 6 servings, but since I shredded the chicken it made a large amount more. There was more than enough for dinner plus two more meals for my family of 4. Make sure to adequately salt, especially if you make your own stock. I do think that the amount of cumin could be increased slightly to a full teaspoon. It would create an even more pronounced flavor.

For the recipe go to Chicken and Hominy Chili Bowl. (registration required)

February 15, 2013

Easy, Flavorful Barbecue Roasted Nuts


As I've discussed before I love to snack. There are days that I eat six small meals a day instead of 3 large ones. When I learned from my doctor that I had to go gluten free I struggled with snacks the most. I have always loved carbs, especially breads and waffles. Pre-packaged gluten free snacks are not that delicious and I only buy them if I am starving and have no other options. It's hard when I am hungry and there is nothing that I can eat in the cupboard. Since my snacking options are limited I try to keep homemade snacks on hand as much as I can. This week I tried a new recipe for Barbecue Roasted Nuts from the November 2012 issue of Southern Living magazine.

This recipe has 10 ingredients. It takes 2 hours 5 minutes of total time, 30 minutes of which is active and makes 6 cups. I did make a number of modifications. First instead of light brown sugar I used sorghum syrup and instead of granulated sugar I used honey. I have been trying to limit the amount of granulated sugar that I use in baking and cooking and honey is a great substitute. Make sure to stir the nuts at least every 10 minutes while they are in the oven. They will go from browned to burnt very quickly, so be careful.

These nuts aren't very spicy so if you are looking for a little kick I suggest adding a 1/2-1 teaspoon of cayenne. The barbecue flavor is nice and even my two kids were fans. One of the best things about the recipe is that it takes very little prep time and makes a large amount of nuts. A great way to make homemade snacks and the flavors can be adjusted to be spicier, more garlic etc.

For the recipe go to Barbecue Roasted Nuts.

January 30, 2013

Flavorful Low Fat Moroccan Lentil Soup


My youngest son went the dentist today and for the first time he had a cavity free appointment. While this is routine for my oldest son, my poor youngest son has had serious problems with his teeth since they came in. He never drank cows milk and still had to have two dental surgeries before his third birthday. Since then he has had fillings every six months. My dentist was determined that it was the food that he was drinking, but has finally been convinced that is has to mostly be genetics. My youngest eats healthier than any other child his age that I know and drinks a ton of water, very little carbs and a high protein diet. Luckily our pediatrician agrees with me and thinks it's 100 percent genetic and not my fault. I still hate the mommy guilt when he has to have another filling. I decided to make one of my son's favorite meals this week in order to calm him down before the dentist. My youngest absolutely loves soup, chicken noodle, vegetable you name it. This week I tried a new recipe for Moroccan Lentil Soup from the February 2013 issue of Eating Well magazine.

This recipe has 18 ingredients. It takes 1 1/2 hours of total time, 30 minutes of which is active and makes 12 servings. Since vegetable stock is so expensive pre-made I made my own. It costs a lot less money and tastes so much better. I used fresh spinach since the taste of frozen spinach always seems off to me. Thanks to my forgetfulness I failed to add the lemon and cilantro to the finished soup. I did add it to the leftovers and the flavor was delicious. I added a little more time to my overall cooking time to ensure that the lentils were fully soft. For soup I prefer my beans very soft, I find the texture more pleasing when eaten. I followed the remainder of the recipe as written.

I love that this soup is only 152 calories and 1 gram of fat per serving. Since it is full of vegetables and lentils it is filling and can either be used as a side or a main dish. I served it as a main dish and it was a perfect option for our vegetarian meal night. My youngest loved the cauliflower and ate all the pieces out first. This soup also makes a large batch so their are plenty of leftovers.

For the recipe go to Moroccan Lentil Soup.

January 21, 2013

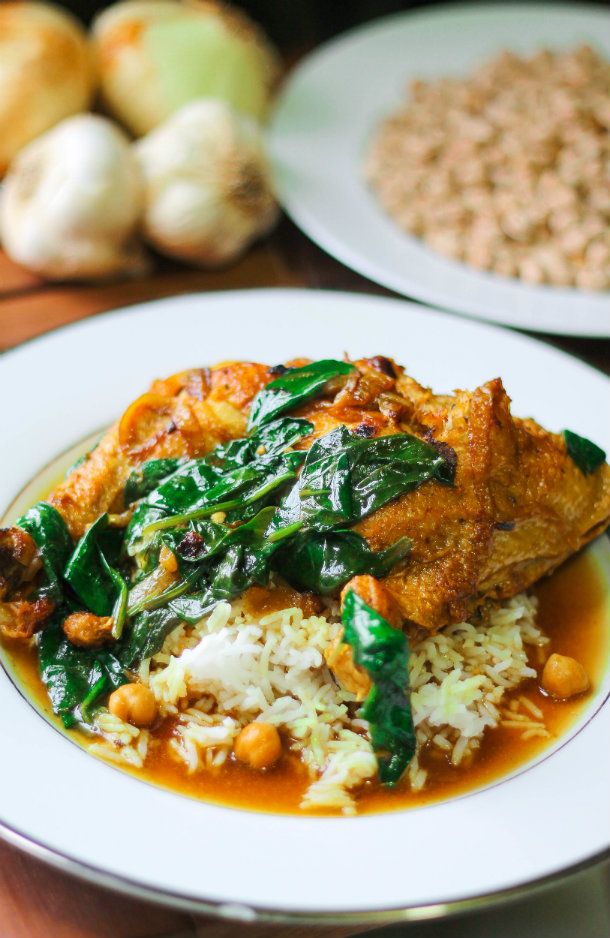
Indian Spiced Chicken with Chickpeas and Spinach

IMG_0321_zps8db7106e photo IMG_0321_zps8db7106e-1_zps3218ba2d.jpg

At the grocery store last week I needed to find chicken legs. I looked all over and then found them. In a large scary looking plastic bag. I have no problems buying large amounts of chicken, but this chicken looked like something that I would rather feed my animals than myself. Someone must be buying it, just not me. This experience got me thinking. It seems that the quality of a lot of grocery products has gone down, not up. It used to be that you could go to the store and expect to find quality products, now even if you want to buy something of higher quality it isn't even available. It is a little disconcerting especially given that there are so many problems in the state that I live in, it would be nice if there were healthy, high quality products available to everyone that wanted them. In the end I substituted all-natural chicken thighs, but it would have been nice to have at least had the option to find the product that I wanted. I digress, on to the chicken recipe that used the chicken legs that were no where to be found. Last week I tried a new recipe for Indian Spiced Chicken with Chickpeas and Spinach from the January 2013 issue of Bon Appetit magazine.

This recipe has 15 ingredients. It takes 2 hours of total time, an hour of which is active and makes 6 servings. As I stated in the intro I had to substitute chicken thighs for almost all the chicken legs. I had two chicken legs left from a previous recipe (that I was lucky enough to find at the store the one time they seemed to actually have them, never to be seen again).  For the remainder of the chicken I used chicken thighs. I found that I had to use more broth than the two cups suggested by the recipe. Two cups just wasn't enough to partially cover the thighs. I left off the cilantro at the end. Honestly my kids aren't fans and I forgot to add it to my serving. I followed the remainder of the recipe as written.

The braise on this chicken turned out very well. I'm not sure that I liked the amount of spinach. I think it needs to be doubled. The sauce was also a little thinner than I prefer as well and if you like spicy foods I would suggest increasing the amount of cayenne. I would also suggest adding a small amount of flour or cornstarch in order that the chickpea sauce has a better consistency. The chicken turned out well and was the best part of the dish, tender and flavorful.

For the recipe go to Indian Spiced Chicken with Chickpeas and Spinach.
Related Posts Plugin for WordPress, Blogger...