Showing posts with label Strawberries. Show all posts

July 26, 2014

Basil Chocolate Cake with Buttercream Frosting


I wish that the internet would turn into a more grown-up version of its current self. As many of you may have noticed I have taken a little time away from blogging. The last year blogging has lost some of the charm it had when I first started (which was a while ago now). My kids were younger when I started, my youngest still took naps, and my oldest hadn't yet started school. I also feel that the internet has changed dramatically. While I love to talk about certain aspects of my life, I am a little burnt out of the over sharing and general debate nature that the internet and social media in particular have taken on. I really hate controversy. When possible I avoid it because 99 percent of the time I have vastly different opinions than everyone else. I grew up in Seattle in a very liberal household, went to a beyond liberal arts school (the same school k-12 with only 300 students), paid my own way through undergraduate and graduate school, and became the first person in my family to graduate college. I grew up very poor, we stood in line at the church food bank most weeks and my father worked his whole life in jobs that barely paid enough to survive. My opinions are a little crazy according to my husband, I rarely agree with any political party and would be perfectly happy avoiding contact with people with overzealous opinions (debating other people rarely leads to any kind of change of opinions). So the internet and I have had to have less contact. I honestly find social media and the internet a little tiring these days. I wish that people could learn the fine act of knowing when to keep their opinions to themselves, not everything has to be made into an argument or debate. Sometimes a simple 'Have a nice day' is just that and nothing more. I guess I am waiting for the internet to grow up, I'm too old to deal with all the drama.


My garden has been growing like crazy and I am swimming in fresh herbs. While I love basil, I get tried of making pesto over and over again so I decided to try a dessert recipe using the abundance of fresh garden basil I currently possess. I came up with the following recipe for Chocolate Basil Cake with Buttercream Frosting. Enjoy!

Basil Chocolate Cake with Buttercream Frosting


Recipe Type: Dessert
Preparation Time: 0h, 15m
Cooking Time: 0h, 25m
Total Time: 0h, 40m
Yield: Serves 9

Adapted from The Food Network and Powerhungry.com


Basil Chocolate Cake with Buttercream Frosting

Ingredients
  • 1 cup packed fresh basil leaves
  • 1 cup granulated sugar
  • 1/2 cup cocoa powder
  • 5 tablespoons unsalted butter
  • 2 eggs
  • 1/2 teaspoon baking soda
  • 1 1/2 teaspoons pure vanilla extract
  • 1/4 teaspoon salt
  • 3/4 cup all-purpose flour (or gluten free replacement)
  • 1/2 cup hot water
  • 3 cups confectioners sugar
  • 1 cup butter
  • 1 teaspoon vanilla extract
  • 2 tablespoons whipping cream
Cooking Directions
  1. Grease a 9 inch cake pan.
  2. Preheat the oven to 350 degrees.
  3. In a food processor chop the basil and sugar until finely chopped.
  4. Combine the basil/sugar mixture, melted butter, and cocoa powder until blended. Add the eggs one at a time, and whisk until smooth.
  5. Add the vanilla.
  6. In another bowl whisk the baking soda, salt and flour until blended.
  7. Add dry ingredients to wet ingredients.
  8. Add hot water and stir just until combined (do not over stir or your cake will be flat).
  9. Pour batter into pan and bake for 20-25 minutes.
  10. After the cake has cooled make frosting.
  11. In a standing mixer whisk butter and sugar together on low speed until blended. Turn up speed to medium and mix another 3 minutes.
  12. Add cream and vanilla, beat for another 1-2 minutes on medium. Add more cream if consistency is too thick to spread.
  13. Spread cake with frosting and enjoy!
My boys both start school in a week and a half so for the first time in 9 years I will have the house to myself for at least a couple of hours a day. I should have more frequent posts in the next couple of months I promise. 

February 23, 2014

Strawberry Champagne Jam

Strawberry Champagne Jam


I have a problem sitting still, I always have. My husband laughs at how many projects I have going on at any given time. As soon as I finish one project I'm already planning five more. Right now I am working on three craft projects and two home improvement projects. My youngest has decided to start his own craft project so that he can work alongside me, it's pretty cute. While I always have lots of projects going on, I am horrible about writing things out and making lists. Grocery lists I'm great about, but not cleaning, chore charts etc. My mother was list obsessed, she had lists that had baby lists. I have a basket, all the things that I need for my various projects are in that basket. When the basket is empty it's time for another project. The basket is rarely empty though, I prefer the chaos of having many projects going on at one time.

For New Year's Eve my husband and I bought a bottle of champagne. Then we fell asleep at 10 o'clock and never saw midnight. For Valentine's Day we opened the bottle, but each of us only drank a small glass. Since neither of us are big fans of champagne I decided to try a new recipe for Strawberry Champagne Jam with the leftovers.
Strawberry Champagne Jam
This recipe has 5 ingredients. It takes one hour of total time, all of which is active and makes 6 cups of jam. I did make a number of changes to the original recipe. First, I increased the sugar to 2 cups. Since I was using cava, which is very dry and not very sweet I thought the increase in sugar was needed. Second, I mashed the strawberries with a potato masher. I like my jam to be full of fruit and mashing the berries helps in this regard. Finally instead of simmering for 15 minutes and then a 5 minute rapid boil, I boiled the jam until it hit the jam point (which I tested on a plate in the fridge). Then I water bathed for 10 minutes. I ended up with 4 small jars of jam.
Strawberry Champagne Jam
The taste of this jam is sweet, but with a different undertone than regular strawberry jam. The champagne makes a nice change from regular jam and is a good way to use leftover champagne. My kids enjoyed the jam with homemade buttermilk biscuits, I ate the jam with coconut flour bread. Both ways it was delicious and something I would make again.
Strawberry Champagne Jam
For the recipe go to Strawberry Champagne Jam.

January 10, 2014

Buttermilk Pancakes with Homemade Strawberry Syrup

Gluten Free Buttermilk Pancakes


For the longest amount of time I loved flavored coffee. I would buy it whole bean and grind it every morning. Then I got tired of the extra work and started buying ground. This week I realized I now hate flavored coffee. I sat down with my morning cup and thought yuck, I really just wanted a cup of dark roast. It's funny how as we get older foods and drinks that we used to love just don't hold the same appeal. I hated beets growing up. However, a couple of years back I discovered roasted beets and I absolutely love them. I have converted pretty much everyone who has tried them, even the massive skeptics. Beets are also delicious hidden in baked goods, you can make a beet cake that is simply delicious. The flip side is also true. The foods that I loved in my 20's I really don't enjoy in my 30's. I used to love breakfast pastries, now I either can't have them or simply don't like sweets that early in the morning. There are still a few foods that have held on for the long haul, mostly peanut butter and popcorn. They are still the comfort foods that I turn to. However, this weekend I will be buying dark roast coffee, the flavored coffee is just not going to be a part of my late 30's. Apparently my food tastes have outgrown the need for sweet coffee in the morning.

My youngest is in a massive growth spurt. He has been eating everything in sight, especially strawberries and blueberries. When we where at the store this last weekend he wanted me to buy a pancake syrup with corn syrup and fake berries. Instead I agreed to make homemade berry sauce for breakfast. So this week I tried a new recipe for Buttermilk Pancakes from Allrecipes.com and made a homemade Strawberry Syrup.
Gluten Free Buttermilk Pancakes

This recipe has 9 ingredients. It takes 25 minutes of total time, 15 minutes of which is active and makes 12 pancakes . I did make a few changes to the original recipe. First, I used coconut flour to replace the all-purpose flour used in the original recipe. I also replaced the butter with coconut oil. I bought a huge container of coconut oil and I have been trying to use it in recipes since I already have it in the cupboard. I found that the pancakes browned a little quickly on my griddle, so you might want to set the heat on a lower setting. Finally, I added 1 1/2 tsp of pure vanilla extract before adding the waffle iron. I love adding vanilla or almond extract to pancakes and waffles, they provide a great taste.

These pancakes turned out really well. They were sweet, without being overly so and rose nicely for gluten free pancakes. My youngest was a huge fan of the homemade strawberry syrup I made. It was easy, just 1 cup of sugar, 2 cups of frozen strawberries and 1 cup of water. I allowed the mixture to cook until thickened and then added a small amount of cornstarch to make it a little thicker. It was great on the waffles and would also be delicious in Greek yogurt for breakfast. If you aren't a fan of traditional sugar coconut or date sugar or sugar substitute should also work.

For the recipe go to Buttermilk Pancakes.

August 18, 2013

Cream Scones with Strawberries


Cream Scone with Strawberries and Whipped Cream


I miss having tea with my mother. From the time I was 10 we would go to tea at one of the fancy hotels in downtown Seattle. They had a full high tea and it was fabulous. We would dress up, eat cucumber sandwiches and talk. After I had a job I paid for my mother and I to stay at the Empress hotel in Victoria (BC) and we had high tea. If you have never been it is a great and beautiful experience and one of the favorite memories I have of my mother. After my mother passed away my aunt sent me the teacups that had been my grandmothers. I keep them in a special cupboard and a couple of times a year I take them out and have tea. Last year my boys joined me and it felt complete, my mother would be smiling. There are certain foods that I always associate with having tea. Tea and scones go hand in hand to me, I love them. I am constantly experimenting with new scone recipes and this week I tried a new recipe for Cream Scones from Martha Stewart Living.
Downtown Huntington, WV From Marshall University Campus

This recipe has 9 ingredients. It takes 30 minutes of total time, 10 minutes of which is active and makes 8 scones. I did make a few changes to the original recipe. First, I always freeze my butter when making scones. It helps to keep the butter from melting while it is being handled and makes for richer scones. Make sure to minimally blend the dough. Just mix until it comes together and hand pat the dough before cutting out the scones. The less you touch the dough, the better the texture and it keeps the butter from melting. I chose to serve half of these scones with cut up strawberries which I tossed with a bit of sugar and real whipped cream.
Downtown Huntington, WV

My two boys loved this recipe. I think they ate 4 of the scones as soon as they came out of the oven. Obviously I did not eat any of them, gluten free scones are just not as delicious. Before anyone disagrees I promise I have tried a ton of recipes, bakeries etc and they just aren't as good as regular flour. These scones were great though and made nice strawberry shortcake. They were also delicious with jam for breakfast.

For the recipe go to Cream Scones.

Cream Scones with Strawberries


Recipe Type: Breakfast
Summary:
A simple cream scones recipe that also make great strawberry shortcake. Only 30 minutes start to finish.
Preparation Time: 0h, 10m
Cooking Time: 0h, 20m
Total Time: 0h, 30m
Yield: Serves 8

July 16, 2013

Summer At It's Best: Homemade Strawberry Scones

Click for Recipe for Gluten Free Strawberry Scones
Gluten Free Strawberry Scones


I am attempting to convince my dad to move to West Virginia. If you've read my blog for any given amount of time you will know that I don't talk about my dad often. It's not for a lack of devotion, but more about him being the only parent I have left. My mother died of brain cancer 2500 miles away from me when my oldest was 9 days old. She was only sick for about a year and I was pregnant almost the whole time. The reason I had my oldest son as young as I did was to try to make sure my mother met a grandchild before she became too ill. I strongly believe she lasted until he was born from sheer will power. My dad and I were always extremely close growing-up. He raised me as if I were a boy, we went to sports games, he taught me to throw a punch. I have never really been a girly girl thanks to him, but I am a very strong and opinionated adult woman. In January he went into kidney failure after refusing to go to the doctor for almost 20 years. He spent 2 months in the hospital 2500 miles away from me. I called him 3 times a day and all the hospital staff knew me by name from all my phone calls. He is now home and starting dialysis this week. Since my mother passed away he has lived by himself in an over priced one bedroom apartment. So everyday when I call him I remind him of how great my state is. Yesterday I finally felt a little bit of light at the end of the tunnel. I mentioned that he could take the train to Chicago and we could meet him and take the train all together the rest of the way. After a pause he said he would look into it. It's a start. My mother loved going to tea and most importantly delicious scones. Thinking of her I made a new recipe for Strawberry Scones from the May 2013 issue of Parade Magazine.

This recipe has 8 ingredients. I takes a total time of 30 minutes, 10 minutes of which is active and makes 8 servings. I did make a few changes to the original recipe. I made two batches of these, one gluten free and one regular. I found with both batches that they weren't very sweet. Now traditional scones are meant to not be very sweet. I am spoiled though and love a little bit of sugar in my scones since that is how my mother prepared them. If you are like me I would suggest doubling the amount of sugar to 6 tablespoons. Make sure to watch the scones, they will brown very quickly at the end and then start to burn on the bottom if you aren't careful. With the gluten free scones I would recommend adding even a little bit more sugar if you are using a gluten free all-purpose flour or better yet use coconut flour. Without the added sugar the gluten free scones had a slightly bitter taste. Finally, if you like lots of fruit in your scones I would double the amount of strawberries. I like my scones filled with strawberries so I added a lot more than the original recipe stated.

When these scones were slathered with homemade jam they were great. Without jam I found them a little low on fruit and the gluten free ones weren't sweet enough. If you eat them with jam they have the right amount of sugar though. My kids thought these were a little crumby since they had eggs. Traditional scones just have butter and heavy cream. I would consider these more of a biscuit.

For the recipe go to Strawberry Scones.

June 27, 2013

Bake Fresh From the Garden: Strawberry Sage Muffins

Click for Recipe for Gluten Free Strawberry Sage Muffins
Gluten Free Strawberry Sage Muffins


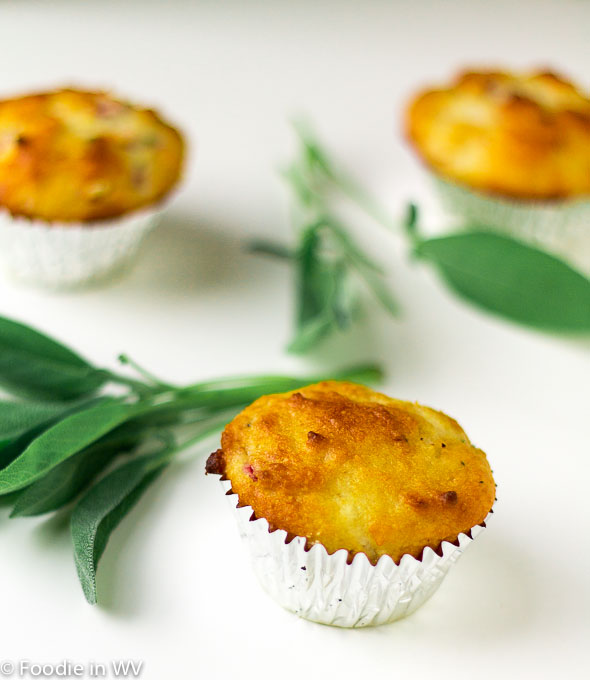
With my oldest home for the summer I have been baking and cooking up a storm. They are able to eat more food than I would think possible for two little children. They are always able to surprise me, especially when it comes to food. As I have posted before I have a new herb garden after my last one left my porch (with help). I try to use everything that I grow in my garden, with little waste. The herb garden that my mother in law purchased at the farmer's market had approximately 15 different types of herbs making for a lot of new recipes. In particular I had 4 large sage plants which I searched for new recipes to try. My two boys love berries in baked goods, so I searched for recipes that combined berries and fresh herbs. I decided on a new recipe for Strawberry-Sage Muffins.

This recipe has 9 ingredients. It takes 40 minutes of total time, 10 minutes of which is active and makes 18 servings. I did make a number of changes to the original recipe. First since I eat gluten free I used a combination of brown rice flour and gluten free all purpose flour as a substitute for the all purpose flour. I love sage, so I used 8 large sage leaves in total. One thing that I did slightly differently than the original recipe is that I tossed my strawberries with the sugar and let it sit for 5 minutes before adding it to the batter. This helped to sweeten the berries and made for a nice flavor in the finished muffins. Gluten free baked goods tend to take a little more batter so I ended up with a total of 14 muffins. I always fill my gluten free muffins to the top of the muffin liners since they don't rise as much as regular muffins.

The strawberries in these muffins had a nice sweet taste which worked perfectly with the mild taste of the sage. The sage works as a nice compliment to the berries without being overpowering. My boys actually thought that these were strawberry muffins and had no idea that they contained herbs from my garden. These muffins were a great way to use fresh sage.

For the recipe go to Strawberry Sage Muffins. 

May 21, 2013

Recipe for Fresh Oregano and Chive Crusted Chicken with Fresh Strawberry Relish

Click for Recipe for Fresh Oregano and Chive Crusted Chicken with Fresh Strawberry Relish
Fresh Oregano and Chive Crusted Chicken with Fresh Strawberry Relish

I love strawberries. Berries in general are high on my list of favorite foods, but strawberries are at the top. Since they are now available frozen year round I am able to enjoy my strawberry smoothies even in the dead of winter. However, there is something so quintessentially summer about eating fresh strawberries. I love using them in desserts, but they are equally great for adding a hint of sweetness to savory dishes. Whatever the preparation method, any dish with strawberries rarely lasts more than a few hours. Last night I tried a new recipe for Herb Crusted Chicken with Fresh Strawberry Relish from the June 2013 issue of Eating Well magazine.

This recipe has 10 ingredients. It takes 1 1/4 hours of total time, 30 minutes of which is active and makes 4 servings. I only made a few changes to the original recipe. Since my herb garden is finally thriving I was able to use fresh oregano from my garden. My 4 thighs weighed exactly 2 pounds and I served the dish over white rice. I added 2 teaspoons of balsamic vinegar since it has great flavor and I love using it with strawberries. Make sure to buy a high quality balsamic vinegar, there really is a difference between the cheap low-quality brands and the top-shelf varieties.

The relish in this recipe was delicious. It had even better flavor after sitting in the fridge overnight. Combined with the herb crusted chicken the flavors made a nice sweet-savory taste. My kids loved the relish, so the recipe is a nice option to get kids to eat fruit in a new way.

For the recipe go to Herb Crusted Chicken with Fresh Strawberry Relish.


July 30, 2012

Alpine Muesli

As I've stated in a few of my previous posts I am determined to be better about eating breakfast. My son starts school in two weeks and with the start of school my eating habits go quickly down-hill. I am great about making my two sons eat a healthy breakfast, I just don't follow my own advice. Honestly, I have never been great about eating breakfast. Growing up my dad worked nights and my mom left for work before I went to school. So when it was time for me to eat breakfast my dad was getting ready to bed for the day and I would literally eat peanut butter out of the jar. My mom tried really hard to get me to eat, she even left pre-made breakfasts for me. It never worked. I preferred the peanut butter on a spoon. If given the choice now and if my metabolism was the same as when I was younger I would still be eating jars of peanut butter a week. I love peanut butter. I know better now, but it is still a daily struggle with myself. Last week I tried a new recipe for Alpine Muesli from Martha Stewart Living magazine, which I was hoping would help to encourage me to eat breakfast.

This recipe has 11 ingredients. It takes 3 hours and 50 minutes of total time, 20 minutes of which is active and makes 8 servings. I had no problems finding any of the ingredients for this recipe at my local grocery store and I made no modifications to the ingredients. For the chopped fruit I used plums and for the sliced fruit topping I used strawberries. I had planned on also using raspberries, however, my two children ate almost all of the fruit out of the fridge before I had the change to make this recipe. Luckily I had just enough fruit. I followed the remainder of the recipe as written.

As written this recipe needs some work. First, I was not a fan of the fresh orange juice. My two boys refused to eat their servings due to the overly citrus taste. If I was to make this again I would make the following changes. I am not a huge fan of citrus, but if you like the taste of fresh oranges, then I would use vanilla almond milk instead of cows milk. The low-fat cows milk and the orange juice did not work well together. Almond milk would solve this problem. Personally, I think the recipe would be better without the orange juice entirely. I liked the whole recipe, except the citrus taste. So leave out the citrus and add a little more honey and this recipe will be a great way to start the day.

For the recipe go to Alpine Muesli.

May 18, 2012

Strawberry Mousse Cake

My son only has days of kindergarten left and that means one thing, a summer full of two kids all day long. Don't get me wrong, I love both of my kids tremendously, however, when they are together for long periods of time they fight. The smallest thing that the other one does will get on their nerves and they will cry, scream, you name it. So what do I do? I eat sweets. Not a lot, but a small slice of great homemade cake can relax me after a stressful and crazy  week. I love cake, especially with homemade frosting, yum! In the spring I love using fresh strawberries and I was excited when I saw a recipe for Strawberry Mousse Cake in the April issue of Southern Living magazine.

This recipe has 11 ingredients. I takes 5 hours and 15 minutes of total time, 45 minutes of which is active and makes 10 to 12 servings. I had no problems finding any of the ingredients at my local grocery store and made no ingredient modifications. I did have to make a few changes to the recipe. The first issue was with the time the recipe stated for the gelatin to set. The recipe states for the gelatin to set for 30 minutes, that is way too short. I tried using the mousse after it had sat in the fridge for 30 minutes and the cake layers slide off. I put the gelatin back in the fridge and let it sit for an hour and then it was much easier to deal with. Finally, I changed the frosting recipe. The frosting didn't add any vanilla extract. I have never made frosting without vanilla or almond extract, so I added a small amount of both and then set it in the fridge until I frosted the cake. This helped the frosting not to be runny and the flavor was great with the addition of the extracts. I followed the remainder of the recipe as written.
The flavor of the fresh strawberries in this cake was delicious. I served this cake for mother's day and I was very pleased with the results. Make sure to change the frosting and mousse components of this cake and it will turn out perfectly. This cake only lasted two days since it was so popular! Overall, a great spring cake and a yummy way to use fresh strawberries.

For the recipe go to Strawberry Mousse Cake.

August 15, 2011

Homemade Strawberry Jam

In the last couple of months I have been making an effort to try to cook as many things from scratch as possible. My whole family does better when we stick to homemade foods, so to keep my family's budget down and for our health I have been making as many things as I can. This year I have had a number of very nice friends give me an abundance of garden veggies, so I have been canning up a storm. I now have a large shelf full of pickles, which makes my two sons very happy. Besides canned vegetables, canned homemade fruit is delicious and making and preserving  it can save a lot of money during the winter. One of my favorite canned fruit products is homemade strawberry jam, which is easy enough that a cook with minimal canning experience can be completely comfortable.

Making homemade strawberry jam is very easy to make. It only takes three ingredients, sugar, pectin and fresh strawberries. I use classic pectin because it has a great flavor and sets the jam quickly. I find the full sugar jam to be a little too sweet for my tastes, so I follow the reduced sugar directions. For every two half-pint jars you will need the following:
  • 1 1/3 cups prepared fruit (hull and crush the strawberries with a potato masher)
  • 1 1/2 Tbsp classic pectin
  • 1 cup granulated sugar
In order to make homemade jam you need a water bath canner. I purchased a new one this year and it was less than 20 dollars. You will also need canning jars, rings and lids (don't re-use lids). I boil my jars for 10 minutes in boiling water since I don't have a dishwasher. Make sure to keep the jars warm while preparing the jam, or the jars will crack. Combine the fruit and pectin in a saucepan, I add a 1/4 tsp of butter to reduce foaming, but it isn't necessary and can be left out if preferred. Bring to a roiling boil, then add sugar and bring to a roiling boil once again and boil hard for one minute. I use a thermometer, once it reaches 220 degrees (if your at sea level) it's at the jelling point. If you don't have a candy thermometer you can also use a metal spoon, dip it into the boiling mixture. If the mixture is done two drops will hang off the edge, then run together in a sheet.  Skim foam if present and pour into jars, leaving 1/4 inch head-space. Wipe tops and place lids and bands on jars. Process in a hot water bath for 10 minutes. Make sure there is at least an inch of water covering the top of the jars. Remove jars from heat and let cool. After 24 hours check jars and make sure that they have sealed. Don't use any jam that the seal has not sealed. It can take as long as three weeks for the jam to fully set.

Homemade jam is a great way to enjoy fruit throughout the year and is much cheaper than store-bought. Leaning to can well only takes a little effort and its a great way to save money. If the water bath canning scares you there are also fresh jams, which is the same recipe except without the water-bath, they just go straight into the fridge and have to be used within 3 weeks. Water-bathed canned jam can last up to a year, so when strawberries go down to a dollar, I make a bunch at one time. One of my favorite things is homemade jam with fresh bread, a delicious combination!


Related Posts Plugin for WordPress, Blogger...